---
title: Update General Settings
description: How to update the general settings
---
[Skip to content](https://knowledge.intuitiveshipping.com/update-general-settings#main-content)
[](https://knowledge.intuitiveshipping.com?hsLang=en)
- [FAQ](https://knowledge.intuitiveshipping.com/faq-page)
- [Main Site](https://intuitiveshipping.com/)
Open main navigation
Close main navigation
- [FAQ](https://knowledge.intuitiveshipping.com/faq-page)
- [Main Site](https://intuitiveshipping.com/)
- [Contact us](https://knowledge.intuitiveshipping.com/contact)
[Contact us](https://knowledge.intuitiveshipping.com/contact?hsLang=en)
How can we help?
- There are no suggestions because the search field is empty.
1. [Intuitive Shipping Help Center](https://knowledge.intuitiveshipping.com/?hsLang=en)
2. [Get Started](https://knowledge.intuitiveshipping.com/get-started?hsLang=en)
# Update General Settings
## Configure Intuitive Shipping's general settings, such as visibility status and units of measure.
**Contents:**
- [How It Works](https://knowledge.intuitiveshipping.com/update-general-settings#how-it-works)
- [General Settings](https://knowledge.intuitiveshipping.com/update-general-settings#general-settings)
- [Discount fetching](https://knowledge.intuitiveshipping.com/update-general-settings#discount-fetching) (beta)
- [Delivery Dates](https://knowledge.intuitiveshipping.com/update-general-settings#delivery-dates)
- [Rate Blending](https://knowledge.intuitiveshipping.com/update-general-settings#rate-blending)
- [Packing Results](https://knowledge.intuitiveshipping.com/update-general-settings#packing-results)
- [Performance](https://knowledge.intuitiveshipping.com/update-general-settings#performance)
Intuitive Shipping lets you configure general settings, such as your dimensional, weight and distance units of measure.
### How It Works
The **General settings** page gives you control over a few key functions in Intuitive Shipping, such as the visibility status, default units of measure for rate calculations, delivery dates, rate blending and others.
Units of measure are typically configured when you first install Intuitive Shipping, but there may come a time when you need to change to a different unit. Other general settings are enabled by default and can be adjusted as needed.
- **Status** manages the overall visibility of Intuitive Shipping. Use it to quickly hide rates system-wide while testing or troubleshooting rate issues. This setting does *not* stop billing.
- **Units** sets the default measurement types for shipping dimensions, weight, and distance throughout the app.
- **Discount fetching** improves the accuracy of rate calculations that require the cart value by applying Scenario conditions, shipping method thresholds or cost adjustments to the discounted cart amount.
- **Delivery dates** allows you to display estimated delivery times at checkout by date instead of by the number of days.
- **Rate blending** lets you switch between simple and advanced blending to control how shipping method rates are combined.
- **Packing results** allows you to choose how and where package details - like title and size - appear in your Shopify order records.
- **Performance settings** manage caching behavior for rate calculations.
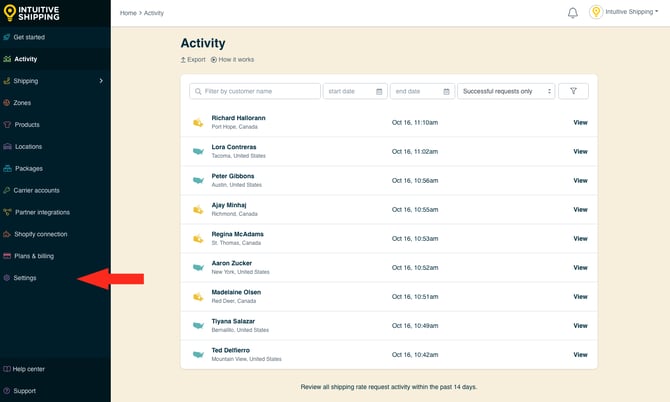
**1.** Click **Settings** in the sidebar menu, then select **General settings** from the drop-down list.
### General Settings
Intuitive Shipping lets you control when shipping rates are available at checkout. If you need to perform testing or troubleshoot on your setup, you can temporarily disable all rate calculations from Intuitive Shipping - or hide them from checkout - without having to adjust the status settings of each individual Scenario and shipping method.
You can also update your units of measure for dimensions, weight and distance to match your shipping needs and store preferences.
#### Status
**1.** Set the general **status** of Intuitive Shipping at checkout.
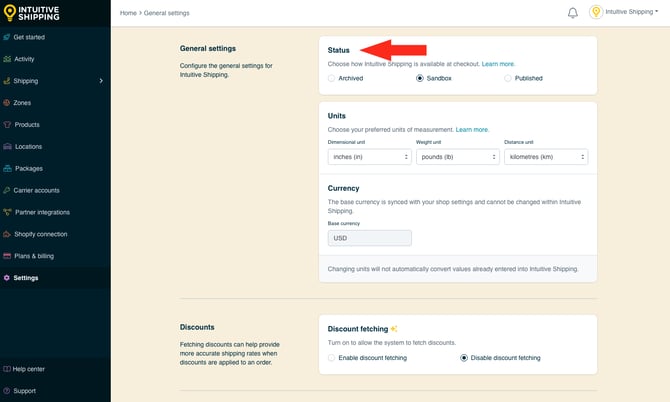
You have three (3) settings to choose from:
- **Archived** - rates are not calculated by Intuitive Shipping. This does *not* stop billing.
- **Sandbox** - rates are calculated by Intuitive Shipping, but can only be displayed at checkout when using ‘Intuitive’ on the checkout page (see below).
- **Published** - rates arelculated by Intuitive Shipping. This is the default setting.
When using the '**Sandbox**' setting:
- For **Shopify** - enter ‘Intuitive’ as either the customer’s first or last name.
- For **BigCommerce and Shopify B2B** - enter ‘Intuitive’ in the optional address field for ‘Apartment/ Suite/ Building’.
While Intuitive Shipping is in [Sandbox mode](https://knowledge.intuitiveshipping.com/select-a-billing-plan?hsLang=en#sandbox-mode), the 'Published' status setting behaves the same as the 'Sandbox' setting until a billing plan has been selected. The 'Off' setting does not stop billing.

Learn more about [billing](https://knowledge.intuitiveshipping.com/select-a-billing-plan?hsLang=en) and [how to test your Intuitive Shipping setup](https://knowledge.intuitiveshipping.com/test-your-setup?hsLang=en).
#### Units
Intuitive Shipping lets you select your preferred unit of measurement for dimensions, weight and distance.
**1.** Choose your preferred **dimensional** **unit**.
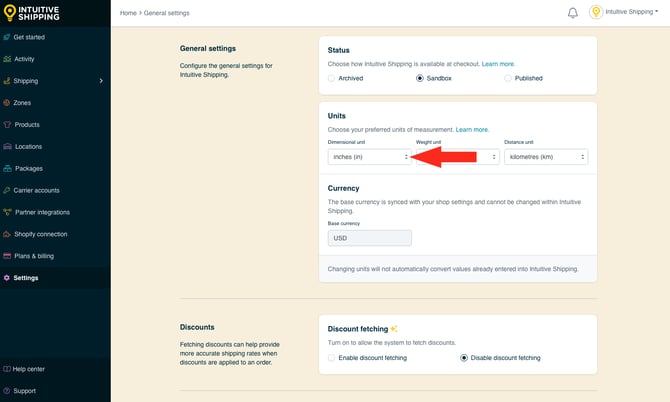
You have four (4) settings to choose from:
- **Millimetres** - dimensional units throughout the app are displayed and calculated as ‘mm’
- **Centimetres** - dimensional units throughout the app are displayed and calculated as ‘cm’
- **Metres** - dimensional units throughout the app are displayed and calculated as ‘m’
- **Inches** - dimensional units throughout the app are displayed and calculated as ‘in’
**2.** Choose your preferred **weight** **unit**.
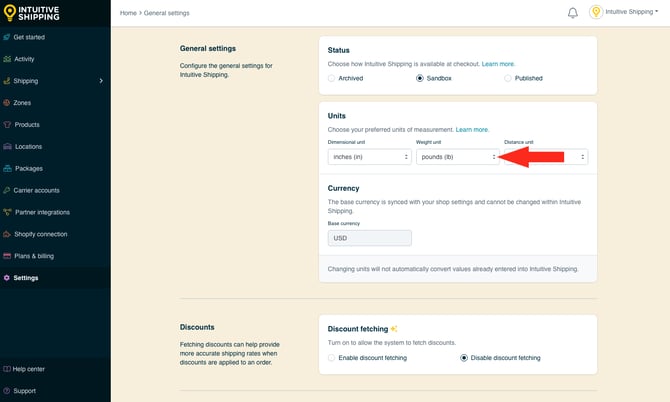
You have four (4) settings to choose from:
- **Grams** - weight units throughout the app are displayed and calculated as ‘g’
- **Kilograms** - weight units throughout the app are displayed and calculated as ‘kg’
- **Pounds** - weight units throughout the app are displayed and calculated as ‘lb’
- **Ounces** - weight units throughout the app are displayed and calculated as ‘oz’
**3.** Choose your preferred **distance** **unit**.
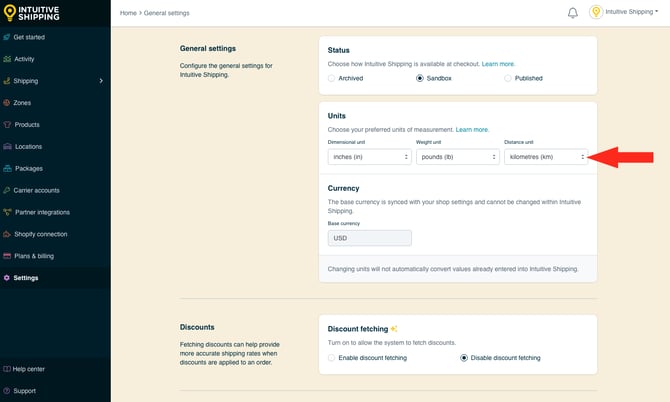
You have two (2) settings to choose from:
- **Kilometres** - distance units throughout the app are displayed and calculated as ‘km’.
- **Miles** - distance units throughout the app are displayed and calculated as ‘mi’.

Changing units does not automatically convert values saved in the app.
For example, if you originally set up package dimensions using centimetres and then change the dimensional units to inches, a box configured as 20 cm x 20 cm x 20 cm will be updated to 20 in x 20 in x 20 in.
Similarly, if you created a local delivery shipping method with a rate table based on miles and then change the distance units to kilometers, a flat rate that previously applied up to 20 mi will now apply up to 20 km.
After changing your measurement units, you will need to manually convert and update all related values throughout the app to ensure they reflect the correct measurements.
#### Currency
The currency setting in Intuitive Shipping is for **reference only** - it cannot be edited within the app.
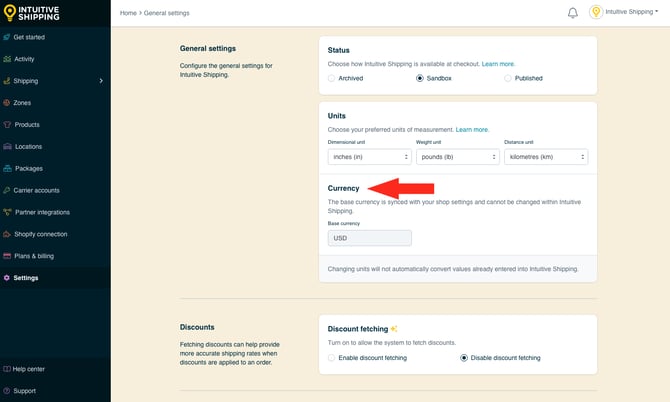

Learn how to change currency in [Shopify](https://help.shopify.com/en/manual/payments/shopify-payments/store-currency/changing-your-store-currency) and [BigCommerce](https://support.bigcommerce.com/s/article/Managing-Currencies?language=en_US).
If you change currencies in your eCommerce platform settings, you’ll need to resync your platform settings with Intuitive Shipping.
### Discount Fetching

Discount fetching is currently in beta.
Fetching discounts can help provide more accurate shipping rates when discounts are applied to an order. This is particularly useful if you're applying additional shipping discounts or using cart thresholds to activate free shipping. Discount fetching is disabled by default.
**1.** Select your preferred **discount fetching** setting.
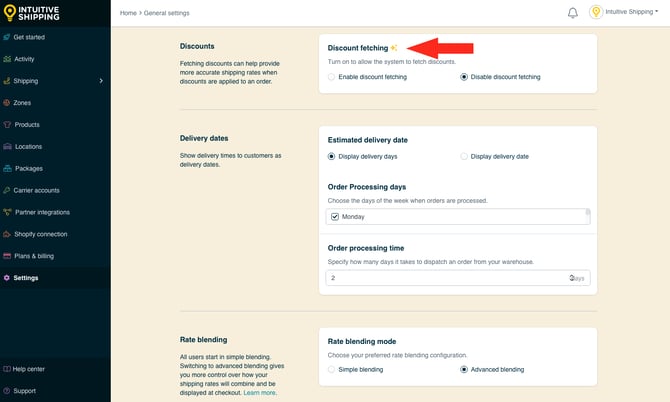
You have two (2) settings to choose from:
- **Enable discount fetching** - the adjusted cart amount (after product or cart discounts) will be used for shipping calculations that require the cart total, such as Scenario conditions, free shipping thresholds and cost adjustments.
- **Disable discount fetching** - the full cart amount (before product or cart discounts) will be used for shipping calculations that require the cart total, such as Scenario conditions, free shipping thresholds and cost adjustments. This is the default setting.
### Delivery Dates
By default, Intuitive Shipping displays estimated delivery times as a number of days, whether the estimate comes from a carrier or is configured manually using the Custom delivery days setting in a shipping method. If you prefer, you can display estimated delivery as a **specific date** instead.
**When enabled, delivery date settings apply to all shipping methods that return an estimated delivery time.**

Learn more about [how to use Delivery dates with shipping methods](https://knowledge.intuitiveshipping.com/how-to-use-delivery-dates?hsLang=en).
To display an estimated date at checkout instead of the number of days:
**1.** Select **Display delivery date**.
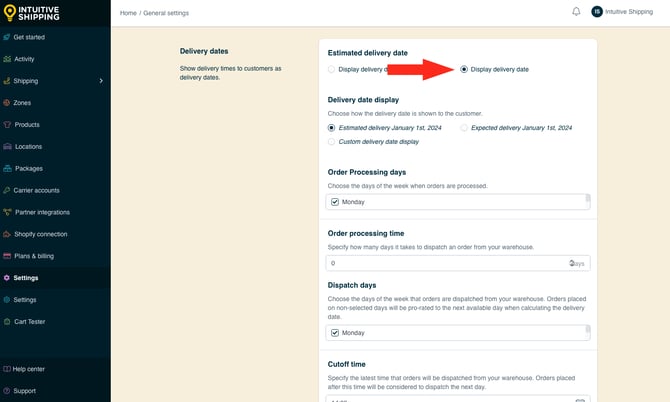
**2.** Choose how **delivery dates will be displayed** to customers at checkout.
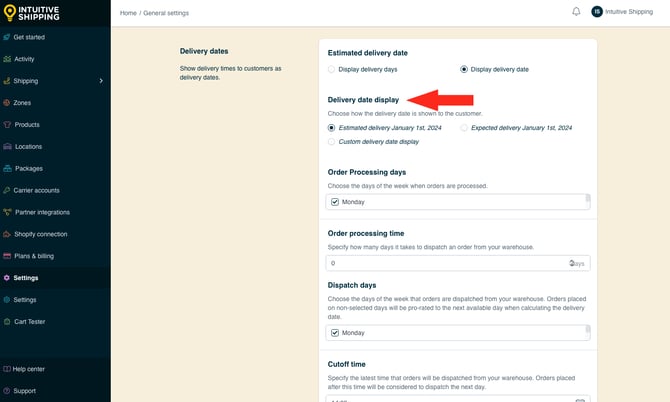
You have three options to choose from:
- **Estimated** - Delivery dates are shown with the word ‘Estimated’. For example, a date of January 4, 2027 will be displayed as ‘Estimated delivery January 4th, 2027’. This is the default setting.
- **Expected** - Delivery dates are shown with the word ‘Expected’. For example, a date of January 4, 2027 will be displayed as ‘Expected delivery January 4th, 2027’.
- **Custom delivery date display** **(beta)** - A custom message will be displayed with the delivery date.
If you selected 'Estimated' or 'Expected', skip ahead to **Step 4**.
**3.** If you selected 'Custom delivery date display', enter a **custom message**, such as 'Your order will be delivered ', followed by the word **date** enclosed in double curly brackets.
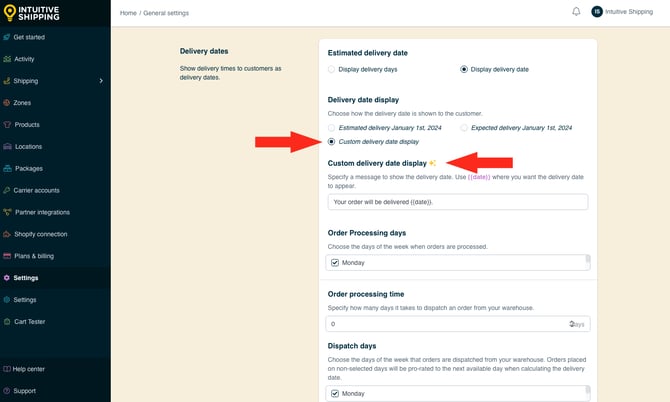
Intuitive Shipping replaces the double-bracketed 'date' placeholder with the estimated delivery date. For example, if the estimated delivery date is calculated as January 4, 2027, the message displayed at checkout will be **Your order will be delivered January 4th, 2027.**
**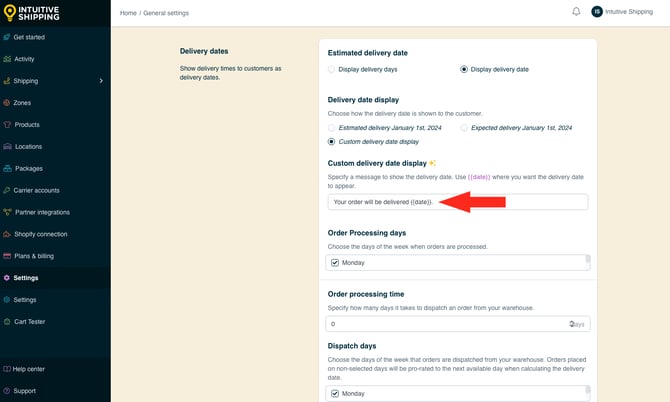**
Be sure to include the word 'date' enclosed in double curly brackets for your estimated delivery date to be included in the custom message.
#### Additional Settings
Additional delivery date settings let you customize how delivery dates are calculated and displayed at checkout:
- **Order processing days** - Select the days of the week your warehouse processes orders so non-processing days aren't included in the delivery estimate.
- **Order processing time** - Improve delivery date accuracy by accounting for the time required to process orders before they're dispatched.
- **Dispatch days** - Choose the days of the week orders are dispatched to customers.
- **Cutoff time** - Set the latest time orders can be received and still be dispatched on the same day. Orders placed after the cutoff time are considered for dispatch on the next available dispatch day.
- **Order fulfillment capacity (beta)**- Specify the maximum number of orders that can be fulfilled on a given day to improve the accuracy of the delivery date when there are unfulfilled orders.
- **Blackout dates** - Exclude specific dates from delivery estimates, such as holidays, company closures, vacations, or other dates when orders won't be processed or dispatched.
**1.** Hover over the **Order processing days** selection box to **expand the list**, then select the **days of the week** when your orders are picked, packed, and prepared for shipment. If a customer places an order on a day that isn't selected, Intuitive Shipping begins calculating the estimated delivery date from the next available order processing day.
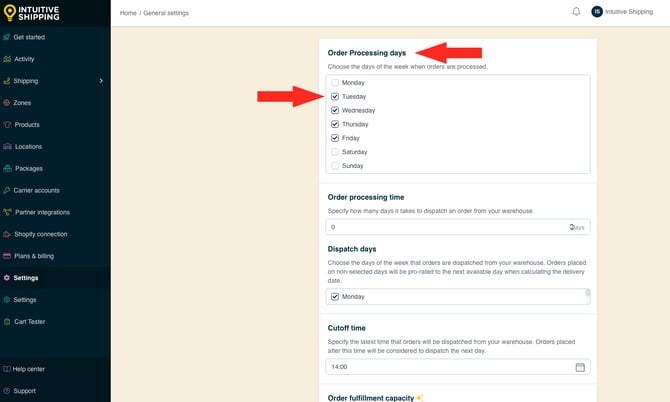
For example, let's say you select **Monday**, **Tuesday**, and **Wednesday** as your Order processing days. If a customer places an order on **Thursday afternoon**, Intuitive Shipping begins calculating the estimated delivery date from the next available order processing day, **Monday**.

At least one Order processing day must be selected to save your settings.
**2.** Add **Order processing time** in days by **entering a number** or **using the arrows to increase or decrease the value**. When a customer places an order, Intuitive Shipping adds the specified number of order processing days before calculating the estimated delivery date.
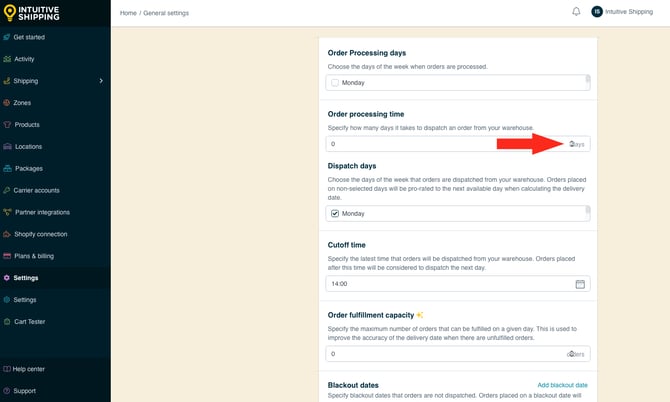
For example, if you select **Monday**, **Tuesday**, and **Wednesday** as your Order processing days and set the Order processing time to **3 days** and a customer places an order on **Sunday, March 3**, Intuitive Shipping skips the next three order processing days, **Monday, March 4**, **Tuesday, March 5**, and **Wednesday, March 6**. Delivery date calculations begin on the next available order processing day, **Monday, March 11**.
If you leave Order Processing time blank, Intuitive Shipping assumes the order can be processed immediately after the order has been placed.
In other words, if you enter **1** (one order processing day), Intuitive Shipping begins calculating the estimated delivery date from the next available Order processing day after the order is placed.
**3.** Hover over the **Dispatch days** selection box to **expand the list**, then select the **days of the week** when orders are dispatched from your warehouse. If a customer places an order on a day that isn't selected, Intuitive Shipping calculates the estimated delivery date using the next available dispatch day.
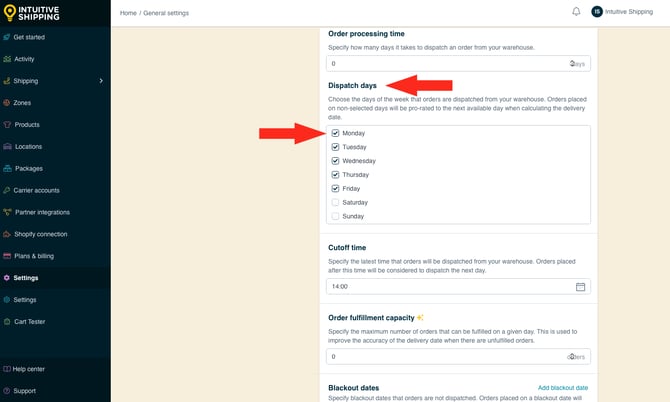
For example, let's say you select **Wednesday**, **Thursday**, and **Friday** as your **Dispatch days**. A customer places an order on **Thursday, March 7**. After Intuitive Shipping applies your **Order processing days** and **Order processing time** settings, the calculated dispatch date falls on **Monday, March 18**. Because Monday isn't one of your selected Dispatch days, Intuitive Shipping moves the dispatch date to the next availableDispatch day, **Wednesday, March 20**.

At least one Dispatch day must be selected to save your settings.
**4.** Enter or select a **cutoff** **time**. Selectable times are displayed in one-hour increments in 24-hour time from 0:00 to 23:00. For example, 2:00 PM is displayed as '14:00'.
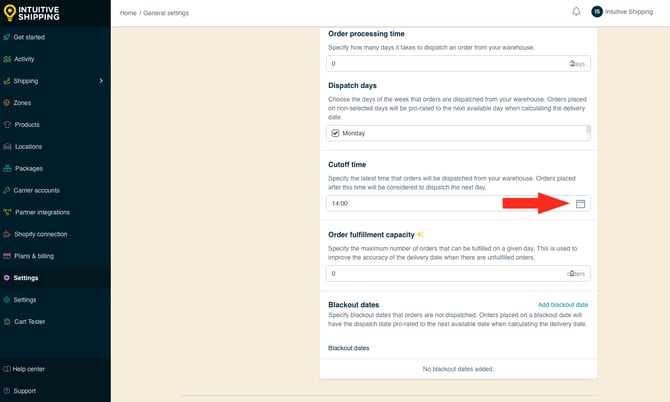
When a customer places an order after theCutoff time, Intuitive Shipping begins counting Order processing time from the next available Order processing day.
For example, let's say you have theseOrder processing and Dispatch settings:
- **Order processing days:** Monday, Tuesday, Wednesday
- **Order processing time:** 2 days
- **Dispatch days:** Tuesday, Wednesday, Thursday, Friday
- **Cutoff time:** 14:00 (2:00 PM)
If a customer places an order at **3:45 PM on Tuesday, March 5**, the order misses that day's cutoff, so Intuitive Shipping begins processing on **Wednesday, March 6**. The two order processing days are **Wednesday, March 6** and **Monday, March 11**. Because **Monday** isn't one of the selected Dispatch days, Intuitive Shipping moves the dispatch to the next available Dispatch day, **Tuesday, March 12**.
Times entered manually must be in the 24-hour format to be accepted. If your cutoff time is 2:30 PM, enter '14:30'.
**5.** Add **Order fulfillment capacity** by **entering the maximum number** of orders your warehouse can fulfill each day or **using the arrows to increase or decrease** the value. Intuitive Shipping uses this value to improve the accuracy of estimated delivery dates by accounting for any unfulfilled orders waiting to be processed.
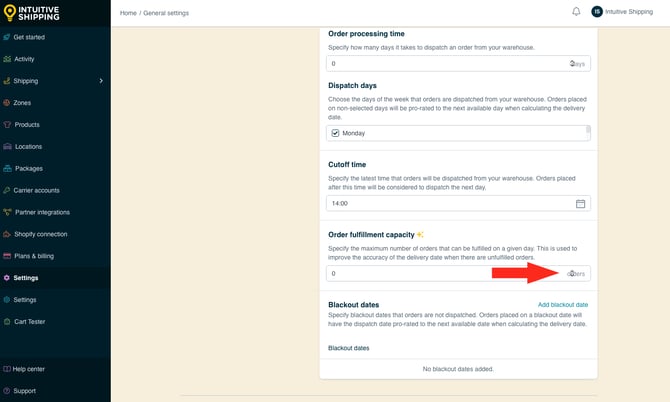
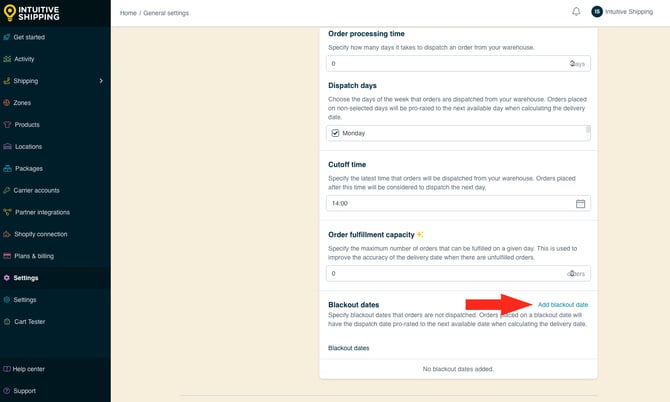
**6.** Click **Add** **blackout date** to exclude specified dates from the delivery date calculation..
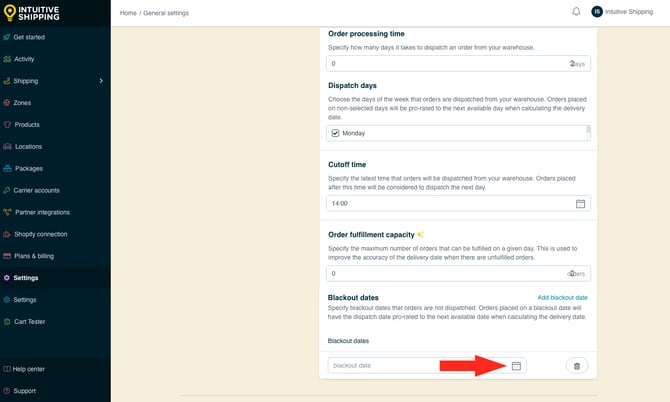
**7.** Click the **calendar icon**, then select a specific **blackout date** from the calendar selector.
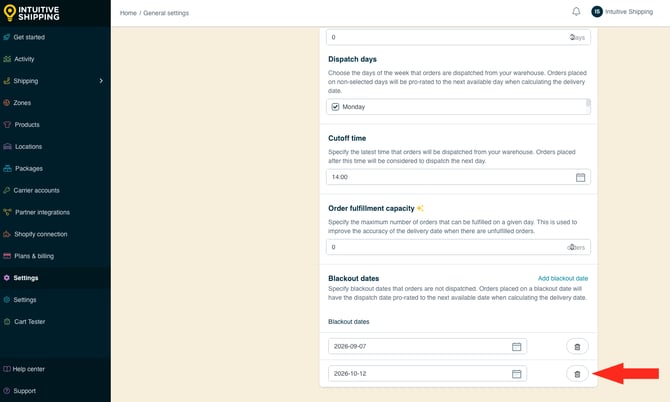
When an order is placed on a **Blackout date**, Intuitive Shipping skips that date and uses the next available dispatch day when calculating the estimated delivery date.
For example, let's say you select **Wednesday**, **Thursday**, and **Friday** as your **Dispatch days** and add **April 3, 2026** as a **Blackout date**. If a customer places an order on **Friday, April 3** - and the order can be processed immediately, Intuitive Shipping skips that dispatch day and begins the delivery calculation on the next available dispatch day, **Wednesday, April 8**.
**8.** Repeat **Steps 6 and 7** to add more blackout dates.
You can remove blackout dates at any time by clicking the **trash can icon** next to a blackout date.
### Rate Blending
Intuitive Shipping lets you combine multiple shipping rates into a single cost. When blending is enabled in any of your shipping methods, you can merge all applicable rates into one, or create multiple blending rules for greater control. These advanced rules provide additional customization options that determine how blended rates appear at checkout.
**Simple blending** lets you quickly configure a single blending setup using options such as:
- Adding costs together
- Displaying the average cost or only the most or least expensive rate
- Showing only the fastest or slowest delivery method
**Advanced blending** gives you more control and allows you to:
- Use all the same options available in simple blending
- Create multiple blending rules for different situations
- Override shipping method titles, descriptions, and delivery times when blending is applied
**1.** Choose a **rate blending mode**.
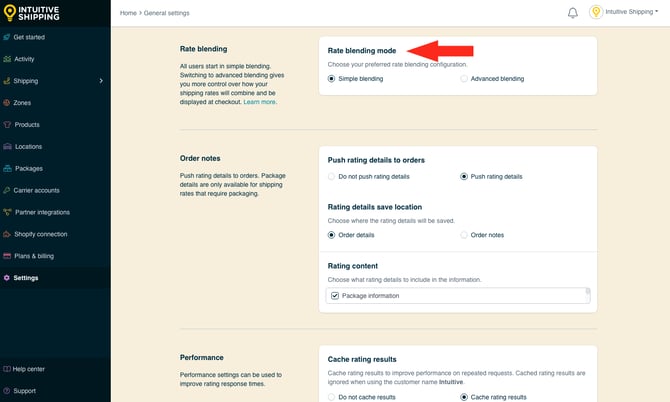
You have two (2) settings to choose from:
- **Simple blending** - rates calculated by shipping methods with rate blending enabled will be combined into a single rate based on your simple rate blending settings. This is the default setting.
- **Advanced blending** - rates calculated by shipping methods with rate blending enabled and matching blending group tags will be combined based on the configuration of your advanced rate blending settings.

Learn more about [how to create simple and advanced blending rates](https://knowledge.intuitiveshipping.com/creating-a-blended-rate?hsLang=en).
### Packing Results
Packing resultsare currently only supported by Shopify. If you are using BigCommerce, these settings will be ignored.
Shipping methods that require packing - such as parcel service and freight service methods - can send packing details directly to the Shopify order. This helps your fulfillment team easily determine which packages are needed when preparing the shipment.
Packing results may include:
- The name and dimensions of each package used.
- The quantity of each package size.
- The weight of each package.
- The name and quantity of products in each package.
These details will only be sent to Shopify after the customer completes their checkout and an order number is created. Packing results are not available for test checkouts or incomplete orders.
While in [Sandbox mode](https://knowledge.intuitiveshipping.com/select-a-billing-plan#sandbox-mode), packing results will not be pushed to the order, even when orders are completed with test payments.
**1.** Choose whether or not **packing results** will be pushed to Shopify when the order is completed.
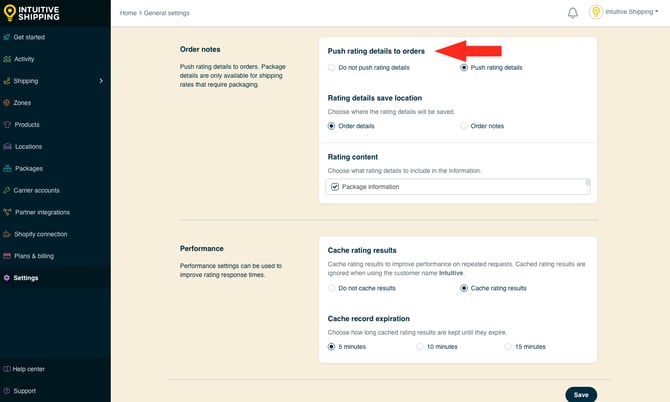
You have two (2) settings to choose from:
- **Do not push package information** - packing results will not be pushed to Shopify when the order is completed.
- **Push package information** - packing results will be pushed to Shopify when the order is completed and will be displayed based on the settings selected in the next two steps. This is the default setting.
**2.** Choose the **save location** for the packing results. The location may be determined by where your fulfillment app or service retrieves the information. Consult with your fulfillment team or service if you're not sure.
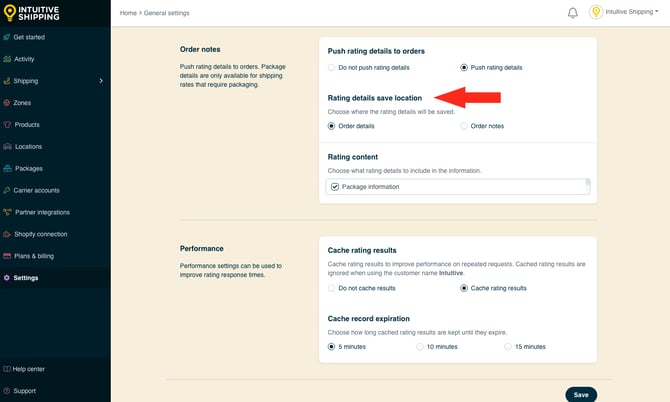
You have two (2) settings to choose from:
- **Order details** - packing results will be sent to the Shopify Order details (or attributes). This is the default setting.
- **Order notes** - packing results will be sent to the Shopify Order notes.
**3.** Choose what **rating content** to include in the packing results by hovering over the field and selecting from the available options.
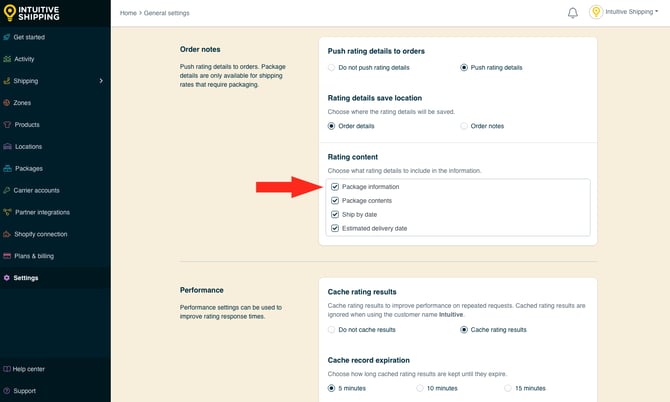
You have four (4) options to choose from:
- **Package information** - packing results will include the package title.
- **Package contents** - packing results will include details about the products in each package, along with the package dimensions and weights.
- **Ship by date** - packing results will include date the order should be shipped in order to meet the estimated delivery date.
- **Estimated delivery date** - packing results will include the estimated delivery date, if applicable.
### Performance
Intuitive Shipping provides you with the option to cache rating results and determine how long cached results are kept.
**1.** Choose whether or not to **cache rating results**.
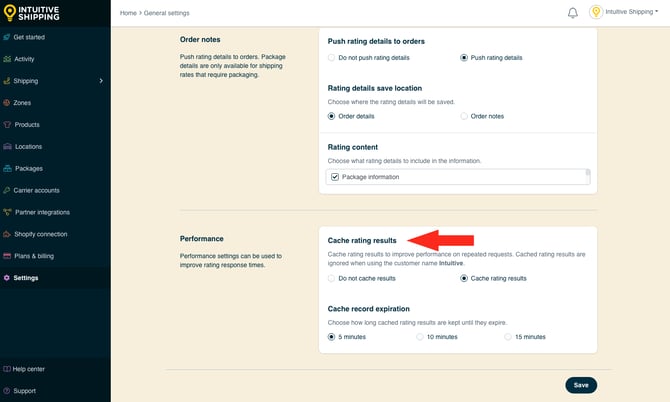
You have two (2) settings to choose from:
- **Do not cache results** - Intuitive Shipping will not cache rating results
- **Cache rating results** - Intuitive shipping will cache results for the period of time selected in the next step
**2.** Choose a **time limit** for caching results before they expire.
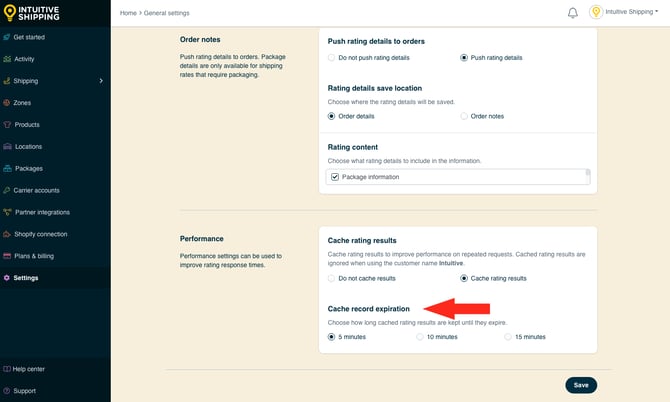
You have three (3) time limits to choose from:
- **5 minutes**
- **10 minutes**
- **15 minutes**
When using 'Intuitive' on the checkout page to test rates, caching settings are ignored. Learn more about the 'Intuitive' bypass method when [testing your setup](https://knowledge.intuitiveshipping.com/test-your-setup?hsLang=en).
### Save Your Settings
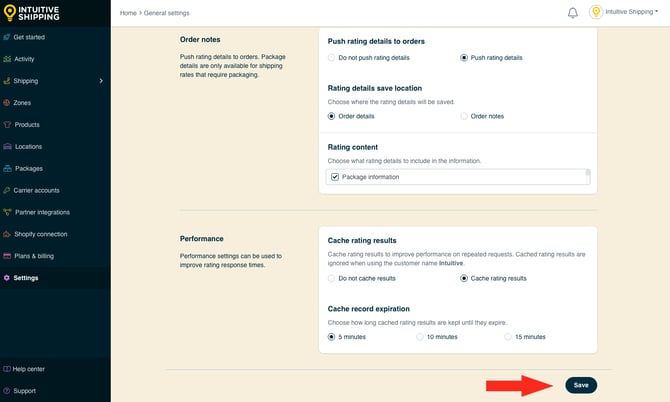
**1.** Click the **Save** button to save your general settings.
### What's Next
- [Test your setup](https://knowledge.intuitiveshipping.com/test-your-setup?hsLang=en)
**Optional**:
- [Create a blended rate](https://knowledge.intuitiveshipping.com/creating-a-blended-rate?hsLang=en)
- [Create a condition group](https://knowledge.intuitiveshipping.com/create-a-condition-group?hsLang=en)
- [Add a location](https://knowledge.intuitiveshipping.com/add-a-location?hsLang=en)
- [Update product settings](https://knowledge.intuitiveshipping.com/update-product-settings?hsLang=en)
**Can we lend a hand?** Let us help you get up and running faster and with greater confidence. Book a [complimentary guided onboarding session](https://intuitiveshipping.com/guided-onboarding/)!
- [Get Started](https://knowledge.intuitiveshipping.com/get-started?hsLang=en)
- [Common Setups](https://knowledge.intuitiveshipping.com/common-setups?hsLang=en)
- [Additional Setups](https://knowledge.intuitiveshipping.com/additional-setups?hsLang=en)
- [How-To](https://knowledge.intuitiveshipping.com/how-to?hsLang=en)
- [Connect A Carrier](https://knowledge.intuitiveshipping.com/connect-a-carrier?hsLang=en)
- [Black Friday](https://knowledge.intuitiveshipping.com/black-friday?hsLang=en)
- [Billing & Account](https://knowledge.intuitiveshipping.com/billing-account?hsLang=en)
- [General Info](https://knowledge.intuitiveshipping.com/general-info?hsLang=en)
- [Get Help](https://knowledge.intuitiveshipping.com/get-help?hsLang=en)
- [Main Site](https://intuitiveshipping.com/)
- [FAQ](https://knowledge.intuitiveshipping.com/faq-page)
- [Privacy Policy](https://intuitiveshipping.com/legal/privacy)
- [Terms](https://intuitiveshipping.com/legal/terms)
- [EULA](https://intuitiveshipping.com/legal/eula)
[](http://intuitiveshipping.com)
The shipping solution for serious sellers.
© Copyright 2019-2025 Intuitive Shipping Inc.