Contents:
Accurate shipping rates at checkout are essential, so it’s important to thoroughly test your Intuitive Shipping setup before activating a billing plan and going live. This ensures that all shipping methods are working correctly. It’s equally important to test again whenever you add new Scenarios, create new shipping methods, or make significant changes to your setup.
When you install Intuitive Shipping, you’ll automatically start in Sandbox mode, which is completely free to use and doesn’t count toward your free trial. Your free trial only begins once you activate a billing plan.
In Sandbox mode, you can take as much time as you need to complete your setup. Once you’ve finished setting up zones, Scenarios, shipping methods, and other components - like packages, locations, or blended rates - you can test everything without making Intuitive Shipping rates visible to customers.

Learn more about Sandbox mode.
How It Works
Several elements in Intuitive Shipping include a ‘status’ setting, such as zones, Scenarios, shipping methods, and advanced blending rules. These elements can typically be set to:
-
Archived - Not in use, but retained for future reference
-
Testing - Used for testing after billing has been activated
-
Published - Used for live rates at checkout after billing has been activated


Archived means the element is completely ignored and will not be included in rate calculations, even during testing. For example, if you have two vendor-based Scenarios, one for a local vendor and one for an overseas vendor, and the overseas Scenario is set to Archived, only the shipping methods from the local Scenario will appear at checkout, even if the conditions for the overseas Scenario are met. All settings are preserved for future use.
Testing means the element is included in rate calculations but only appears when using the Intuitive bypass at checkout.
-
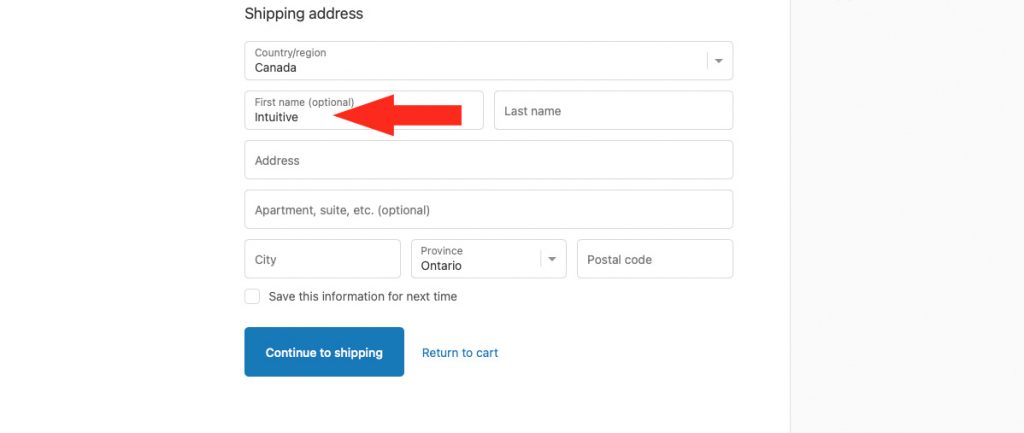
For Shopify, enter ‘Intuitive’ as the customer’s first or last name.
-
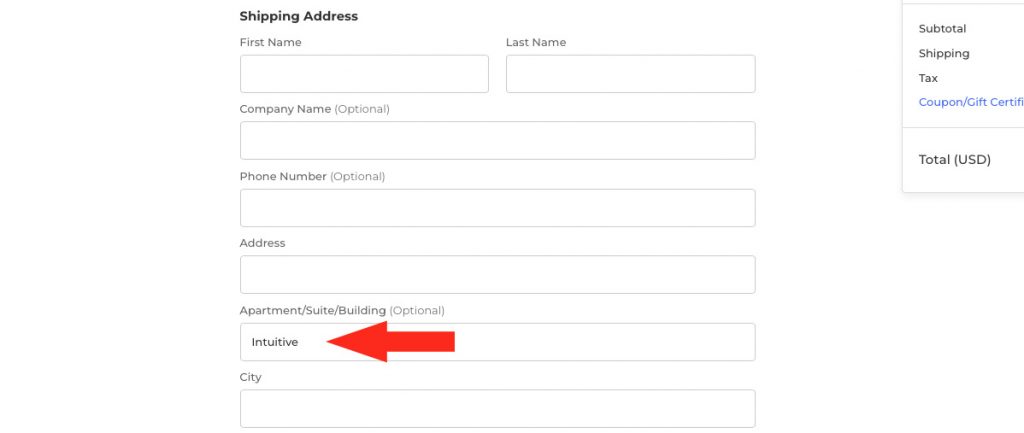
For BigCommerce or Shopify B2B, enter ‘Intuitive’ in the optional address field such as Apartment, Suite, or Building.
Using the same example, if the overseas Scenario is set to Testing, shipping methods from both the local and overseas Scenarios will appear when using the bypass. Customers will only see rates from the local Scenario during a normal checkout.
Published means the element is fully active and available to customers at checkout.
 While Intuitive Shipping is in Sandbox mode, the 'Published' status setting behaves the same as the 'Testing' setting until a billing plan has been selected.
Learn more about how to test your Intuitive Shipping setup.
When you install Intuitive Shipping, status settings are usually set to Published by default, even while the app is in Sandbox mode. This allows your setup to go live automatically once you activate a billing plan, without needing to update each status manually.
Even if a status is set to Published, customers will not see any rates from Intuitive Shipping until you activate your free trial by selecting a billing plan. While the app is in Sandbox mode, the only way to view rates at checkout is by using the Intuitive bypass method, either by entering it in the customer name field or in the secondary address field.
Test Your Setup
Here's how to test your Intuitive Shipping setup:
1. Click your store name at the top right of the app header, then select Shopify storefront or BigCommerce storefront from the drop-down menu. This will open your store’s main page in a new browser tab.
2. Add some products to the cart, then proceed to the checkout page.
3. If you’re using Shopify, enter the name 'Intuitive' in either the customer first or last name field (it doesn't matter which one you choose).
4. If you’re using BigCommerce or Shopify B2B, enter 'Intuitive' in the optional address field.
This bypass method will allow rates from Intuitive Shipping to appear the way your customers will see them once you activate your account.
5. Complete the Shipping address form on the checkout page by adding a test address.
A real address is not required for testing - as long as the postal or zip code is valid for the province, state, region, or country you’re testing in.
If you're currently getting shipping rates from another provider while Intuitive Shipping is being tested, rates from that provider will be displayed along with your test rates from Intuitive Shipping.
This is normal.
While you’re in Sandbox mode and using the 'Intuitive' bypass method, only you can see the rates calculated by Intuitive Shipping. Customers will continue to see rates from your eCommerce platform - or from a third-party rate provider, if you’re using one - until you activate Intuitive Shipping and start your free trial.
Testing Customer Account-Specific Rates
Intuitive Shipping is commonly used for customer-specific rates, such as:
- Wholesale
- Loyalty shipping tiers
- Subscription-based
If you’re using Intuitive Shipping to create these types of shipping rates, you’ll need to set up a test version of a Customer Account. Include 'Intuitive' in the first or last name, or in the secondary address field - depending on what your eCommerce platform supports - and assign any necessary customer tags, such as 'wholesale', to the test account.
Carrier-Calculated Shipping (Shopify Only)
Whether you’re testing new Scenarios or updating existing ones, you must ensure that Shopify’s third-party carrier-calculated shipping feature is enabled on your account. If it's not enabled, Intuitive Shipping rates won't appear at checkout, even in Sandbox mode. You'll see a banner on the Intuitive Shipping Get Started page prompting you to connect it.
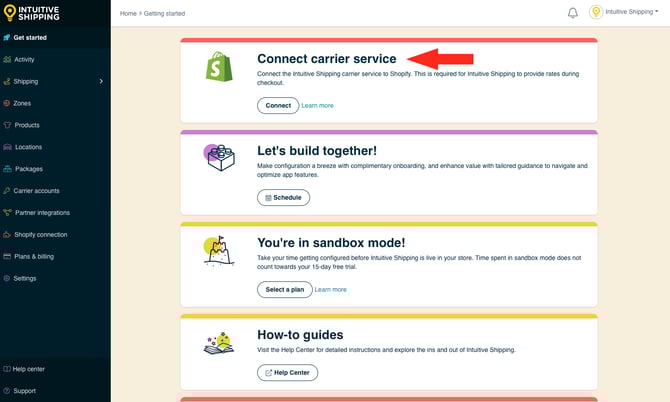
The third-party carrier-calculated shipping feature is not required to install or configure Intuitive Shipping. However, it must be enabled to test rates, even while the app is in Sandbox mode.
In some cases, you may see a prompt to connect this feature if it was previously enabled but later disabled.
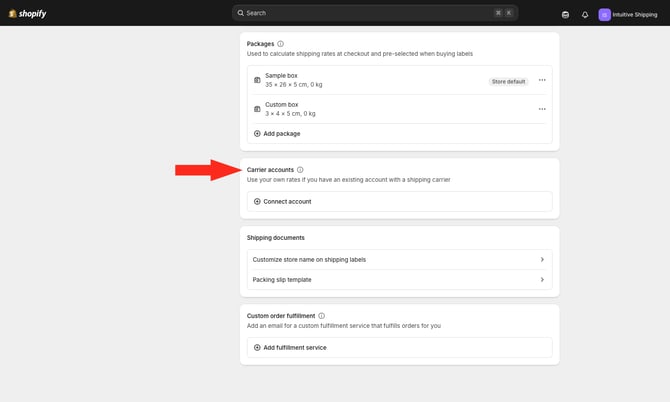
To confirm the status of carrier-calculated shipping:
1. Click your store name at the far right of the app header, then select Shopify admin from the drop-down menu. This will open your store’s main page in a new browser tab.

2. Click Settings on the admin sidebar menu in Shopify.

3. Click Shipping and delivery in the Settings sidebar menu.

4. Scroll down to 'Carrier accounts'. If you're prompted to 'Use your own rates...', it means the feature is already enabled. If you're prompted to 'Enable third-party calculated rates' - or something similar - and have the option to upgrade your plan, it means the feature is not enabled on your Shopify account.
The carrier-calculated shipping feature is a Shopify requirement for any third-party rate calculator, including Intuitive Shipping, as it allows Shopify to connect our system to your checkout page.
Lite, Starter and Basic Plans
Since January 1, 2023, Shopify no longer supports the third-party carrier-calculated shipping feature as a paid add-on for the following plans:
-
Lite
-
Starter (no longer available; replaced by ‘Lite’)
-
Basic
If you’re on one of these plans and want to use Intuitive Shipping, you will need to upgrade to at least the Grow plan (formerly called the 'Shopify' plan) and contact Shopify support to have the feature enabled.
If you were already on a Lite, Starter, or Basic plan and had the carrier-calculated shipping feature enabled before January 1, 2023, it was grandfathered in. This means you can continue using Intuitive Shipping with those plans.
However, upgrading to a higher plan may remove the grandfathered status. If you later downgrade, the carrier-calculated shipping feature may no longer be available, and Intuitive Shipping will not be able to display rates at checkout.
Contact Shopify's support team for more information.
Grow Plan
If you’re on the Grow plan (previously called the 'Shopify' plan), or if you upgrade to it from a lower-tier plan such as Lite, Basic, or Starter, the third-party carrier-calculated shipping feature can be added to your Shopify account for $20.00 USD per month.
If you switch to annual billing, Shopify will include the feature at no additional cost. You'll also receive a 10% discount on your Grow plan.
Switching your Grow plan to annual billing does not automatically enable the feature. You'll still need to contact Shopify support to request that it be activated.
Advanced and Plus Plans
If you're on the Advanced or Plus plans, third-party carrier-calculated shipping rates is included and enabled. No further action is required to use this feature with Intuitive Shipping.
Clear the Cache (Shopify only)
When testing new or updated Scenarios or shipping methods on your Shopify store, you may need to clear Shopify’s checkout cache to see the most recent rate changes from Intuitive Shipping.
For example, if you’ve just updated your rate settings and want to immediately run another test checkout, slightly change the street address before testing again:
-
Original test address: ‘123 Main St.’
-
Change it to something different, such as: ‘124 Main St.’
You don't need to change the customer’s name or postal/ ZIP code. Changing those fields may affect rate calculations if you are using customer-based or location-based conditions.
If you need to reuse the exact same address from a previous test, you will need to change the cart contents instead. You can do this by:
-
Increasing or decreasing the quantity of any item, or
-
Adding or removing a product
As long as the items in the cart change in type or quantity, Shopify will clear the checkout cache and request new rates.
Contact Intuitive Shipping Support
If testing isn’t going as well as you’d hoped, or if you’d just like some reassurance that everything is configured properly, we’re here to help!
-
Submit a ticket from the app’s Support page
-
Book a complimentary guided onboarding session and we’ll walk you through everything
Learn more about contacting us for setup and testing assistance.
Ready To Go?
Once you’re done testing and satisfied with your setup, you’ll need to select a billing plan to activate your free trial and start displaying Intuitive Shipping rates to customers at checkout.
Before going live, check the status settings throughout the app to make sure all required elements, such as zones, Scenarios, shipping methods, blending rules, and packages, are set to 'Published'. If any of these are set to 'Archived' or 'Sandbox', they won’t be included in rate calculations during customer orders.
If you’ve been using shipping rates from your eCommerce platform or another third-party provider while testing Intuitive Shipping, you’ll need to remove or disable those rates before going live with Intuitive Shipping. Our system can’t override rates from other providers at checkout.
Hide Intuitive Shipping From Customers
Once billing is enabled and your Intuitive Shipping account is active, you can still hide rates from Intuitive Shipping whenever needed. There are two ways to do this, depending on your requirements.
-
Disable specific elements - set individual elements, such as Scenarios, shipping methods or zones, to 'Archived. This is helpful if you want to isolate and review parts of your setup that are not working as expected, or if you are making changes and want to confirm everything is correct before those changes go live.
-
Hide all rates from Intuitive Shipping - set Intuitive Shipping's status to Sandbox in the General settings if you want to test your entire setup without changing the status of each Scenario, shipping method or zone. When General settings are set to Sandbox, customers will not see any rates from Intuitive Shipping.
Setting Intuitive Shipping's General status to 'Sandbox' does not disable billing.
While rates are hidden by Intuitive Shipping, make sure customers can still check out by temporarily adding a shipping rate in your eCommerce platform’s shipping and delivery settings. When you're ready to re-publish Intuitive Shipping, remember to remove that temporary rate. Otherwise, customers may see both sets of rates at checkout.
1. Click Settings on the sidebar menu.
2. Set the status to Testing.

3. Scroll to the bottom, then click the Save button to save your Status settings.
4. Follow the steps above in Test Your Setup - being sure to use the ‘Intuitive’ bypass method. This will allow you to override the 'Sandbox' status and see rates from Intuitive Shipping.
5. When testing is completed, return to 'General Settings' and return the status to 'Published'. This will allow customers to see rates from Intuitive Shipping again.

If you added a temporary rate to Shopify or BigCommerce, allowing customers to check out while Intuitive Shipping was in 'Sandbox' status, be sure to remove it again to prevent customers from seeing rates from multiple sources.
As an alternative to using 'Sandbox', you can set the general status to Archived. This completely disables all Scenarios and shipping methods in Intuitive Shipping, preventing any rates from appearing to customers, even if you use Intuitive as the customer’s first or last name.

Setting Intuitive Shipping's General status to 'Archived' does not disable billing.
Learn more:
Can we lend a hand? Let us help you get up and running faster and with greater confidence. Book a complimentary Onboarding session!