Contents:
ShipStation gives you access to major carriers and lets you manage them from one central hub. You can connect your own carrier accounts or use ShipStation’s negotiated rates.
You can easily connect your ShipStation account with Intuitive Shipping to access all of your rates. When an order is successfully completed, Intuitive Shipping automatically sends package details to ShipStation for a smooth handoff.
If you don’t have a ShipStation account yet, start your free trial here.
Find a list of carriers supported by ShipStation here.

Some ShipStation carrier partners may not work with Intuitive Shipping.
ShipStation's New Layout
Our integration with ShipStation requires their New Layout version. If you’re still using the legacy version of ShipStation, you can connect your account to Intuitive Shipping, but the integration won’t function.
To check which version you’re using, look at the URL while signed into ShipStation. If you’re on the New Layout, the URL will include ‘shipX’, where ‘X’ is typically a 2-digit number like ‘ship11’. If this is not present, you’re on the Legacy version.
To switch, click the 'Try new layout' button at the top of the screen in ShipStation.
After switching, complete this guide and test your ShipStation shipping method setup to confirm that carrier rates are working properly.
Connect A ShipStation Account
1. Click Settings on the sidebar menu, then select Partner integrations from the drop-down list.

2. In the 'Integration partners' section, click the Enable integration button for ShipStation.

3. When prompted, enter your ShipStation username and password, then click the Login button. If you experience any login issues, please contact ShipStation directly.

After successfully logging in, you will be redirected to an access permission screen.
4. Review the details provided on the access permission screen, then click the Connect with Intuitive Shipping button. A brief success page will appear before you’re redirected back to Intuitive Shipping.
If your experience differs or you have trouble connecting your ShipStation account, please contact us for assistance.
Please note: your ShipStation account can only be connected to one eCommerce store. Connecting it to more than one store can cause a conflict that may permanently disconnect one or both stores from ShipStation.
Updating Carrier Services
Prior to creating your shipping method, if you’ve made any changes to your ShipStation carriers or services since enabling the integration, be sure to update those changes.
1. Clicking Edit partner settings on the Partner Integrations page.

2. Click Update carrier services.

Create A Shipping Method with ShipStation
After connecting your ShipStation account to Intuitive Shipping, you can create an integrated service shipping method using ShipStation as the carrier. This will give you access to all of the carrier services associated with your account.
Some ShipStation carrier partners may not work with Intuitive Shipping.
If you don't have a Scenario for your ShipStation shipping method, you'll need to create one.
Learn how to create a Scenario.
1. Click Shipping on the sidebar menu, then select Scenarios from the drop-down list.
2. Click Edit beside an existing Scenario.

3. Scoll down to the Shipping rates and services section, then click the Create shipping method button.

You must save any changes made to your Scenario before you can add a shipping method.
Select An Integrated Service
1. Click the downward arrow beside 'Integrated services', then select ShipStation from the list.

2. Click the Next button.

3. Select a zone.

Learn more about zones.
4. Click the Configure shipping button.

If you have set up a parcel service shipping method in Intuitive Shipping, a ShipStation shipping method is very similar.
General
1. Enter a shipping method title, like 'ShipStation'. This will not be displayed to customers (see next step).

2. Leave the title type set to 'Service titles provided by carrier'. This setting ensures the service titles from your ShipStation carrier services, such as ‘FedEx Ground’ or ‘FedEx 2Day’, are displayed as the shipping method titles at checkout.

Please note: If you choose ‘Use the shipping title’ instead, the custom title you entered in the previous step will appear at checkout. This replaces all carrier-provided service titles with your custom title, even when multiple service options are selected.
In Shopify, if multiple shipping methods share an identical title, only the cheapest one appears at checkout. To offer multiple carrier service options from a single method, we strongly recommend using the carrier’s service titles.
3. Choose the shipping method status.

You have three (3) settings to choose from:
- Off - when Scenario conditions are met, the shipping method will be ignored and will not display rates, even in Sandbox mode.
- Test - when Scenario conditions are met, the shipping method will be displayed at checkout only when using ‘Intuitive’ on the checkout page (see below).
- On - when Scenario conditions are met, the shipping method will be displayed at checkout. This is the default setting.
When using the 'Test' setting:
- For Shopify - enter ‘Intuitive’ as either the customer’s first or last name.
- For BigCommerce and Shopify B2B - enter ‘Intuitive’ in the optional address field for ‘Apartment/ Suite/ Building’.
While in Sandbox mode, the 'On' setting behaves the same as 'Test' until a billing plan is selected. Learn more about how to test your Intuitive Shipping setup.
4. If desired, enter a description. We recommend limiting your description to 90 characters or less to ensure it displays properly on the checkout page.

Descriptions are displayed below the shipping method title at checkout.

Additional Display Settings
Additional display settings are available for custom delivery times, order processing time and service codes.
- Delivery times are displayed at checkout and help manage expectations for customers.
- Order processing time lets you add buffer time to start the fulfillment process, if the products can't be packaged, picked or completed the same day the order is received.
- Service codes are not displayed to customers, but get pushed to your fulfilment service, if applicable) once a checkout is successfully completed.
To configure delivery times, order processing times and service codes:
1. Click Show additional display settings.

2. Choose whether or not to have a delivery time displayed at checkout along with the rate.

You have two (2) settings to choose from:
If you selected ‘Do not show delivery time’, skip ahead to Order processing time.
To configure delivery times:
3. Select the delivery time type.

You have two (2) settings to choose from:
- Carrier delivery time - delivery times displayed at checkout are estimates provided from your ShipStation account as part of the rate calculation. This is the default setting.
- Custom delivery time - delivery times displayed at checkout are based on values entered in the next step.
If you selected 'Carrier delivery time', skip ahead to Order processing time.
To configure custom delivery times:
4. Enter a custom delivery time in days.

- Min delivery time - the lower limit of the delivery time range.
- Max delivery time - the upper limit of the delivery time range.
Number of days: Enter a number in either 'Min' or 'Max and leave the other field blank. For example, to display delivery time as '3 business days', enter '3' in 'Min' and leave the 'Max' field blank (or vice versa).
Range of days: Enter different numbers in each field. For example, to display delivery time as '3 to 5 business days', enter '3' in 'Min' and enter '5' in 'Max'.
Delivery times are displayed below the shipping method title at checkout.

5. Enter order processing time in days. This is useful when you sell products that cannot be shipped out the same day the order is placed.

Order processing time is combined with either the carrier’s delivery time or your custom delivery time, depending on your selection, and shown as a single estimated time. It is not displayed separately.
For example, if you set a 3-day processing time and the carrier estimates 2-day delivery, Intuitive Shipping will display ‘5 business days’ at checkout.
6. Enter a custom service code. The service code is pushed to ShipStation when a customer successfully completes their checkout.

Custom service codes will override the service codes provided by the carrier. If you want to use the carrier-provided service codes, leave this setting blank.
Packages
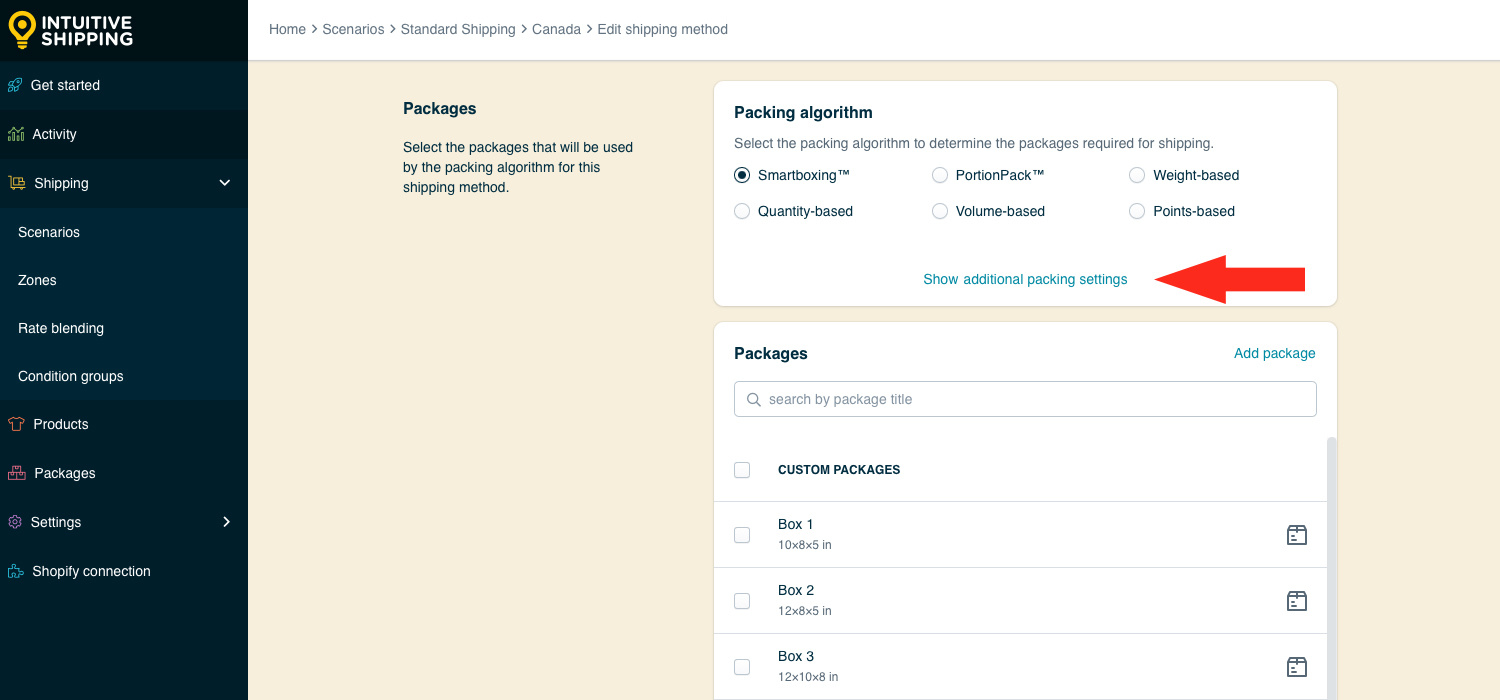
You can control how the customer’s order is packaged by choosing a packing algorithm and assigning the packages you want the ShipStation shipping method to use.
1. Select a packing algorithm.

You have six (6) options to choose from:
- SmartBoxing - Intuitive Shipping will select the best package combination based on both the weight and the dimensional volume of the order.
- PortionPack - Intuitive Shipping will select the best package combination based on the portion weight of the order.
- Weight-based – Intuitive Shipping will select the best package combination based only on the whole weight of order.
- Quantity-based - Intuitive Shipping will select the best package combination based only on the number of items in the order.
- Volume-based - Intuitive Shipping will select the best package combination based only on the dimensional volume of order.
- Points-based - Intuitive Shipping will select the best package combination based on a point system. Points are arbitrary values assigned by you.
 For SmartBoxing and volume-based algorithms to work with Shopify, you must assign product dimensions in your Intuitive Shipping product settings.
PortionPack vs. Weight-based
Both PortionPack and weight-based packing algorithms consider the combined weight of the products being ordered. PortionPack allows you to sell items in bulk or 'portions', such as raw meat, whereas weight-based considers the weight as a whole.
Let's say you only use one package for every order and that package has a maximum weight of 25 lbs. If a customer orders 40 lbs worth of product:
- PortionPack - the order will be packed in 2 packages - one with 25 lbs, one with 15 lbs.
- Weight-based - the order will fail at checkout because the the only available package cannot hold the entire weight of the order. An additional package (or packages) capable of of holding up to 40 lbs would be required.
Additional Packing Settings
Additional packing settings are available for packing method, multiple package blending and product dimensions.
- Packing method lets you choose if different products in the order are packed together or separately.
- Multiple package blending gives you the option blend shipping costs for different packages when carrier services don't match.
- Product dimensions can be used to limit packing when the packing algorithm doesn't otherwise consider dimensions, such as weight-based.
If you don't need to adjust the packing method, multiple package blending or product dimensions settings, skip ahead to Add Packages.
To adjust these settings:
1. Click Show additional packing settings.
2. Select a packing method.

You have two (2) settings to choose from:
- Pack products together - all of the products in the order will be packed together. Packages will be split based on the selected packing algorithm and the packages assigned to the shipping method. This is the default setting.
- Pack products separately - each unique product in the order will be packed separately based on the selected packing algorithm and the packages assigned to the shipping method.
Any product or variant with a unique Product ID is considered a unique product.
For example, if you select ‘Pack products separately’ and a customer orders 3 black hats, 2 yellow t-shirts, and 1 red hoodie, each product type will be packed in its own set of packages: the hats together, the shirts together, and the hoodie by itself.
Individual products already set to pack separately in product settings will ignore this setting. Learn about product settings.
3. Choose how multiple packages will be blended when carrier services don’t match.

You have two (2) settings to choose from:
- Flexible blending - an attempt will be made to blend costs based on services. The lowest cost for each package will be blended together if packages do not have matching services. This is the default setting.
- Strict blending - costs will be blended only if all packages have matching services. No costs will be returned if packages do not have matching services.
Sometimes, packages in an order may not qualify for the same carrier service. When that happens, the shipping costs will be blended based on the setting you choose.
For example, if Package 1 only qualifies for Service A and Package 2 only qualifies for Service B, the 'Flexible blending' setting will blend the costs. The 'Strict' setting won’t return a rate at all.
When packages qualify for matching services, this setting is ignored.
This means if a customer orders 3 products - one that qualifies for USPS Priority Flat Rate Medium and two that don’t - the 'Flexible' setting will blend the Flat Rate cost with other available services. The 'Strict blending' setting won’t return any rates at all.
4. Choose how product dimensions interact with the packing algorithm. This is useful if you have products with one or more dimensions that exceed the dimensional limits of certain packages, regardless of the packing algorithm.

You have two (2) settings to choose from:
- Use product dimensions - product dimensions are checked to ensure every product in the order fits in the selected packages, regardless of the selected packing algorithm.
- Ignore product dimensions - individual product dimensions are not considered, and packages are selected strictly based on the selected packing algorithm.
Use product dimensions: Let’s say you’re using a weight-based algorithm.
- A package with dimensions 12 x 10 x 8 inches that holds up to 20 lbs.
- A package with dimensions 15 x 10 x 10 inches that holds up to 25 lbs.
When a customer orders a 18-lb product that is 6 x 15 x 3 inches, the second package will be selected because the product width (15 inches) is greater than any of the first package's dimensions, even though the weight of the product is less than the package can hold. This setting works well when you have rigid product dimensions that cannot be manipulated.
Ignore product dimensions: Using the same example, when a customer orders a product that is 6 x 15 x 3 inches, the first package will be selected because the product's dimensions are ignored and its weight is less than the package can hold. This setting works well when you have products that are flexible, meaning they can be bent, curved, folded or otherwise manipulated to fit into the box.
Add Packages
All packages saved in the Package management system are listed in this section of the shipping method. If needed, you can add more packages directly from here. Any new packages you add will also be saved to your central package settings, so they’re available for other shipping methods that use packages.
The next few steps will show you how to add a package directly from the shipping method.
If all the packages you need are listed and you don't need to add more, skip ahead to Select Packages.
To add a package that is not currently listed:
1. Click Add package.

2. Enter a package title, like ‘Box 1’ or ‘Large Envelope’.

Package titles are not visible to customers.
3. Select a package type.

You have two (2) settings to choose from:
- Box - fixed length, width and height dimensions.
- Soft package - fixed length and width dimensions; adjustable height dimension.
- Add the outer length, width, and height dimensions. Carrier services use these dimensions when calculating the shipping cost.

If you selected Soft package in the previous step, the height dimension refers to maximum height. Intuitive Shipping automatically adjusts height based on the actual size of the products being packaged. Learn more about soft packages.
Additional Settings
Additional settings are available for inner dimensions, maximum weight, empty weight and package cost.
- Inner dimensions are used with the SmartBoxing packing algorithm. These values provide greater packing accuracy if there are any tangible differences between the inner and outer dimensions or when extra packing material is needed.
- Maximum weight allows you to limit the weight capacity of each package. This is useful if the package has a physical weight limit that may be exceeded or if you are concerned about exceeding the carrier’s package weight limit.
- Empty weight lets you account for the weight of the package if it is significant enough to affect the total weight used for the carrier service rate calculation.
If you don't need to add inner dimensions or a maximum or empty weight to your new package, skip ahead to Select Packages.
To add more information about your package:
1. Click Show additional settings.

2. Add the inner length, width, and height dimensions. When using the SmartBoxing packing algorithm, these values provide greater packing accuracy if there are any tangible differences between the inner and outer dimensions or when extra packing material is needed.

When inner dimensions are excluded, SmartBoxing will use the outer dimensions to determine the most efficient packaging set.
3. Enter the maximum weight of the package. Intuitive Shipping will ensure the total product weight does not exceed this limit for a single package. We recommend using this setting if the package has a physical weight limit that may be exceeded or if you are concerned about exceeding the carrier’s package weight limit.

Check with the carrier for any package weight restrictions.
4. Enter the empty weight of the package. Intuitive Shipping will add this weight to the combined weight of the products. We recommend using this setting if the weight of the package is significant enough to affect the total weight used for the carrier service rate calculation.

When a maximum weight is assigned, Intuitive Shipping automatically subtracts the empty weight from the maximum weight of a package when performing the packaging process.
Weight units, such as pounds (lbs) and kilograms (kg) are configured in general settings.5. Enter the cost of the package. Intuitive Shipping will add it to the total shipping cost. It is not displayed as a separate cost. We recommend using this setting to recover the cost of packaging through the shipping cost.

Currency is managed by your eCommerce platform. Learn more about updating currency settings.
6. Click the Save button.

The newly added package will appear as a selectable option in this shipping method and will also be saved in the Package management system for use in other shipping methods.
Select Packages
All packages you’ve added to Intuitive Shipping are listed in the shipping method. Only the ones with a checkmark next to them will be used by the packing algorithm during carrier rate calculations.
1. To make all of your packages available, check the box beside 'Custom Packages', which behaves like a ‘select all’ feature.

2. If you don’t want to use all packages, check the boxes next to the ones you do want. If you have a long list, you can use the search bar or scroll to find specific packages.

Packages that aren't selected will be ignored by the packing algorithm during carrier rate calculations.

Packages that have been turned off in the package management system appear muted and show a ‘Package not available’ message. They will be ignored by the packing algorithm during carrier rate calculations, regardless of whether their checkbox is selected.

Learn how to change the On/Off status of a package in the package management system.
Shipping Origin
Carrier rates from ShipStation can be calculated using the primary location set up in your eCommerce platform or one or more custom locations saved in Intuitive Shipping. This is useful if you ship products from different retail or warehouse locations.
1. Select the ship from location for the shipping method.

You have two (2) settings to choose from:
- Dynamic origin location - carrier rates for the shipping method will be calculated based on the distance between the customer’s address and your primary eCommerce platform address. This is the default setting.
- Specify origin location - carrier rates for the shipping method will be calculated based on the address specified in the next step.
If you selected 'Dynamic origin location', skip ahead to Services.
Add And Select A Custom Origin Location
All custom locations saved in the Location management system are listed in this section of the shipping method. If needed, you can add more origin locations directly from here. Any new origin locations you add will also be saved to your central locations settings, so they’re available for other shipping methods that use custom locations.
The next few steps will show you how to add a custom origin location directly from the shipping method. If the location you need are listed and you don't need to add more, skip ahead to select a location.
To add a location that is not currently listed:
1. Click Add location.

2. Enter a location title, such as ‘Warehouse 2’.

Location titles are not visible to customers.
3. Enter the address for the location. A complete address is not required, meaning you don’t have to fill in every field, such as the postal/zip code field.

Some carriers require a complete address to accurately calculate live rates.
4. Click the Save button.

The newly added location will appear as a selectable option in this shipping method and will also be saved in the Location management system for use in other shipping methods.
5. Select a location. This location will be used as the starting point for carrier rate calculations in this shipping method.

Intuitive Shipping cannot see inventory and doesn’t use inventory-based rules. Locations are used to improve the accuracy of carrier calculations when shipping from multiple warehouse locations.
Services
Unlike a typical parcel service shipping method, which only list available services for a specific carrier, ShipStation shipping methods let you select any service from any carrier connected to your ShipStation account.
If you notice a carrier or carrier service that is missing, try updating your carrier services or reconnecting ShipStation after saving the shipping method.
Some ShipStation carrier partners may not be supported by the integration.
1. Select all services you wish to offer. Selecting the carrier's name will select all services offered by the carrier.

2. If you don’t want to offer all services, check the boxes next to the ones you do want.

Selected services must be available in the customer’s location to be displayed at checkout.
Let’s say you’ve selected UPS Standard and UPS Next Day Air. If a customer lives at an address where Next Day Air is not offered by UPS, they will only see the UPS Standard service as shipping option at checkout.
Additional Service Settings
Additional settings are available to filter services. By default, each service you selected in the steps above is displayed at checkout if it's available in the customer's postal code or zip code. You can choose to limit which services are offered based on their cost or estimated delivery time.
If you don't want to filter the services offered to customers at checkout, skip ahead to Optional Settings.
To filter services:
1. Click Show additional service settings.

2. Choose a filter.

You have six (6) options to choose from:
- Return all selected - all available services selected above will be displayed to the customer at checkout.
- Best value - only the available service with the best overall value from those selected above will be displayed to the customer at checkout.
- Cheapest cost - only the available service with the lowest cost from those selected above will be displayed to the customer at checkout.
- Most expensive - only the available service with the highest cost from those selected above will be displayed to the customer at checkout.
- Fastest delivery time - only the available service with the fasted estimated delivery time from those selected above will be displayed to the customer at checkout.
- Slowest delivery time - only the available service with the slowest estimated delivery time from those selected above will be displayed to the customer at checkout.
The 'Best value' filter considers both cost and delivery time to determine the overall value.
Optional Settings
Optional settings for carrier settings, fallback rating, cost adjustments, free shipping, custom shipping blending and rate blending give you further control of your custom shipping rates at checkout. These settings are not required.
To configure optional settings:
- Click Show optional settings, then configure the settings as needed.

Learn more about optional settings.
Save Your Settings
1. Click the Save button to save your ShipStation integrated service shipping method.

Edit ShipStation Settings
From time to time, you may need to update your ShipStation integration.
- Delivery options - choose whether or not to have package information sent to your ShipStation account (completed orders only).
- Carrier services - update the integration whenever you remove carrier services or add new ones.
1. Click Partner integrations on the sidebar menu.
2. Click the Edit partner settings button on the ShipStation card.
3. Choose a delivery options setting.

You have two (2) options to choose from:
- Disable delivery options - Intuitive Shipping will not push package information from the order to your ShipStation account.
- Enable delivery options - Intuitive Shipping will push package information from the order directly to your ShipStation account. This is the default setting.
When enabled, you can review the shipping method selected by your customer from your ShipStation account, then set up the shipping label.
4. If required, click the Update carrier services button. Any time you add, remove or edit carriers or services linked to your ShipStation account, you will need to update your carriers list in Intuitive Shipping.
5. If you edited the delivery options setting or updated carrier services, click the Save button to save the changes.

Disconnect ShipStation
If you need to disconnect ShipStation from Intuitive Shipping temporarily or permanently, you can disable the integration. Shipping methods using ShipStation will stop working. If you reenable the integration later, they will work again as long as they haven’t been deleted or changed.
Disabling and reenabling the integration can also help troubleshoot issues with rates from your ShipStation account.
1. Click Partner integrations on the sidebar menu.
2. Click the Disable integration button on the ShipStation card. You will be prompted to confirm you wish to proceed.

If you’re troubleshooting, or if you decide at any time to reenable the ShipStation integration, repeat the steps in Connect A ShipStation Account.