Contents:
A freight service shipping method lets you offer paid shipping with real-time rates from FedEx Freight LTL ('Less Than Truckload').
How It Works
Shipping methods control how rates are calculated and displayed to your customers at checkout. For rates to be presented on the checkout page, a shipping method must be assigned to at least one Scenario and associated with at least one zone.
If you have an account with FedEx Freight LTL, your account credentials can be stored in Intuitive Shipping, allowing you to access your discounted or negotiated rates.
If you don't have an account with FedEx Freight LTL, you can create one of these shipping methods instead:
- Parcel service shipping methods allow you to access real-time rates from one of several integrated carrier partners, sometimes without an account.
- Custom service shipping methods let you set up flat shipping rates, rate tables and free shipping options.
- Integrated service shipping methods provide real-time carrier rates from one of our integrated subscription-based service partners.
- Local delivery shipping methods display distance-based rates using a Google API account.
Before setting up your FedEx Freight LTL shipping method, make sure your billing address and shipping origin location are the same. This is a requirement from FedEx Freight LTL. If the addresses are different, rate calculation errors will occur at checkout.
Add A Shipping Method
 To complete this setup, you need at least one Scenario and one custom zone. Shipping methods are created within Scenarios and must be associated with at least one zone.

2. Click Edit beside the Scenario you want to assign your freight shipping method to. If you don't have any Scenarios, you'll need to create one.


Learn more about how to create a Scenarios.
3. Scroll down to 'Shipping rates and services', then click the Create shipping method button.

Select A Freight Service
This section will guide you through setting up a paid shipping service with real-time rates directly from FedEx Freight LTL. An account is required.
1. Click the downward arrow beside ‘Freight services’ to display a list of carriers.

2. Select a freight service from the list. Currently, Intuitive Shipping is only integrated with FedEx Freight LTL.
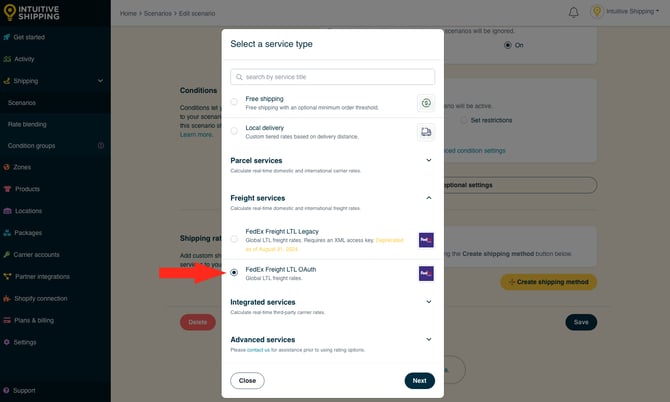
If you’ve never set up a FedEx Freight shipping method before, we strongly recommend using the OAuth version. While Legacy accounts can still be accessed, Legacy shipping methods will eventually be sunset. To avoid unexpected rate calculation issues, select FedEx Freight LTL OAuth.
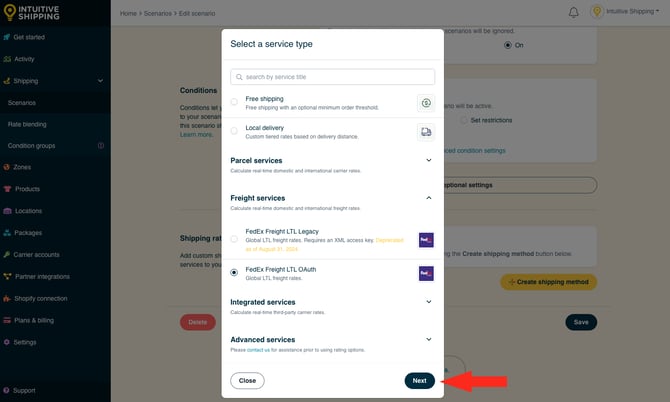
3. Click the Next button.
4. Select a Zone. If you have a lot of zones, type the zone name into the search field to narrow the list.

5. Click the Configure shipping button.

General
1. Enter a shipping method title.

Depending on the option you choose in the next step, this title may or may not be shown to customers at checkout.
2. Select the title type.

You have two (2) settings to choose from:
- Service title provided by carrier - the service title(s) returned by FedEx Freight during rate calculation will be the shipping method title(s) displayed at checkout. This is the default setting.
- Use the shipping method title - the shipping method title entered in Step 1 will be displayed at checkout. If more than one service option is selected, all of the service titles provided by FedEx Freight will be replaced with this title.
For example, if you select ‘Service title provided by carrier’ and FedEx Freight returns multiple titles like ‘Freight Economy' and 'Freight Priority', both will appear at checkout exactly as provided by FedEx Freight, regardless of the shipping method title entered in Step 1.
If you select ‘Use the shipping method title’ instead', both will be replaced by the title entered in Step 1.
In Shopify, if multiple shipping methods have the same title, only the lowest-cost option will appear at checkout. To display multiple carrier service options from a single shipping method, we strongly recommend using the carrier’s service titles.
3. Choose the shipping method status.

You have three (3) settings to choose from:
- Off - the shipping method will be ignored and will not display rates, even in Sandbox mode.
- Test - when conditions are met, the shipping method will be displayed at checkout only when using ‘Intuitive’ on the checkout page (see below).
- On - when conditions are met, the shipping method will be displayed at checkout. This is the default setting.
When using the 'Test' setting:
- For Shopify - enter ‘Intuitive’ as either the customer’s first or last name.
- For BigCommerce or Shopify B2B - enter ‘Intuitive’ in the optional address field for ‘Apartment/ Suite/ Building’.
While in Sandbox mode, the 'On' setting behaves the same as 'Test' until a billing plan is selected. Learn more about how to test your Intuitive Shipping setup.
4. If desired, enter a description. We recommend limiting your description to 90 characters or less to ensure it displays properly on the checkout page.

Descriptions are displayed below the shipping method title at checkout.

Additional Display Settings
Additional display settings are available for custom delivery times, order processing time and service codes.
- Delivery times are displayed at checkout and help manage expectations for customers.
- Order processing time lets you add buffer to the fulfillment process if the products can't be packaged, picked or completed the same day the order is received.
- Service codes are not displayed to customers, but get pushed to your fulfilment service, if applicable, once a checkout is successfully completed.
1. Click Show additional display settings.

2. Choose whether or not to have a delivery time displayed at checkout along with the rate.

You have two (2) settings to choose from:
If you selected ‘Do not show delivery time’, skip ahead to Step 6.
3. Select the delivery time type.

You have two (2) settings to choose from:
- Carrier delivery time - delivery times displayed at checkout are estimates provided directly from FedEx Freight as part of the rate calculation. This is the default setting.
- Custom delivery time - delivery times displayed at checkout are based on values entered in the next step.
If you selected 'Carrier delivery time', skip ahead to Step 5.
4. Enter a custom delivery time in days.

- Min delivery time - the lower limit of the delivery time range.
- Max delivery time - the upper limit of the delivery time range.
If you want your custom delivery time displayed as a single number, enter that number in either 'Min' or 'Max while leaving the other field blank. For example, to display delivery time as '3 business days', enter '3' in 'Min' and leave the 'Max' field blank (or vice versa).
If you prefer to display a range of days, enter different numbers in each field. For example, to display delivery time as '3 to 5 business days', enter '3' in 'Min' and enter '5' in 'Max'.
Delivery times are displayed below the shipping method title at checkout.

5. Enter order processing time in days. This is useful when you sell products that cannot be shipped out the same day the order is placed. Order processing time is combined with the carrier’s delivery time or your custom delivery time - whichever was selected in the previous step - and shown as a single estimated time. It is not displayed separately.

For example, if you set a 3-day processing time and FedEx Freight estimates 5-day delivery, Intuitive Shipping will display ‘8 business days’ at checkout.
6. Enter a custom service code, such as ‘GRD’. Custom service codes will override the service codes provided by FedEx Freight. If you want to use the carrier-provided service codes, leave this setting blank.

Packages
You can control how the customer’s order is packaged by choosing a packing algorithm and assigning the packages you want this shipping method to use.
1. Select a packing algorithm.

Your have six (6) options to choose from:
- SmartBoxing - Intuitive Shipping will select the best package combination based on both the weight and the dimensional volume of the order. This is the default setting.
- PortionPack - Intuitive Shipping will select the best package combination based on the portion weight of the order. See below for details.
- Weight-based – Intuitive Shipping will select the best package combination based on the whole weight of the order. See below for details.
- Quantity-based - Intuitive Shipping will select the best package combination based on the number of items in the order.
- Volume-based - Intuitive Shipping will select the best package combination based on the dimensional volume of the order.
- Points-based - Intuitive Shipping will select the best package combination based on a point system. Packing points are arbitrary values assigned to products by you.
For SmartBoxing and volume-based algorithms to work with Shopify, you must assign product dimensions in your Intuitive Shipping product settings.
Learn more about assigning packing points to products.
PortionPack vs. Weight-based
Both PortionPack and weight-based packing algorithms consider the combined weight of the products being ordered. PortionPack allows you to sell items in bulk or 'portions', such as raw meat, whereas weight-based considers the weight as a whole.
Let's say you only use one package for every order and that package has a maximum weight of 25 lbs. If a customer orders 40 lbs worth of product:
- PortionPack - the order will be packed in 2 packages - one with 25 lbs, one with 15 lbs.
- Weight-based - the order will fail at checkout because the only available package cannot hold the entire weight of the order. A package capable of holding up to 40 lbs would be need to be assigned to the shipping method.
Additional Packing Settings
Additional packing settings are available for packing method, multiple package blending and product dimensions.
- Packing method lets you choose if different products in the order are packed together or separately.
- Multiple package blending gives you the option blend shipping costs for different packages when carrier services don't match.
- Product dimensions can be used to limit packing when the packing algorithm doesn't otherwise consider dimensions, such as weight-based.
If you don't need to adjust the packing method, multiple package blending or product dimensions settings, skip ahead to Add Packages.
1. Click Show additional packing settings.

2. Select a packing method.

You have two (2) settings to choose from:
- Pack products together - all of the products in the order will be packed together. Packages will be split based on the selected packing algorithm and the packages assigned to the shipping method. This is the default setting.
- Pack products separately - each unique product in the order will be packed separately based on the selected packing algorithm and the packages assigned to the shipping method.
Any product or variant with a unique Product ID is considered a unique product.
For example, if you select ‘Pack products separately’ and a customer orders 3 black hats, 2 yellow t-shirts, and 1 red hoodie, each product type will be packed in its own set of packages: the hats together, the shirts together, and the hoodie by itself.
Individual products already set to pack separately in product settings will ignore this setting. Learn more about product settings.
3. Choose how multiple packages will be blended when carrier services don’t match.

You have two (2) settings to choose from:
- Flexible blending - an attempt will be made to blend costs based on services. The lowest cost for each package will be blended together if packages do not have matching services. This is the default setting.
- Strict blending - costs will be blended only if all packages have matching services. No costs will be returned if packages do not have matching services.
Sometimes, packages in an order may not qualify for the same carrier service. When that happens, the shipping costs will be blended based on the setting you choose.
For example, if Package 1 only qualifies for Service A and Package 2 only qualifies for Service B, the 'Flexible blending' setting will blend the costs. The Strict setting won’t return a rate at all.
When packages qualify for matching services, this setting is ignored.
This means if a customer orders 3 products - one that qualifies for Freight Priority and two that don’t - the Flexible setting will blend the Priority cost with other available services. The 'Strict blending' setting won’t return any rates at all.
4. Choose how product dimensions interact with the packing algorithm. This is useful if you have products with one or more dimensions that exceed the dimensional limits of certain packages, regardless of the packing algorithm.

You have two (2) settings to choose from:
- Use product dimensions - product dimensions are checked to ensure every product in the order fits in the selected packages, regardless of the selected packing algorithm.
- Ignore product dimensions - individual product dimensions are not considered, and packages are selected strictly based on the selected packing algorithm.
For example, if you’re using a weight-based algorithm and have selected ‘Use product dimensions’, you might have:
-
A package measuring 12 x 10 x 8 inches that holds up to 20 lbs.
-
A package measuring 15 x 10 x 10 inches that holds up to 25 lbs.
If a customer orders an 18-lb product that measures 6 x 14 x 3 inches, the second package will be selected. That’s because the product’s width (14 inches) exceeds any of the first package’s dimensions, even though the weight is within the limit. This setting is ideal when your products have rigid dimensions that can’t be altered.
If you use the same example but choose ‘Ignore product dimensions’, the first package will be selected instead. That’s because only the product’s weight is considered, and 18 lbs is under the package limit. This option works well for flexible or malleable products that can be bent, folded, or adjusted to fit the box.
SmartBoxing always requires dimensions and will ignore this setting.
Add Packages
All packages saved in the Package Management system are listed in this section of the shipping method. You can select any or all packages from the list. If needed, you can also add new packages directly from here. Any package you add will automatically be saved to your central package settings, making it available for other shipping methods that use packages.
Learn more about adding packages to the package management system.
The following steps will show you how to add a package directly from the shipping method.
If all the packages you need are listed and you don't need to add more, skip ahead to Select Packages.
1. Click Add package.

2. Enter a package title, like ‘Box 1’ or ‘Large Envelope’.

Package titles are not visible to customers.
3. Select a package type.

You have two (2) settings to choose from:
- Box - fixed length, width and height dimensions.
- Soft package - fixed length and width dimensions; adjustable height dimension.
4. Enter the outer length, width, and height dimensions. Carrier services use these dimensions when calculating the shipping cost.

If you selected Soft package in the previous step, the height dimension refers to maximum height. Intuitive Shipping automatically adjusts height based on the actual size of the products being packaged. Learn more about soft packages.
Additional Settings
Additional settings are available for inner dimensions, maximum weight, empty weight, and package cost:
-
Inner dimensions are used with the SmartBoxing algorithm to improve packing accuracy. Use these if there’s a noticeable difference between the inner and outer dimensions or if extra packing material takes up space.
-
Maximum weight lets you set a weight limit for each package. This helps prevent overloading the package or exceeding the carrier’s weight limit.
-
Empty weight accounts for the package’s own weight, which can impact the total weight used to calculate carrier rates.
-
Package cost is added to the total shipping cost, helping you recover the cost of your packaging materials.
If you don't need to add additional package information, skip ahead to Select Packages.
1. Click Show additional settings.

2. Enter the inner length, width, and height dimensions. When using the SmartBoxing packing algorithm, these values improve packing accuracy if there’s a noticeable difference between the inner and outer dimensions or if extra packing material takes up space.

When inner dimensions are excluded, SmartBoxing will use the outer dimensions to determine the most efficient packaging set. Learn more about SmartBoxing.
3. Enter the maximum weight the package can hold. Intuitive Shipping will make sure the total product weight in a single package doesn’t exceed this limit. This setting is helpful if your package has a physical weight restriction or if you’re concerned about going over the carrier’s weight limit. Be sure to check with the carrier for any package weight restrictions.

4. Enter the empty weight of the package. Intuitive Shipping adds this to the total weight of the products. Use this setting if the package’s weight is significant enough to affect the carrier’s rate calculation. If a maximum weight is set in the previous step, Intuitive Shipping automatically subtracts the empty weight from the package’s maximum weight during the packaging process.

Weight units, such as pounds (lbs) and kilograms (kg) are configured in General Settings. Learn more about updating your General settings.5. Enter the package cost. Intuitive Shipping adds it to the total shipping cost - it does not appear as a separate line item. This setting is useful for recovering packaging costs through your shipping charges.

Currency is managed by your eCommerce platform. Learn more about updating currency settings.
6. Click Save. The new package will appear as a selectable option within this shipping method and will also be saved to the Package Management system for use in other shipping methods that use packages.

Select Packages
All packages you’ve added to Intuitive Shipping, including those added in the previous section, are listed in the shipping method. Only those with a checkmark next to them will be used by the packing algorithm during carrier rate calculations.
1. To make all of your packages available, select ‘Custom Packages’. This acts as a select all option.

2. If you don’t want to use all packages, select only the ones you need. For longer lists, use the search bar or scroll to find specific packages.

Packages that aren't selected will be ignored by the packing algorithm during carrier rate calculations.

Packages that have been turned off in the Package Management system will appear muted and show a ‘Package not available’ message. These packages are ignored by the packing algorithm during carrier rate calculations, even if their checkbox is selected.

Learn how to change the On/Off status of a package in the Package management system.
Shipping Origin
Freight rates can be calculated using the primary location set up in your eCommerce platform or a custom location saved in Intuitive Shipping. This is useful if you ship products from different retail or warehouse locations.
1. Select the ship from location for the shipping method.

You have two options to choose from:
-
Dynamic origin location - Carrier rates will be calculated based on the distance between your customer’s address and your primary eCommerce platform address. This is the default setting.
-
Specify origin location - Carrier rates will be calculated using the address you enter in the next step.
If you selected 'Dynamic origin location', skip ahead to Account.
The shipping origin address must match your account billing address. Otherwise, rate calculation errors will occur. This is a FedEx Freight LTL requirement.
Add And Select A Custom Origin Location
All locations saved in the Location Management system are listed in this section of the shipping method. If needed, you can also add new shipping origin locations directly from here. Any location you add will automatically be saved to your central location settings, making it available for other shipping methods that use locations.
Learn more about adding locations to the location management system.
The following steps will show you how to add a ship from location directly from the shipping method.
If the location you need is listed and you don't need to add a new one, skip ahead to Account.
1. Click Add location.

2. Enter a location title, such as ‘Warehouse 2’.

Location titles are not visible to customers.
3. Enter the location address. A complete address is not required, meaning you don’t have to fill in every field to save the location.

FedEx Freight LTL may require a complete address to accurately calculate live rates.
4. Click the Save button. The new location will appear as a selectable option within this shipping method and will also be saved to the Location Management system for use in other shipping methods.

5. Select a location. This location will be used as the starting point for carrier rate calculations in this shipping method.

Intuitive Shipping cannot see inventory and doesn’t use inventory-based rules. Locations are used to improve the accuracy of carrier calculations when shipping from multiple warehouse locations.
The shipping origin address must match your account billing address. Otherwise, rate calculation errors will occur. This is a FedEx Freight LTL requirement.
Account
If your FedEx Freight LTL OAth account is already connected to Intuitive Shipping, it will appear under ‘Carrier accounts’ as a selectable option. If it doesn't appear, you'll have to add it.

You will be unable to save the shipping method unless a valid FedEx Freight LTL OAuth account is available and selected.
Add A Carrier Account
FedEx Freight LTL accounts saved in the Carrier Accounts Management system are listed in this section of the shipping method. Only FedEx Freight accounts are listed. If needed, you can also add a new account directly from here. Any FedEx Freight account you add will automatically be saved to your central carrier settings, making it available for other shipping methods that use the same carrier.
Learn more about connecting carrier accounts..
The following steps will show you how to add a FedEx Freight LTL account directly from the shipping method.
If the account you need is listed and you don't need to add a new one, skip ahead to Services.
1. Click Add carrier account.

2. Enter a carrier account title like 'FedEx Freight OAuth'.
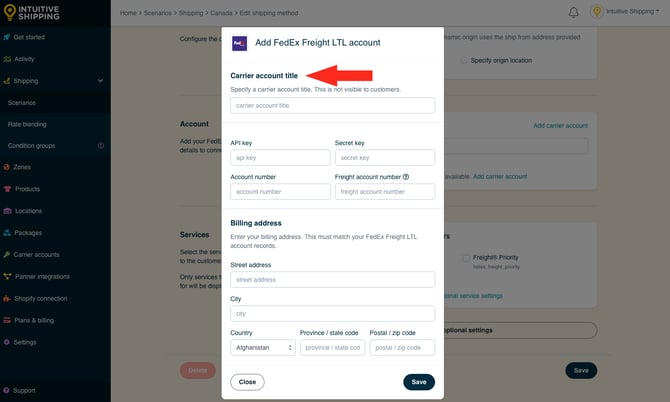
Carrier account titles are not visible to customers.
3. Enter your FedEx Freight LTL OAuth account credentials.
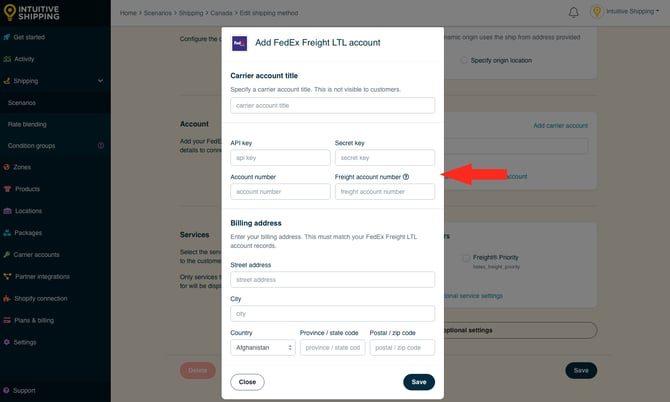
4. Enter your billing address.
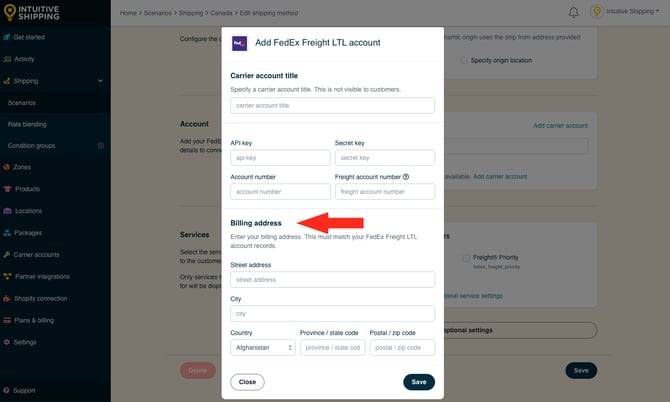
The billing address must match your shipping origin address. Otherwise, rate calculation errors will occur. This is a FedEx Freight LTL requirement.
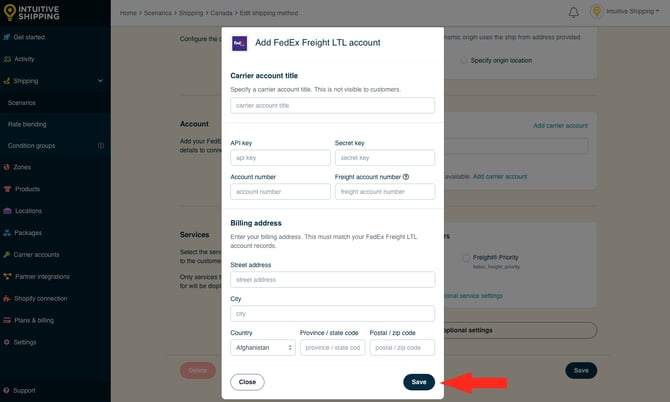
5. Click the Save button. The new FedEx Freight LTL account will appear as a selectable option within this shipping method and will also be saved to the Carrier Account Management system for use in other shipping methods.
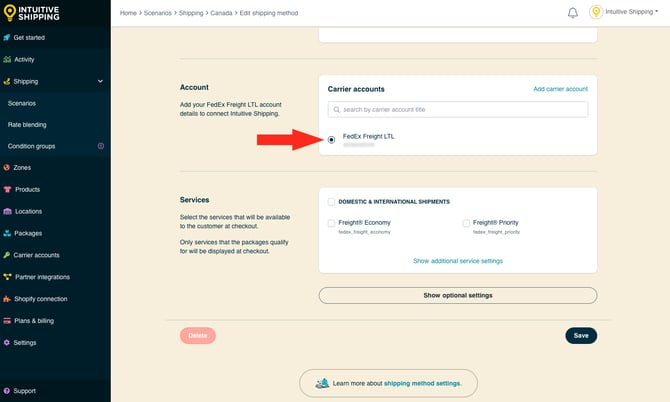
5. Select a carrier account.
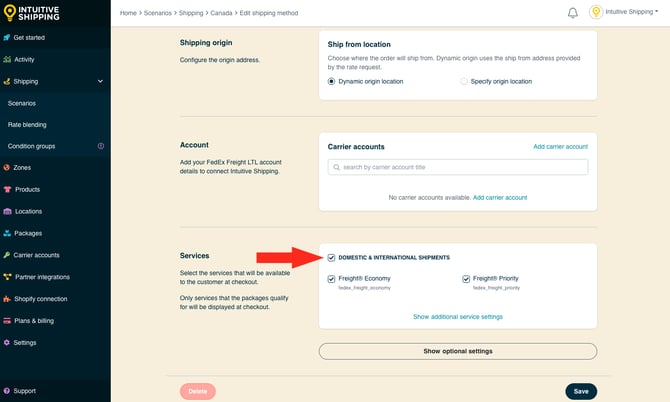
Services
FedEx Freight LTL offers two delivery services for domestic and international shipping.
1. To offer both services, select 'Domestic & International Shipments'. Both services within that region will be selected automatically.
2. If you don’t want to offer both services, select one or the other. Rate calculations will only be provided for the selected service.
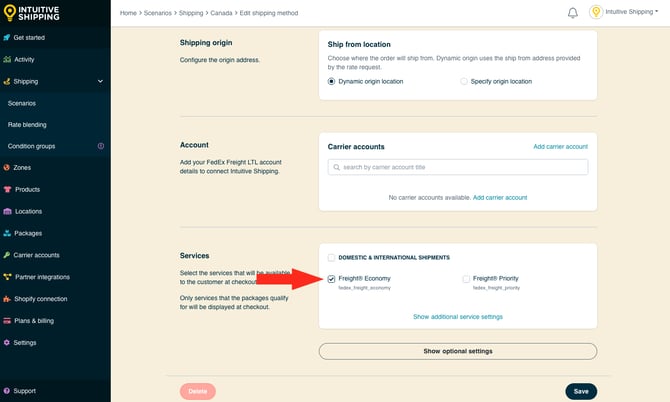
Selected services must be available in the customer’s location to be displayed at checkout.
For example, if both services are selected and a customer lives at an address where 'Freight Priority' is not offered by FedEx Freight LTL, they will only see 'Freight Economy'. If only 'Priority' is selected, no rates will be displayed at checkout.
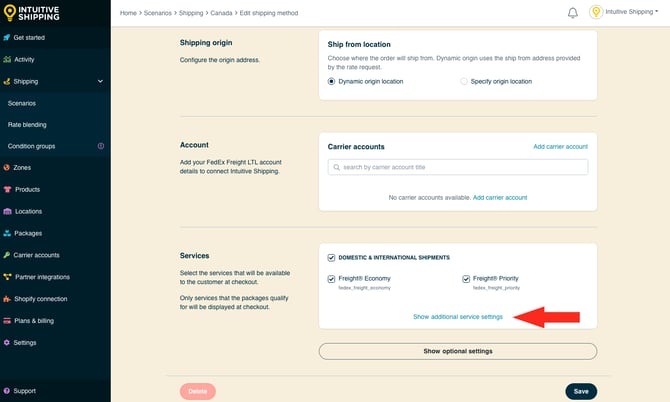
Additional Service Settings
Additional settings are available to filter services. By default, each service you selected in the previous section is displayed at checkout if it's available in the customer's postal code or ZIP code. You can use this setting to limit which services are offered based on their cost or estimated delivery time.
If you don't want to filter the services offered to customers at checkout, skip ahead to Optional Settings.
1. Click Show additional service settings.
2. Choose how services should be filtered.
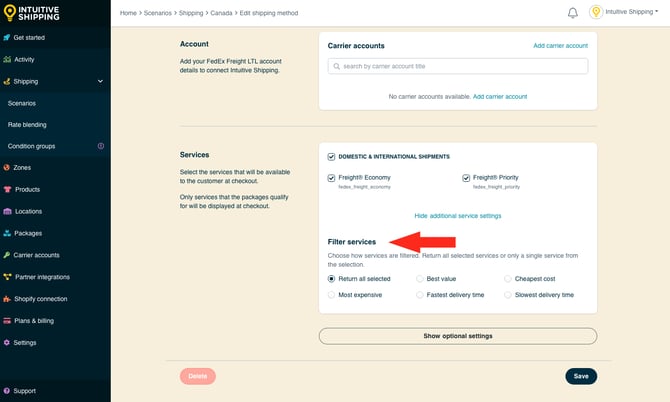
You have six (6) options to choose from:
- Return all selected - all available services selected in the previous section will be displayed to the customer at checkout.
- Best value - only the available service with the best overall value from those selected in the previous section will be displayed to the customer at checkout.
- Cheapest cost - only the available service with the lowest cost from those selected in the previous section will be displayed to the customer at checkout.
- Most expensive - only the available service with the highest cost from those selected in the previous section will be displayed to the customer at checkout.
- Fastest delivery time - only the available service with the fasted estimated delivery time from those selected in the previous section will be displayed to the customer at checkout.
- Slowest delivery time - only the available service with the slowest estimated delivery time from those selected in the previous section will be displayed to the customer at checkout.
The 'Best value' filter considers both cost and delivery time to determine the overall value.
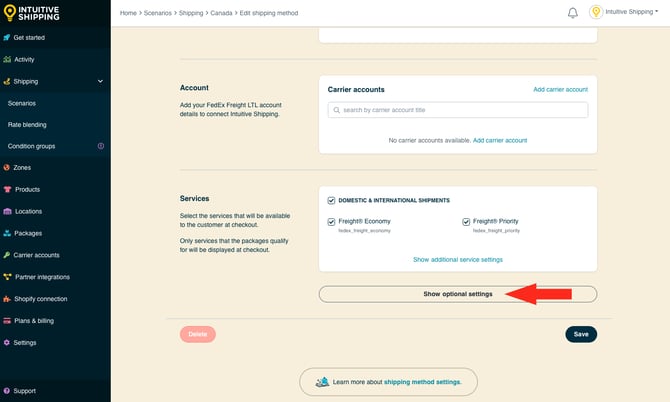
Optional Settings
Optional settings for carrier settings, fallback rating, cost adjustments, free shipping, custom shipping blending, and rate blending give you more control over how carrier rates appear at checkout. These settings are not required to complete your shipping method setup.
-
Carrier settings offer additional options like address type (residential or commercial) and package insurance, helping you match the settings used during fulfillment.
-
Carrier service fallback rating ensures a rate is shown at checkout if the carrier request times out.
-
Cost adjustments let you modify the final shipping cost shown to the customer, regardless of the original carrier rate.
-
Free shipping allows you to set a threshold where shipping becomes free for orders that would otherwise be charged.
-
Custom shipping blending gives you the ability to blend this method’s rates with product-specific shipping costs.
-
Rate blending lets you combine this shipping method’s rates with others using either simple or advanced blending options.
1. Click Show optional settings.
Carrier Settings
You can configure additional settings to match your fulfillment setup, ensuring the rates shown at checkout more accurately reflect the rates used during fulfillment.
1. Select a destination address type.
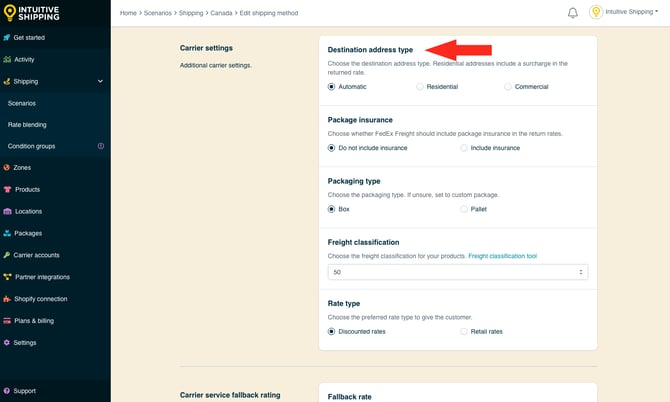
You have three (3) settings to choose from:
-
Automatic - FedEx Freight LTL will determine the address type during rate calculation.This is the default setting.
-
Residential - Rates will always be calculated based on addresses being residential.
- Commercial - Rates will always be calculated based on addresses being residential.
Rates for residential addresses are usually higher than commercial ones. If you consistently ship to one type, you can set your rates to always calculate using that address type. If you’re unsure which type your customers use or you ship to a mix of residential and commercial locations, we recommend choosing ‘Automatic’.
2. Choose whether or not to include package insurance. Your selection should align with the option you select during fulfillment.
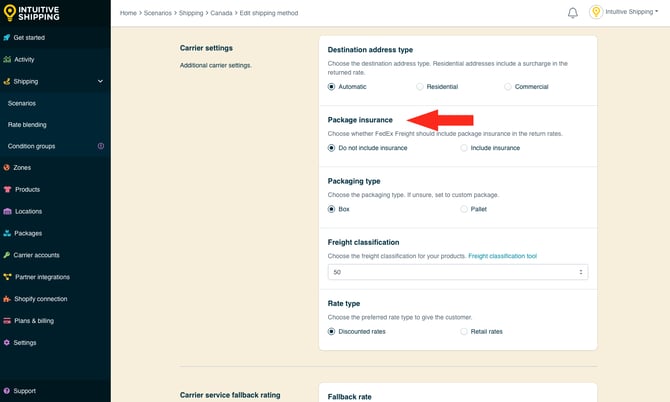
You have two (2) settings to choose from:
- Do not include insurance - rates will be calculated without package insurance.
- Include insurance - rates will be calculated with package insurance.
3. Select the packaging type. Your selection should align with the option you select during fulfillment.
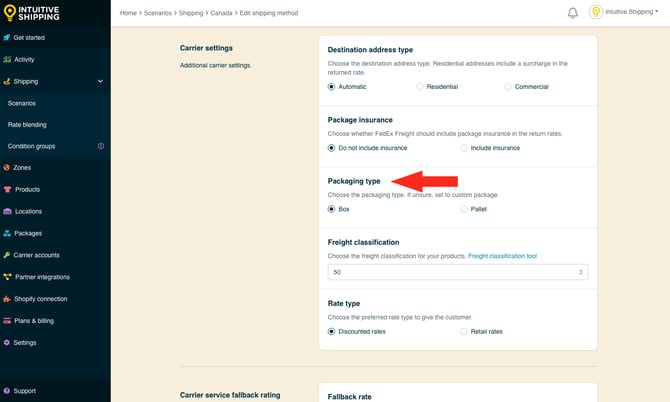
You have two (2) settings to choose from:
- Box - rates will be calculate based on goods being packed in boxes.
- Pallet - Rates will be calculated based on goods being shipped on pallets.
This setting helps FedEx determine which logistic network to use. Boxes typically go through the Ground or Express network, with your LTL contract or negotiated rates in effect. Pallets are routed through the Freight network and use freight class, pallet dimensions and weight to calculate shipping rates.
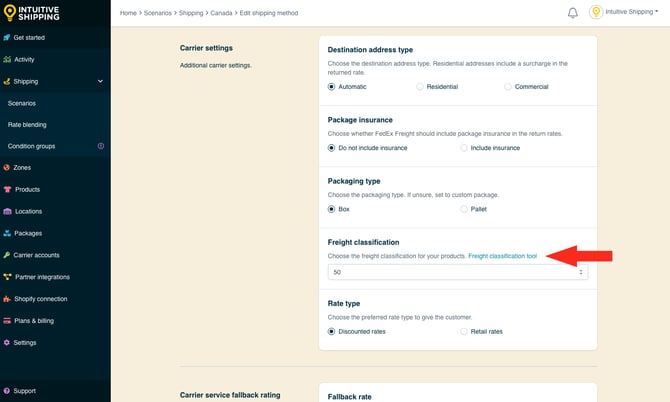
4. Select a freight classification from the list. Your selection should align with the option you select during fulfillment.
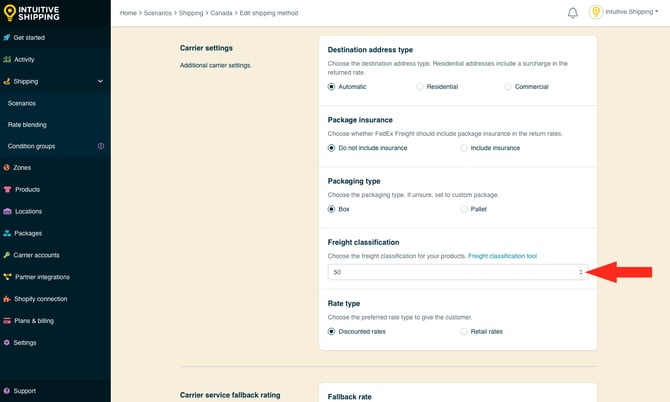
If you’re not sure which classification to select, click on Freight classification tool. This will open a new browser tab and take you to the LTL freight classification tool page on the FedEx website.
5. Select a rate type.

You have two (2) settings to choose from:
- Discounted rates - rates from the shipping method will be calculated using your discounted or negotiated rates. This is the default setting.
- Retail rates - rates from the shipping method will be calculated using FedEx Freight LTL standard retail rates.
Carrier Service Fallback Rate
Intuitive Shipping gives you the option to display a fallback rate at checkout if the carrier service times out. This can be helpful during carrier outages or high-traffic periods like Black Friday.
Fallback rates are only used when the system doesn’t receive a response from the carrier within the timeout window.
The timeout limit is how long Intuitive Shipping has to send carrier-provided rates to your checkout page within your eCommerce platform’s established time limit.
1. Choose whether or not to enable a fallback rate.

You have two (2) settings to choose from:
- Do not use a fallback rate - if the carrier service does not return a rate within the timeout limit, rates from the shipping method will not be displayed at checkout. This is the default setting.
- Define a fallback rate - if the carrier service does not return a rate within the timeout limit, the fallback rate entered in Step 2 will be displayed at checkout, along with any fallback rate display settings entered in the steps immediately following.
 Fallback rates will not be displayed if there are rate calculation errors, such as missing dimensions or weights, unauthenticated account credentials, invalid shipping addresses, or if the carrier fails to return rates for any reason.
2. Enter a fallback shipping cost.

Fallback Rate Optional Display Settings
Optional settings are available for fallback rate titles, descriptions, delivery times and service codes can override the shipping method's general display settings when the fallback rate is activated and displayed at checkout.
1. Click Show optional display settings.

2. Enter a fallback rate title. When a fallback rate is enabled, the title entered here will override the title entered in General if the fallback rate is activated.


4. Enter a fallback rate delivery time. When a fallback rate is enabled, the delivery time entered here will override the delivery time entered in General if the fallback rate is activated.

5. Enter a fallback rate service code, such as 'FALLBACK'. The service code is pushed to your fulfillment service (if applicable) when a customer successfully completes their checkout. When a fallback rate is enabled, the service code entered here will override the service code entered in General if the fallback rate is activated.

Cost Adjustments
Customize how shipping costs appear at checkout by adjusting the final carrier rate calculation. Adjustments are applied in the order listed in the app.
1. Click Add adjustment.

2. Enter a title for the first cost adjustment, such as 'Markup', 'Discount' or 'Handling Fee'.

3. Select a method for the first cost adjustment.

You have ten (10) settings to choose from:
- add flat amount - shipping costs returned by the carrier will increase by the amount entered in Step 4. For example, if the carrier returns a cost of $28.50 and the flat amount in Step 4 is $3.00, the adjusted cost will be $31.50.
- 28.50 + 3.00 = 31.50
- add % of shipping cost - shipping costs returned by the carrier will increase by the percentage entered in Step 4, which is determined by the shipping cost. For example, if the carrier returns a cost of $28.50 and the percentage in Step 4 is 5%, the adjusted cost will be $29.93.
- 28.50 x 5% = 1.43
- 28.50 + 1.43 = 29.93
- add % of cart value - shipping costs returned by the carrier will increase by the percentage entered in Step 4, which is determined by the cart value. For example, if the cart value is $150.00, the carrier returns a cost of $28.50 and the percentage in Step 4 is 10%, the adjusted cost will be $43.50.
- 150.00 x 10% = 15.00
- 28.50 + 15.00 = 43.50
- subtract flat amount - shipping costs returned by the carrier will decrease by the amount entered in Step 4. For example, if the carrier returns a cost of $28.50 and the flat amount in Step 4 is $3.00, the adjusted cost will be $25.50.
- 28.50 - 3.00 = 25.50
- subtract % of shipping cost - shipping costs returned by the carrier will decrease by the percentage entered in Step 4, which is determined by the shipping cost. For example, if the carrier returns a cost of $28.50 and the percentage in Step 4 is 5%, the adjusted cost will be $27.07
- 28.50 x 5% = 1.43
- 28.50 - 1.43 = 27.07
- subtract % of cart value - shipping costs returned by the carrier will decrease by the percentage entered in Step 4, which is determined by the cart value. For example, if the cart value is $150.00, the carrier returns a cost of $28.50 and the percentage in Step 4 is 10%, the adjusted cost will be $13.50.
- 150.00 x 10% = 15.00
- 28.50 - 15.00 = 13.50
- multiply by - shipping costs returned by the carrier will be multiplied by the value entered in Step 4. For example, if the carrier returns a cost of $28.50 and value in Step 4 is '1.5', the adjusted cost will be $42.75.
- 28.50 x 1.5 = 42.75
- divide by - shipping costs returned by the carrier will be divided by the value entered in Step 4. For example, if the carrier returns a cost of $28.50 and value in Step 4 is '2', the adjusted cost will be $14.25.
- 28.50 ÷ 2 = 14.25
- set minimum cost - shipping costs returned by the carrier will be adjusted up to the value entered in Step 4 if the returned cost is lower. For example, if the carrier returns a cost of $8.95 and the minimum cost is $10.00, the adjusted cost will be $10.00.
- set maximum cost - shipping costs returned by the carrier will be adjusted down to the value entered in Step 4 if the returned cost is higher. For example, if the carrier returns a cost of $118.95 and the maximum cost is $100.00, the adjusted cost will be $100.00.
4. Enter a value for the first cost adjustment as a whole number or decimal. The value type (currency or percentage) will be based on the adjustment method selected in Step 3.

Currency and '%' symbols are not required and will result in errors when saving the shipping method.
Additional Cost Adjustments
You can add multiple cost adjustments by clicking 'Add adjustment' again. Adjustments are applied in the order they appear in the list.
For example, let’s say you have the following adjustments:
-
Markup - ‘add % of shipping cost’ - 5%
-
Handling - ‘add % of cart value’ - 2%
-
Promo Discount - ‘divide by’ - 2
-
Minimum Cost - ‘set minimum cost’ - 18.00

If the cart value is $150.00 and the carrier returns a rate of $28.50, here’s how the adjustments would be applied:
-
Markup:
28.50 × 5% = 1.43
28.50 + 1.43 = 29.93
-
Handling:
150.00 × 2% = 3.00
29.93 + 3.00 = 32.93
-
Promo Discount:
32.93 ÷ 2 = 16.47
-
Minimum Cost:
16.47 is below the $18.00 minimum, so the final cost is set to $18.00
If the adjusted cost after the discount had been higher - say, $21.75 - the 'Minimum Cost' adjustment would be skipped.
Adjusted costs cannot be a negative number. If the final adjusted cost results in a negative amount, the cost will be adjusted to 0.00 (zero).
If the shipping cost returned by the carrier is $8.95, the final cost would be adjusted to $0.00 because the true adjusted value (-$1.05) cannot be displayed at checkout.
Costs adjustments can be rearranged by dragging and dropping them in your preferred order of operations. To move a cost adjustment, hover over the up/down arrow to the left of the adjustment row, then click and drag to move it up or down the list.

Click the trash can symbol to the right of the adjustment row to remove a cost adjustment.

Rounding
Rounding can be applied to the final shipping cost, whether or not other cost adjustments are used. For example, if the carrier returns a rate of $28.50 and no other adjustments are applied, the amount can still be rounded up or down.
1. Select a rounding setting.

You have two (2) settings to choose from:
- Do not apply rounding - the final shipping cost, after any other cost adjustments, will be displayed exactly as calculated. This is the default setting.
- Round final shipping cost – the final shipping cost, after any other cost adjustments, will be rounded up or down, depending on the settings selected in the following two steps.
If you are not applying rounding, skip ahead to Free Shipping threshold.
2. Choose the rounding direction.

You have three (3) settings to choose from:
- Up/down - the final shipping cost will be rounded up or down to the nearest increment selected in the next step, whichever is closer.
- Up - the final shipping cost will always be rounded up to nearest the increment selected in the next step.
- Down - the final shipping cost will always be rounded down to the nearest increment selected in the next step.
3. Choose the increment amount to round the shipping cost.

You have four (4) settings to choose from:
- 0.50 - the final shipping cost will be rounded up or down to the nearest 0.50 of your base currency. If the final shipping cost is $18.80, the cost will be rounded down to $18.50 or up to $19.00, depending on the setting selected in the previous step.
- 1.00 - the final shipping cost will be rounded up or down to the nearest 1.00 of your base currency. If the final shipping cost is $23.20, the cost will be rounded down to $23.00 or up to $24.00, depending on the setting selected in the previous step.
- 5.00 - the final shipping cost will be rounded up or down to the nearest 5.00 of your base currency. If the final shipping cost is $33.00, the cost will be rounded down to $30.00 or up to $35.00, depending on the setting selected in the previous step.
- 10.00 - the final shipping cost will be rounded up or down to the nearest 10.00 of your base currency. If the final shipping cost is $22.38, the cost will be rounded down to $20.00 or up to $30.00, depending on the setting selected in the previous step.
Free Shipping
You can offer free shipping to customers whose orders exceed certain minimum or maximum thresholds.
If you don't want a free shipping threshold, skip ahead to Custom Shipping Blending.
1. Select Set a free shipping threshold.

2. Select a free shipping threshold type.

You have three (3) settings to choose from:
- Total - free shipping will activate based on the combined value of items in the cart.
- Quantity - free shipping will activate based on the combined number of items in the cart.
- Weight - free shipping will activate based on the combined weight of items in the cart.
3. Select the free shipping threshold logic.

You have six (6) settings to choose from:
-
Greater than - free shipping will activate when the combined cart value is more than the value entered in the next step.
-
Greater than or equals - free shipping will activate when the combined cart value is more than or the same as the value entered in the next step.
-
Less than - free shipping will activate when the combined cart value is lower than the value entered in the next step.
-
Less than or equals - free shipping will activate when the combined cart value is lower than or the same as the value entered in the next step.
-
Equals - free shipping will activate when the combined cart value is exactly the same as the value entered in the next step.
-
Does not equal - free shipping will activate when the combined cart value is anything except the value entered in the next step.
4. Enter the free shipping threshold value. Free shipping will activate when the cart value exceeds the value entered here, based on the settings in the previous two steps.

The unit of measure for the threshold value is based on the free shipping threshold type selected.
Optional Free Shipping Display Settings
Optional free shipping display settings are available for a title, description, delivery time and service code. When the free shipping threshold is met, these values will override the shipping method's general display settings.
If unique display settings aren't required when free shipping is activated, skip ahead to Custom Shipping Blending.
1. Click Show optional display settings.

2. Enter a free shipping title. When a free shipping threshold is enabled, the title entered here will override the title entered in General if free shipping is activated.

3. Enter a free shipping description. When a free shipping threshold is enabled, the description entered here will override the description entered in General if free shipping is activated.

4. Enter a free shipping delivery time. When a free shipping threshold is enabled, the delivery time entered here will override the delivery time entered in General if free shipping is activated.

5. Enter a free shipping service code, like 'FREE'. The service code is pushed to your fulfillment service (if applicable) when a customer successfully completes their checkout. When a free shipping threshold is enabled, the service code entered here will override the service code entered in General if free shipping is activated.

Custom Shipping Blending
If you have products with custom shipping costs, Intuitive Shipping can blend those product-specific rates with the rates calculated by the shipping method.
Learn how to set up custom shipping costs in product shipping settings.
For example, if a customer’s cart includes a product with a $100.00 custom shipping cost - meaning it always costs $100.00 to ship that product - and the shipping method calculates $25.00 to ship the other items in the cart, the customer will be charged a total of $125.00 at checkout.
If blending doesn’t suit your setup, you can choose to display either the custom shipping costs or the rates from this shipping method instead - whichever works best for your needs.
If you don’t have products with custom shipping costs, these settings are ignored regardless of how they’re set. Skip ahead to Rate Blending.
1. Select a custom shipping blending option.

You have two (2) settings to choose from:
-
Do not blend - custom shipping costs are ignored by the shipping method. This is useful if you want custom shipping costs to apply only when customers order those specific products, while using the shipping method’s rates when other items are included in the order.
-
Blend custom shipping costs - custom shipping costs are combined with the rates calculated by the shipping method based on the blending mode settings (next step). This is the default setting.
For example, if a product has a $100.00 custom shipping cost and 'Do not blend' is selected, the customer will be charged only the $100.00 if they order that product alone. If they add other products without custom shipping costs, they’ll be charged only the rate from the shipping method, and the $100.00 cost will be ignored.
If you selected 'Do not blend', skip ahead to Rate Blending.
If 'Blend custom shipping costs' is selected, the customer will be charged only the $100.00 if they order that product alone. If they add other products without custom shipping costs, they'll be charged $100.00 for the custom shipping cost plus the shipping rate calculated by the method. This applies if Blending mode (next step) is set to 'Add'.
2. If you're blending custom shipping costs, select a blending mode.

You have two (2) settings to choose from:
- Add to final shipping cost - custom shipping costs are added to the rate calculated by the shipping method. This is the default setting.
- Replace shipping cost - custom shipping costs replace the rate calculated by the shipping method.
Let’s say a customer orders a product with a $100.00 custom shipping cost along with other products that don’t have custom charges.
If 'Add to final shipping cost' is selected, the customer will be charged $100.00 plus the shipping rate calculated by the shipping method.
If 'Replace shipping cost' is selected, the customer will only be charged $100.00 to ship the entire order; the shipping method’s rate will be ignored.
Additional Custom Shipping Blending Settings
Additional custom shipping blending settings are available for a filtering, mark ups and discounts.
- Filtering lets you decide if you want products with custom shipping costs included in or excluded from the rate calculation.
- Mark ups give you the option to increase the amount of the custom shipping costs before they're blended with the shipping method.
- Discounts give you the option to reduce the amount of custom shipping costs before they're blended with the the shipping method.
If you don’t need to filter or apply cost adjustments to products with custom shipping costs, skip ahead to Rate Blending.
1. Click Show additional custom shipping blend settings.

2. Select a filter products option.

You have two (2) settings to choose from:
- Include in shipping calculation - products with custom shipping costs will be included in the rate calculation. For SmartBoxing™, PortionPack™, weight-based or volume-based packing algorithms, the product weight or dimensions will be included in the rate calculation.
- Exclude from shipping calculation - products with custom shipping costs will be excluded from the rate calculation. For SmartBoxing™, PortionPack™, weight-based or volume-based packing algorithms, the product weight or dimensions will be ignored by the rate calculation. This is the default setting.
For example, if you’re using a weight-based packing algorithm, you can choose whether or not the weight of products with custom shipping costs counts toward the dimensional weight calculated by the carrier.
This setting does not affect custom shipping blending settings. It simply determines if products with custom shipping costs factor into the total weight or dimensional volume used to calculate the shipping cost.
3. Add a mark up to the custom shipping costs.

You have two (2) settings to choose from:
- Flat - the amount entered enter here will be added to the combined custom shipping costs when those products are included in the order. The adjusted total will be blended with the shipping method, based on the Blending mode you selected above.
- Percentage - the percentage entered enter here will be applied to, then added to the combined custom shipping costs when those products are included in the order. The adjusted total will be blended with the shipping method, based on the Blending mode you selected above.
For example, let's say a customer orders various products, including two products that have custom shipping costs of $50.00 and $30.00 respectively.
If the amount entered in 'Flat' is $10.00, the combined custom shipping cost becomes $90.00.
- $50.00 + $30.00 = $80.00 (the combined custom shipping costs)
- $80.00 + $10.00 = $90.00 (the combined custom costs plus the flat mark-up)
The total custom shipping cost of $90.00 will be blended with the rate calculated by the shipping method. If that rate is $42.50, the customer will be charged $132.50 for shipping at checkout.
If the amount entered in 'Percentage' is 10%, the combined custom shipping cost becomes $88.00.
- $50.00 + $30.00 = $80.00 (the combined custom shipping costs)
- $8.00 (10% of the combined custom costs)
- $80.00 + $8.00 = $88.00 (the combined custom costs plus the % mark-up)
The total custom shipping cost of $88.00 is blended with the rate calculated by the shipping method. If that rate is $42.50, the customer will charged $130.50 for shipping at checkout.
Both a flat amount and percentage amount can be applied to the same shipping method. The flat amount is added first, followed by the percentage amount.
Let's say the flat amount is $10.00 and the percentage is 5%, here's how the adjustment works:
- $50.00 + $30.00 = $80.00 (the combined custom shipping costs)
- $80.00 + $10.00 = $90.00 (the combined custom costs plus the flat mark-up)
- $4.50 (5% of $90.00)
- $90.00 + $4.50 = $94.50 (the adjusted combined custom cost plus the % mark-up)
The total custom shipping cost of $94.50 will be blended with the rate calculated by the shipping method. If the calculated rate is $42.50, the customer will be charged $137.00 for shipping at checkout
4. Add a discount to the custom shipping costs.

You have two (2) settings to choose from:
- Flat - the amount entered enter here will be subtracted from the combined custom shipping costs when those products are included in the order. The adjusted total will be blended with the shipping method, based on the Blending mode you selected above.
- Percentage - the percentage entered enter here will be applied to, then subtracted from the combined custom shipping costs when those products are included in the order. The adjusted total will be blended with the shipping method, based on the Blending mode you selected above.
Using a similar example to the one used for 'mark up', let's say a customer orders various products, including two products that have custom shipping costs of $50.00 and $30.00 respectively.
If the amount entered in 'Flat' is $10.00, the combined custom shipping cost becomes $70.00.
- $50.00 + $30.00 = $80.00 (the combined custom shipping costs)
- $80.00 - $10.00 = $70.00 (the combined custom costs less the flat discount)
The total custom shipping cost of $70.00 will be blended with the rate calculated by the shipping method. If that rate is $42.50, the customer will be charged $112.50 for shipping at checkout.
If the amount entered in 'Percentage' is 10%, the combined custom shipping cost becomes $88.00.
- $50.00 + $30.00 = $80.00 (the combined custom shipping costs)
- $8.00 (10% of the combined custom costs)
- $80.00 - $8.00 = $72.00 (the combined custom costs less the % discount)
The total custom shipping cost of $72.00 is blended with the rate calculated by the shipping method. If that rate is $42.50, the customer will charged $114.50 for shipping at checkout.
Both a flat amount and percentage amount can be applied to the same shipping method. The flat amount is subtracted first, followed by the percentage amount.
Let's say the flat amount is $10.00 and the percentage is 5%, here's how the adjustment works:
- $50.00 + $30.00 = $80.00 (the combined custom shipping costs)
- $80.00 - $10.00 = $70.00 (the combined custom costs less the flat discount)
- $3.50 (5% of $70.00)
- $70.00 - $3.50 = $66.50 (the adjusted combined custom cost less the % mark-up)
The total custom shipping cost of $66.50 will be blended with the rate calculated by the shipping method. If the calculated rate is $42.50, the customer will be charged $109.00 for shipping at checkout
Rate Blending
Rates from different shipping methods can be blended together - whether they’re part of the same Scenario or come from separate ones. This can be achieved by:
- Selecting simple blending or advanced blending in General Settings.
- Enabling the rate blending setting (described in this section) in at least two shipping methods.
- Setting up blending rules.
Learn more about blending rules and how to create them.
Let's say you have multiple product-based shipping rates. One product type uses a custom $10.00 flat rate and another gets live rates from a carrier. When the live rate calculates $27.50, rate blending can combine it with the flat rate so the customer is charged $37.50 when both product types are in the same order.
You can also use rate blending to:
- add optional shipping upsells or fees, like 'white glove delivery'.
- offer expedited service options, like 'Priority' and 'Economy', even when rates are coming from multiple carriers or services.
If you don't need blending rules, leave rate blending set to the default ‘Do not blend’, and skip ahead to Save Your Settings.
1. Select Blend with other rates.

Simple Blending vs. Advanced Blending
By default, Intuitive Shipping is set to simple rate blending. If you apply the 'Blend with other rates' setting in the previous step to more than one shipping method, those rates - when activated at checkout - will be blended together according to your simple blending settings.
Advanced rate blending gives you greater control, allows for customization, and lets you create multiple blending rules using blending group tags.
If you're not sure which blending method your account is currently using, check the statement below the rate blending settings:
- 'Your account is currently setup to use simple rate blending.'

- 'Your account is currently setup to use advanced rate blending.'

To switch between simple and advanced rate blending, click on 'Account settings'. Changes will be applied after you save your shipping method.
1. Select a blending mode. If the carrier returns rates for multiple services - such as 'Priority', '2-day' and 'Ground', this setting lets your choose which of those services will be blended with other shipping methods.

You have three (3) settings to choose from:
- Best value - the rate with the best overall value will be blended with rates from other shipping methods.This is the default setting.
- Cheapest cost - the rate with the lowest cost will be blended with rates from other shipping methods.
- Fastest delivery time - the rate with the fastest estimated delivery time will be blended with rates from other shipping methods.
Best value considers both cost and delivery time to determine overall value.
2. If you're using advanced blending, enter a Blending group tag. All shipping methods with the same blending group tag, regardless of the type of shipping method, will be blended together based on the rate blending rules.

Blending group tags can only be assigned when advanced rate blending is enabled in General Settings. Tags are not case sensitive and can be a letter or word. We recommend something simple, like the letter 'A'.
Blending group tags cannot contain spaces or special characters.
Save Your Settings
1. Click the Save button to save your freight service shipping method.

What's Next:
Optional:
- Create a custom service shipping method (custom rates, free shipping)
- Create a parcel service shipping method (carrier-based rates)
- Create an integrated service shipping method (subscription-based rates)
- Create a blended rate
- Create a condition group
- Add a location
- Update product settings
- Update general settings
Can we lend a hand? Let us help you get up and running faster and with greater confidence. Book a complimentary Onboarding session!