
Contents:
If rates aren't being calculated or displayed by Intuitive Shipping, here are some things you can do to troubleshoot.
Check For Errors
Rates might not be calculated or displayed if there’s an error. Common causes include oversized or overweight packages, missing product weights or dimensions, invalid addresses, or unavailable carrier services based on the cart.
To check for errors, go to the Activity page and look for entries under ‘Warnings & Errors’.
1. Click Activity on the sidebar menu.
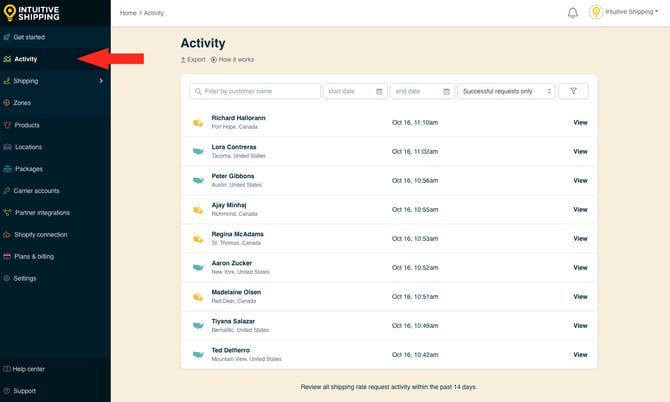
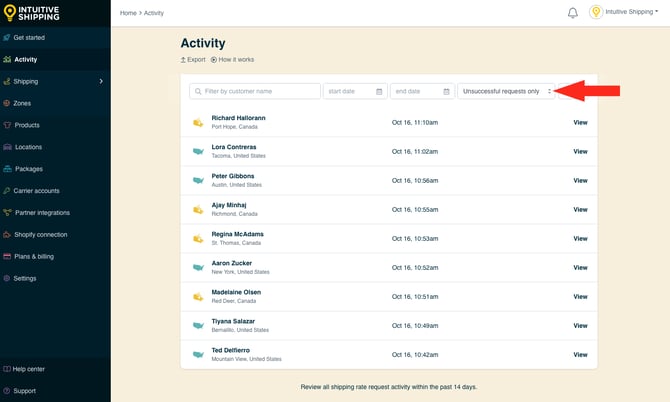
2. Select Unsuccessful requests only from the ‘requests’ filter. This will update the list and display all Activities that did not return a rate.
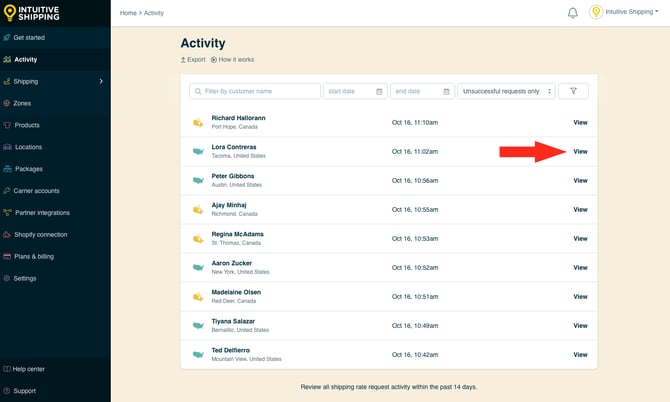
4. In the Details section of the activity, click View log beside ‘Warnings & errors’.
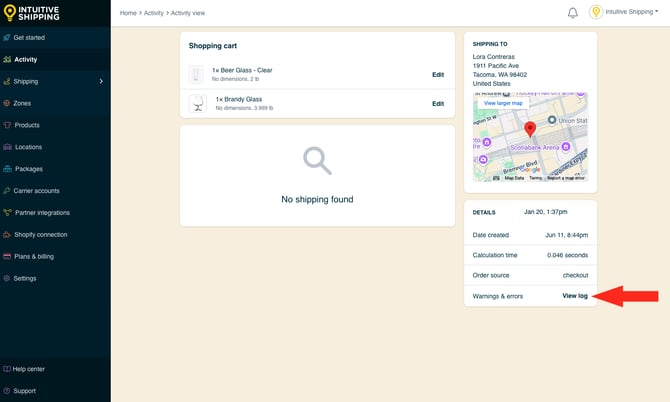
5. Review the errors, if any, which may indicate why rates were not displayed at checkout.
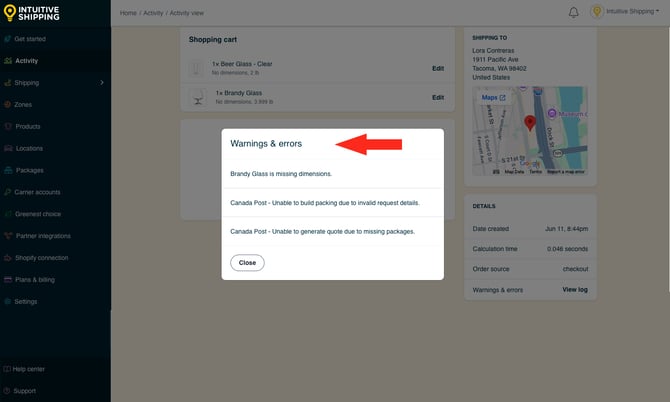
If there are no error messages, continue to the next section.
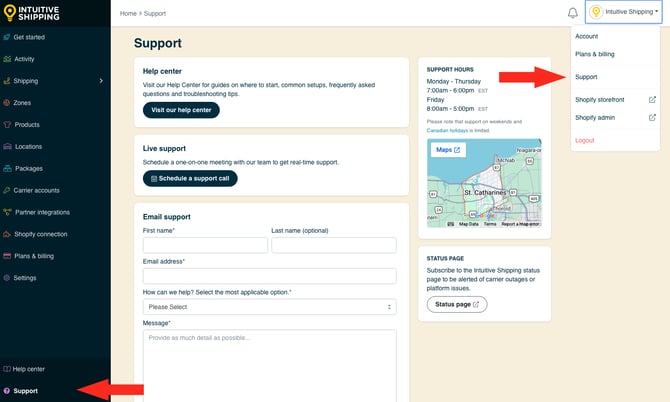
If you’re seeing an error and aren’t sure what it means, contact us or submit a tech support request from the ‘Support’ page in the app. If you have an active billing plan, you can also book a live support appointment.
To access the Support page:
6. Click Support at the bottom of the sidebar menu, or click your store name in the top-right corner of the app, then select 'Support' from the drop-down menu.
Check For Missing Product Dimensions & Weight
Shipping methods that use dimensional volume packing algorithms, such as SmartBoxing, require product dimensions. If any product in the cart is missing dimensions, the rate calculation will fail. If you're using Shopify, product dimensions can be configured using metafields. In BigCommerce, product dimensions can be added to your product settings. If you don't have dimensions in BigCommerce or you're not using metafields for dimensions with Shopify, you'll need to add dimensions directly to Intuitive Shipping.

Learn more about using metafields for product dimensions with Shopify.
The same goes for weight-based methods, including real-time carrier rates. If weight isn’t set in your eCommerce platform, be sure to add it to Intuitive Shipping.
To avoid errors, make sure all products have both dimensions and weight entered where needed.
Learn how to add physical attributes to Intuitive Shipping.
Default Product Settings
If you regularly add products but don’t always have time to enter dimensions and weights, use Default Product Settings. This feature lets you apply fallback dimensions, weights, and other details to avoid errors caused by missing info.
Learn more about default product settings here.
Check Status Settings
Intuitive Shipping gives you control over visibility at every level. Use status settings to manage whether your entire setup, individual Scenarios, shipping methods, or other features are active or hidden.
General Settings Status
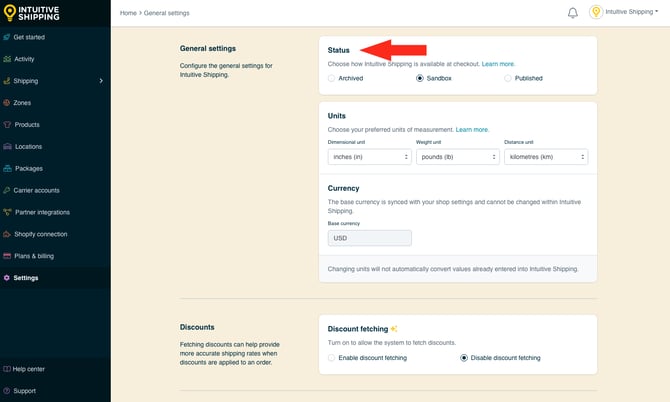
After activating a billing plan, you can control the app’s status:
-
Published (default when active): Intuitive Shipping rates are active and shown at checkout.
-
Sandbox (default before activating): Rates only appear when ‘Intuitive’ is used as the customer’s first or last name at checkout.
-
Archived: No rates from Intuitive Shipping are shown, even with test credentials. A yellow banner will appear on certain pages, like the Activity page, to indicate the app is off.
Changing the general status to ‘Off’ does not disable billing. It simply prevents rates from Intuitive Shipping from being displayed at checkout.
- Click the Settings button on the yellow banner to change the status to 'Test' or 'On', as needed.
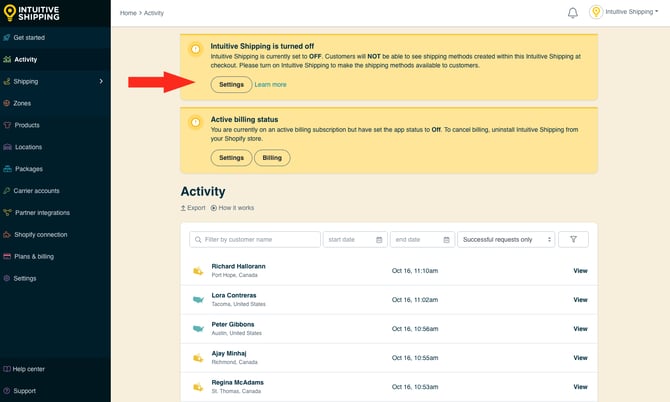
Learn more about updating General Settings.
Scenario Status
While the General Settings status controls the visibility of Intuitive Shipping across your entire store, each Scenario also has its own status setting. When a Scenario is set to 'Off', its rates will not appear at checkout, even with test credentials. Unlike the General Settings status, there is no warning banner for a disabled Scenario, since it only affects that specific setup.
1. Click Shipping on the sidebar menu, then select Scenarios from the drop-down list.
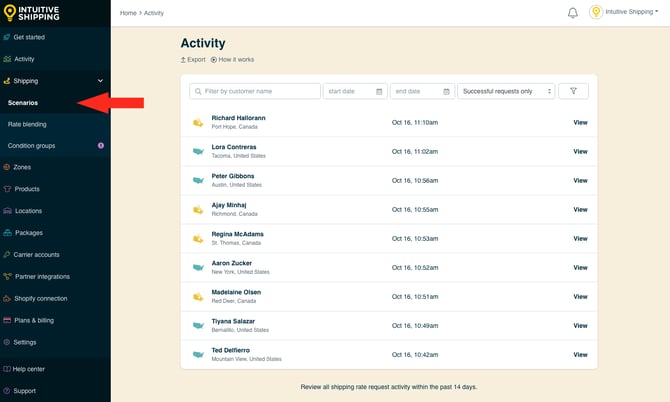
2. Check to see if any of your Scenarios are set to 'Archived'. The status is displayed below the Scenario title along with a colour indicator. 'Archived' is grey.
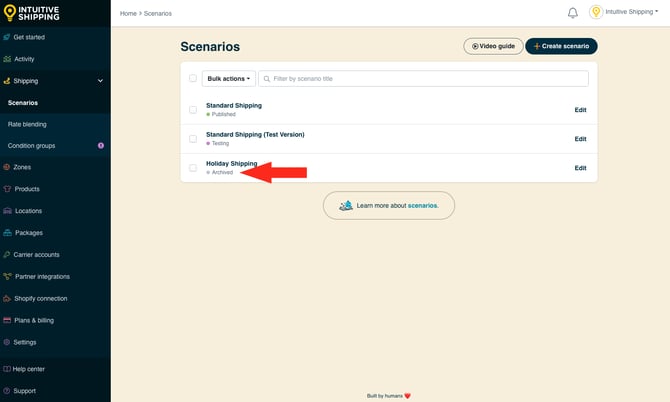
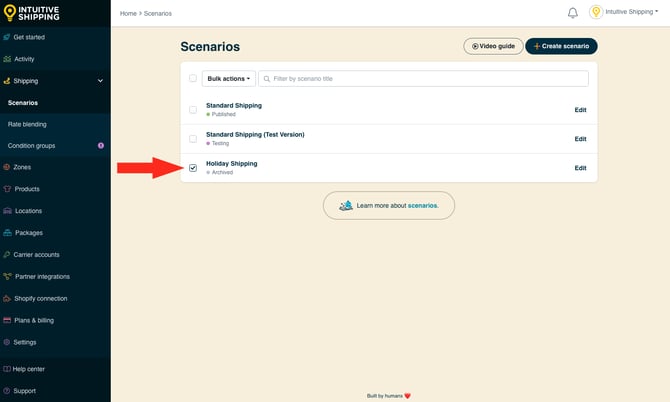
3. If a Scenario that should be published is set to 'Archived', select the checkbox next to it.
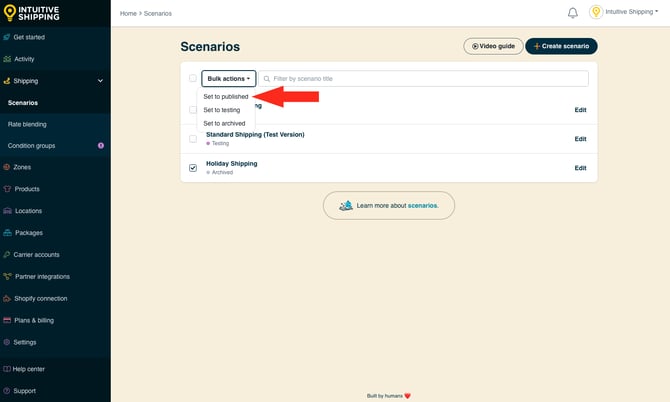
4. Click the Bulk Updates button, then select 'Set to published' from the drop-down list.
Shipping Method Status
Shipping method status works just like the Scenario status but only controls a specific method within the Scenario. If a Scenario includes multiple methods, any set to ‘Archived’ won’t appear at checkout, even if the Scenario is published (live).
1. Click Shipping on the sidebar menu, then select Scenarios from the drop-down list.
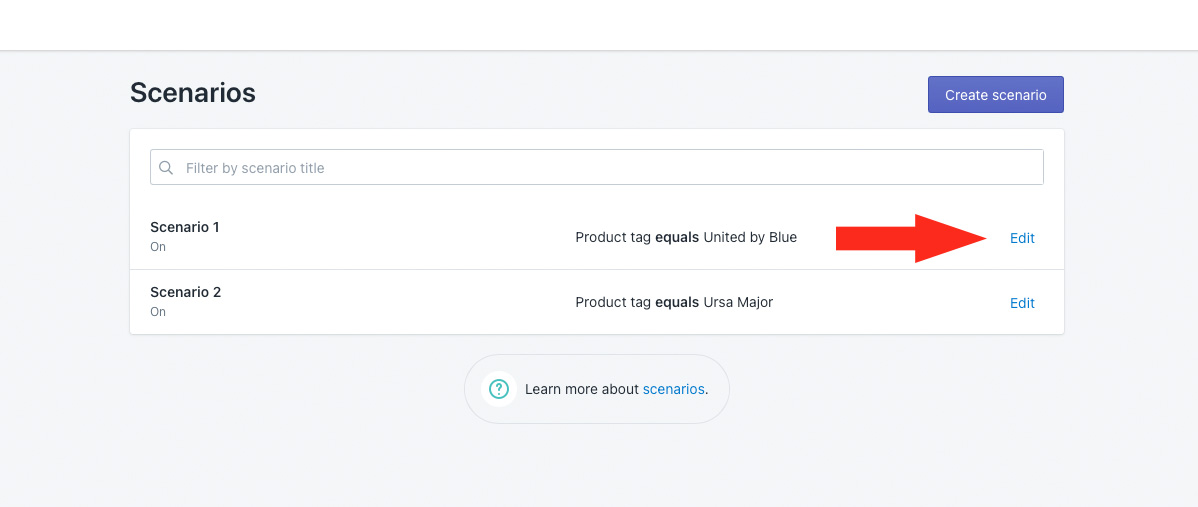
2. Click Edit beside a Scenario that may contain a shipping method that has been turned off.
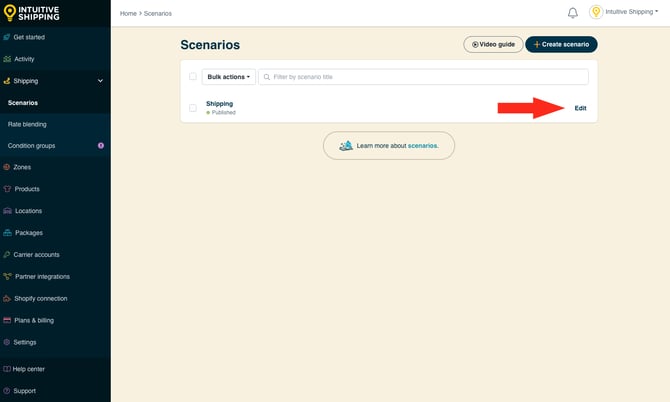
3. Scroll down to the shipping methods section, then check to see if any of your shipping methods are set to 'Archived'. The status is displayed below the shipping method title and a red indicator is displayed next to it.
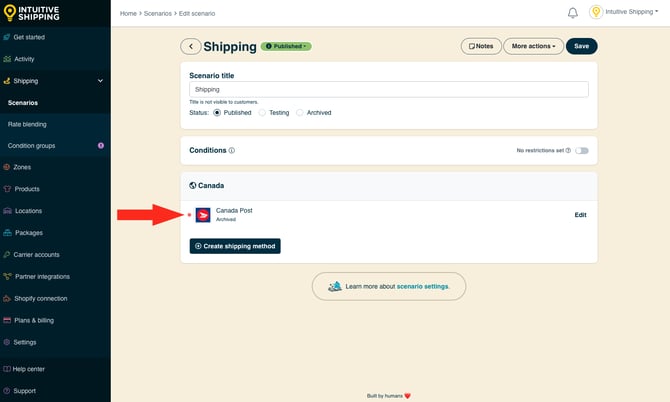
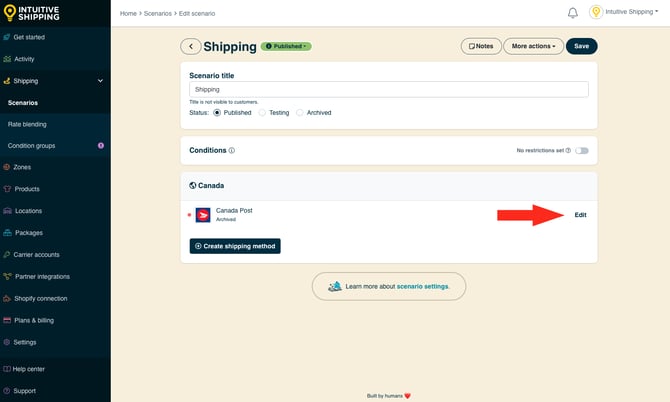
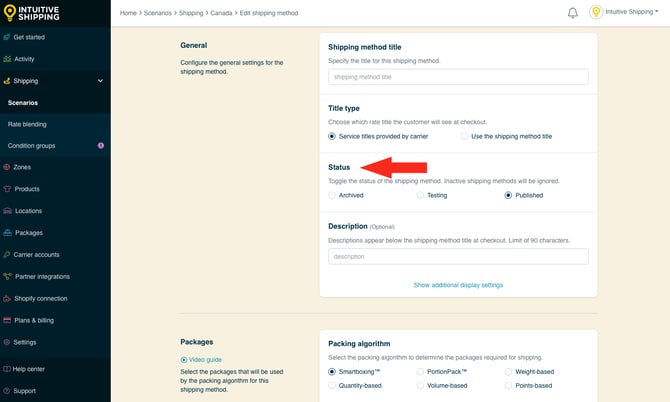
5. After saving changes to your shipping method status, repeat Steps 1 to 4 for any other shipping methods set to 'Archived'.
Zone Status
Zone status works like shipping method status but applies to a single zone. If a Scenario has multiple zones, any set to ‘Off’ will prevent shipping methods assigned to that zone from appearing at checkout, even if the Scenario and method statuses are set to ‘On’ or ‘Test’.
1. Click Zones on the sidebar menu.
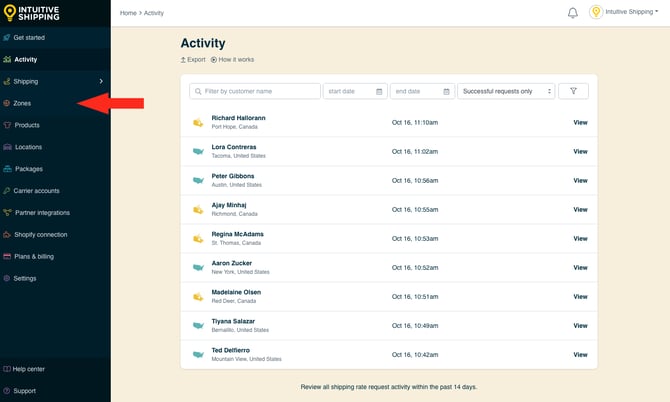
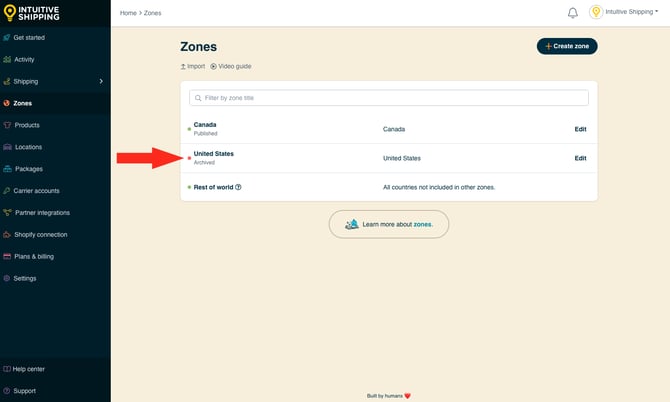
2. Check to see if any of your zones are set to 'Archived'. The status is displayed below the zone's name and a red indicator is displayed next to it.
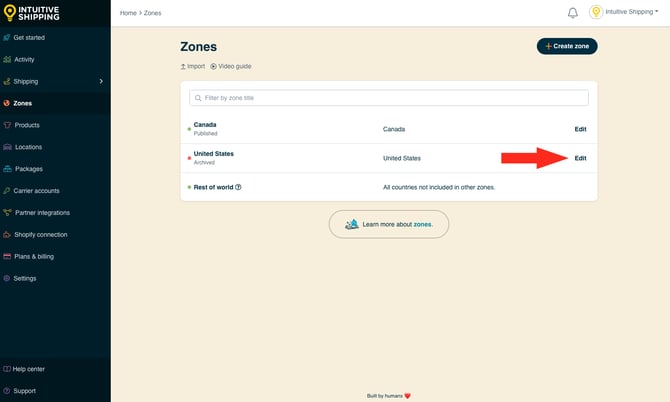
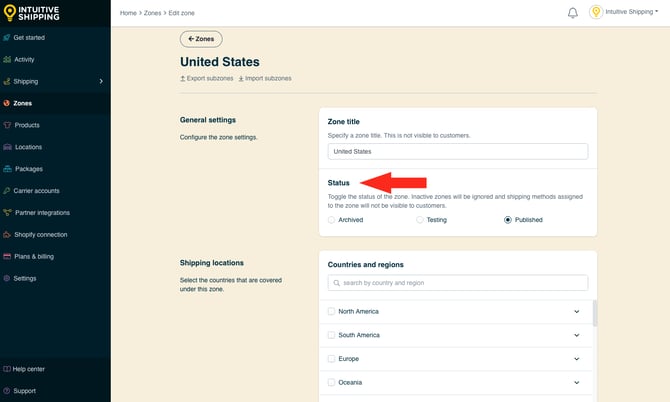
3. If a zone is set to 'Archived', click Edit beside the zone, then update the status by setting it to 'Published'.
Check Shopify Settings
Shopify automatically adds Intuitive Shipping as a carrier service to your General Profile when the app is installed. If it’s been removed, you’ll need to re-add Intuitive Shipping through your Shopify Settings.
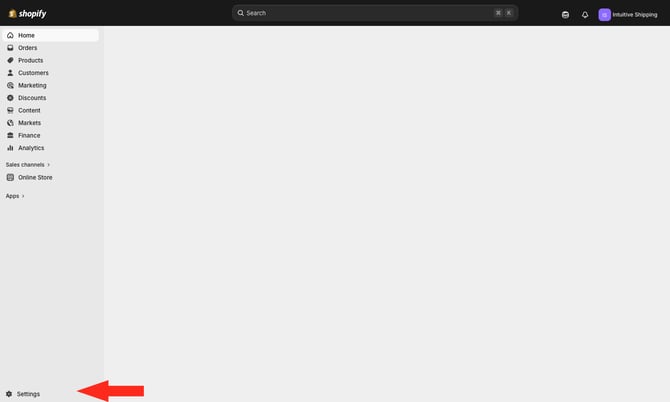
1. Click Settings at the bottom of the Shopify admin sidebar.
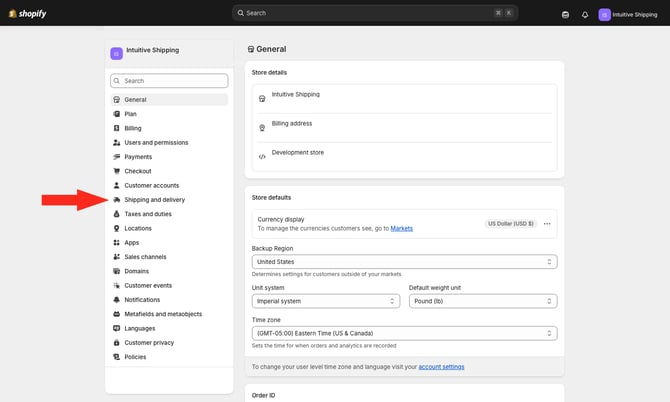
2. Click Shipping and delivery.
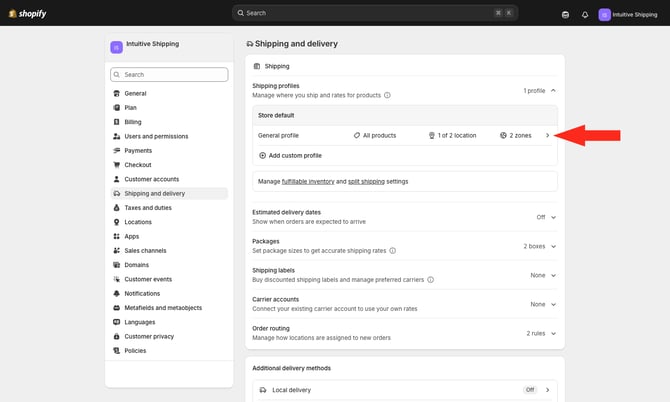
3. In the Shipping section, click the side-facing arrow next to 'General profile'.
4. Confirm that all of your Shopify shipping zones have Intuitive Shipping listed as a rate provider.
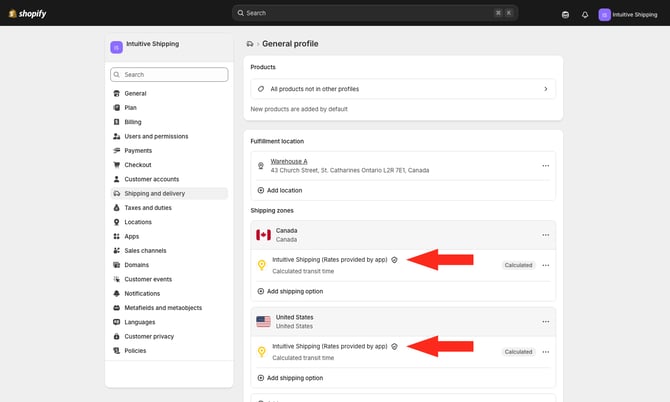
If all of your Shopify shipping zones include Intuitive Shipping as a rate provider, skip ahead to Future Services.
If any zones are missing Intuitive Shipping as a rate provider:
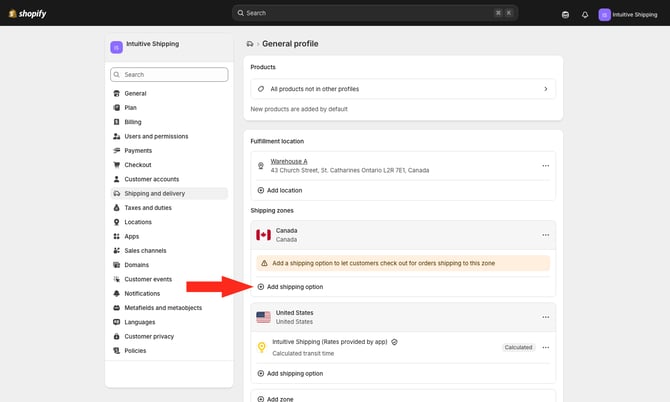
5. Click Add shipping option below any zone that does not have Intuitive Shipping listed as a rates provider.
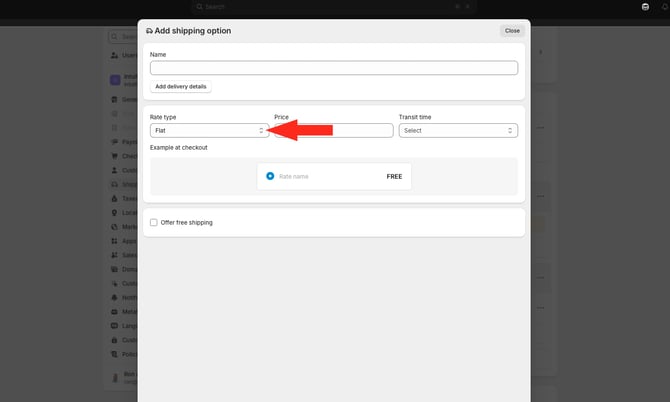
6. Click on Rate type.
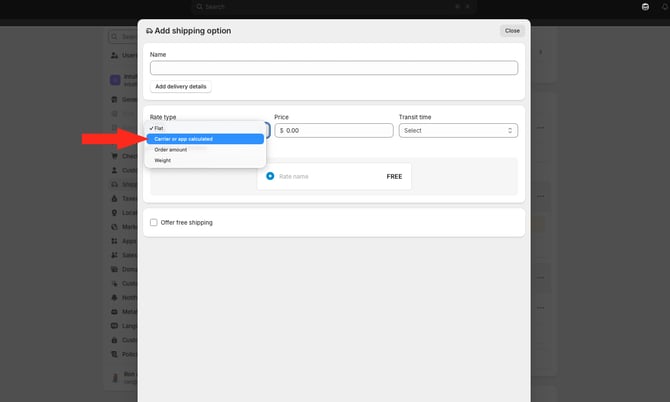
7. Select Carrier or app calculated, then select 'Intuitive Shipping (Rates provided by app)' from the drop-down menu below.
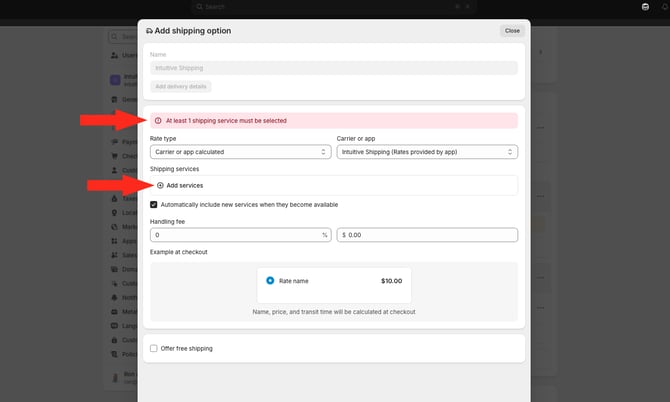
8. Make sure that the Future services box is checked. This is required in order to ensure rates from Intuitive Shipping calculate properly.
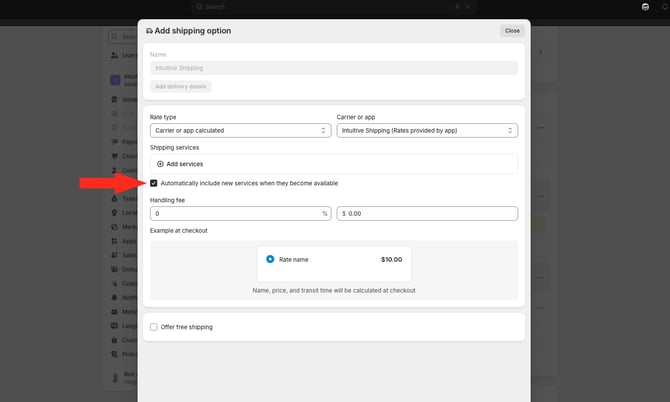
If this box isn’t checked, Intuitive Shipping will still calculate rates and they’ll appear on the Activity page, but your customers won’t see them at checkout.
9. If prompted, select existing services by clicking ‘Add services’. These don’t affect how rates are calculated in the app, but if they’re unchecked, rates won’t be shown at checkout.
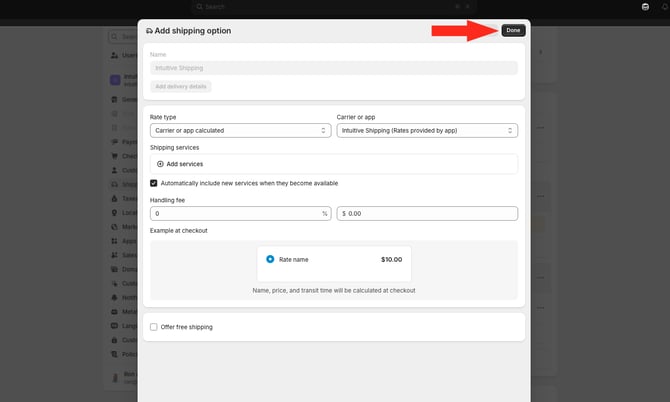
10. Click the Done button to save your changes.
12. Click the Save button on the Shopify menu bar at the top of the screen to save your Shopify shipping zone settings.
Future Services
Intuitive Shipping requires Shopify's Future Services to be available. This allows the app to calculate rates any time you update shipping methods.
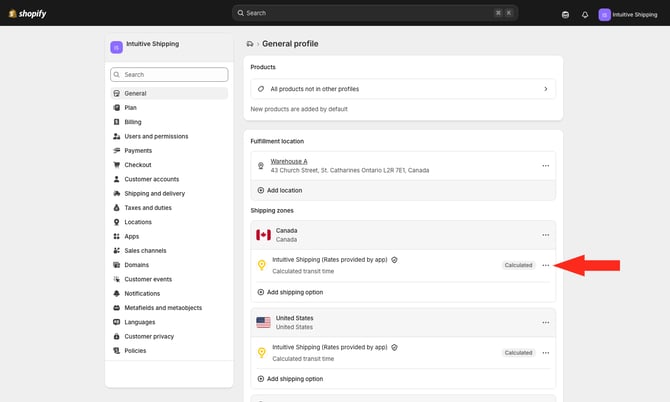
1. Click the ellipsis (three dots) beside ‘Intuitive Shipping (Rates provided by app)’.
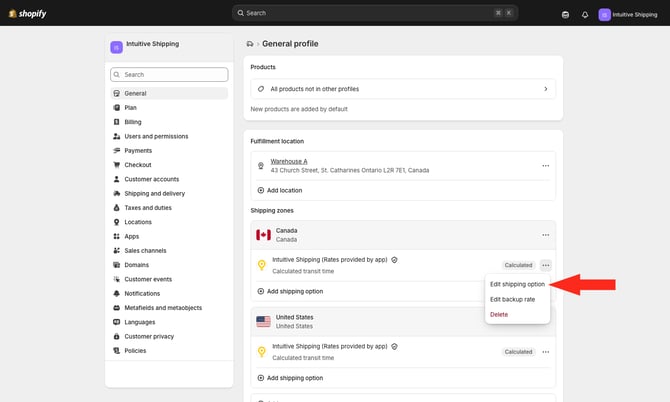
2. Click Edit shipping option on the drop-down list.
3. Make sure that the Future services box is checked. This is required in order to ensure rates from Intuitive Shipping calculate properly.
If this box isn’t checked, Intuitive Shipping will still calculate rates and they’ll appear on the Activity page, but your customers won’t see them at checkout.
4. If prompted, select existing services by clicking ‘Add services’. These don’t affect how rates are calculated in the app, but if they’re unchecked, rates won’t be shown at checkout.
5. Click the Done button to save any changes made to your ‘Services’ settings.
6. Repeat the Steps 1 to 5 for any other zones to ensure ‘Future Services’ is selected in each one.
7. If you made changes, click the Save button on the Shopify menu bar at the top of the screen to save your Shopify shipping zone settings.
Enable Shopify Third-party Carrier-calculated Shipping
Shopify requires the third-party carrier-calculated shipping feature to be enabled on your store in order to use any external shipping app, including Intuitive Shipping. This applies even if you are not using live rates from a carrier like FedEx or UPS. If the feature is not enabled, a red warning banner will appear on the Activity page.
1. Click Activity on the sidebar menu.
2. Check to see if the red warning banner for 'Third-Party carrier calculated rates feature required' is displayed at the top of the page.
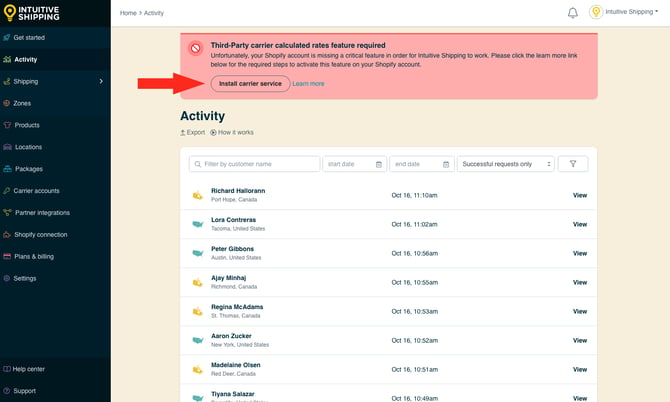
3. If the banner is displayed, click the Install carrier service button. You will need to enable the feature in order for Intuitive Shipping to calculate shipping at checkout, even in Sandbox mode.
The third-party carrier-calculated shipping feature is not required to complete your setup. However, it is required for testing rate calculations after setup, and for displaying rates to customers.
Check Carrier-calculated Shipping Setting In Shopify
In some cases, the red banner may not appear even if the carrier-calculated shipping feature is not enabled. This can happen if the feature was previously active but was accidentally disabled.
To confirm the status of carrier-calculated shipping:
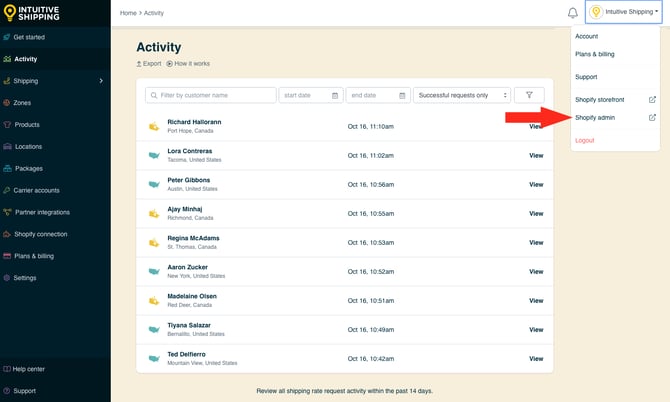
1. Click on your store name at the far right of the app header, then select Shopify admin from the drop-down list. This will open your Shopify admin page in a new browser tab.
3. Click Shipping and delivery.
4. Scroll down to 'Carrier accounts'. If you're prompted to 'Use your own rates...', it means the feature is already enabled. If you're prompted to 'Enable third-party calculated rates' - or something similar - and have the option to upgrade your plan, it means the feature is not enabled on your Shopify account.down to the Carrier accounts section. If you are prompted to Connect account, the feature is enabled.
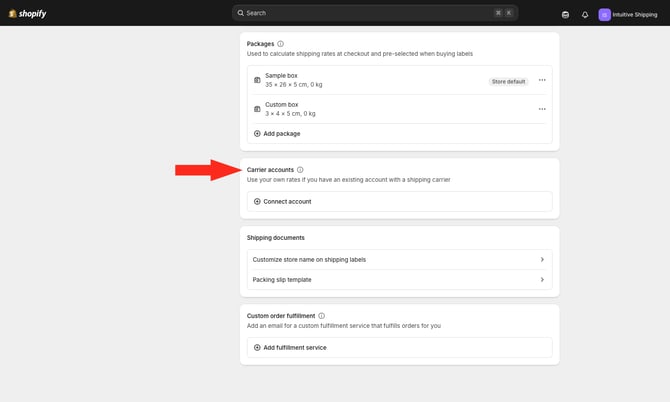
Enabling third-party carrier-calculated shipping at checkout is required by Shopify when using any third-party rate calculator, including Intuitive Shipping, even if you are not connecting to live carrier rates such as FedEx or UPS.
- Starter, Lite, or Basic plans - As of January 1, 2023, third-party carrier-calculated shipping is no longer available as a paid add-on. To use Intuitive Shipping or any third-party rate calculator, you must upgrade to a supported Shopify plan. If you had this feature enabled before January 1, 2023, you were grandfathered and can continue using Intuitive Shipping. However, if you upgrade your plan and later downgrade, you may lose this grandfathered status and third-party rates will no longer appear at checkout.
- Grow plan (formerly 'Shopify' plan) - Third-party carrier-calculated shipping costs $20 USD per month. If you switch to Shopify's annual billing system, Shopify includes this feature at no additional cost and applies a 10% discount to your Shopify subscription. Switching to annual billing does not enable the feature automatically. You must still contact Shopify to have it activated.
- Advanced and Plus plans - Third-party carrier-calculated shipping is included and enabled by default. No additional action is required.
Check BigCommerce Settings
BigCommerce automatically adds Intuitive Shipping as a carrier service to your General Profile when the app is installed. If it’s been removed, you’ll need to re-add Intuitive Shipping through your Shopify Settings.
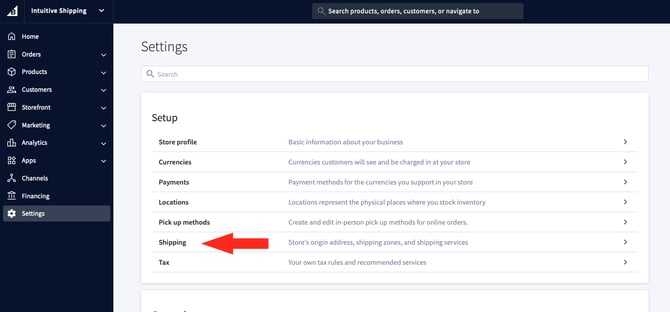
1. Click Settings at the bottom of the BigCommerce admin sidebar.
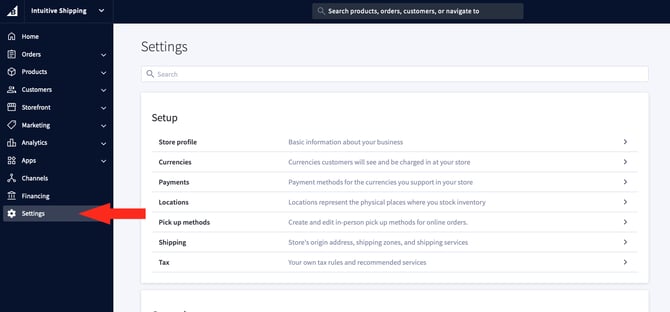
2. Click Shipping on the 'Setup' menu.
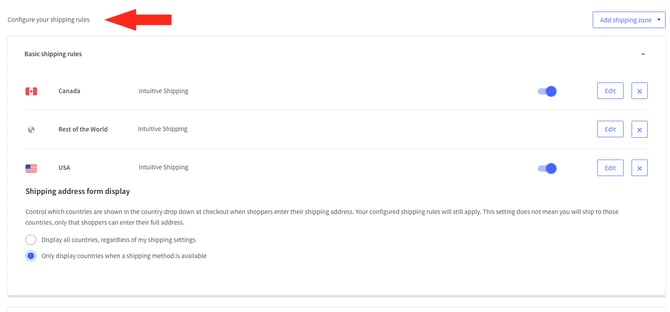
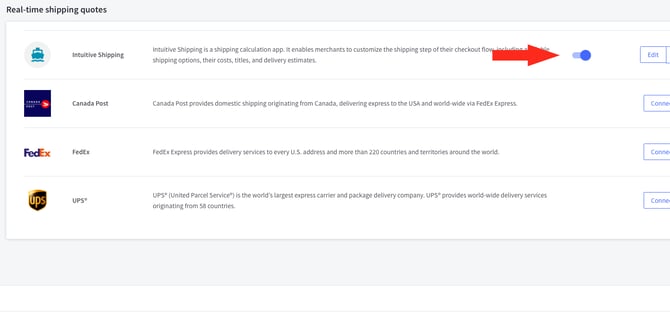
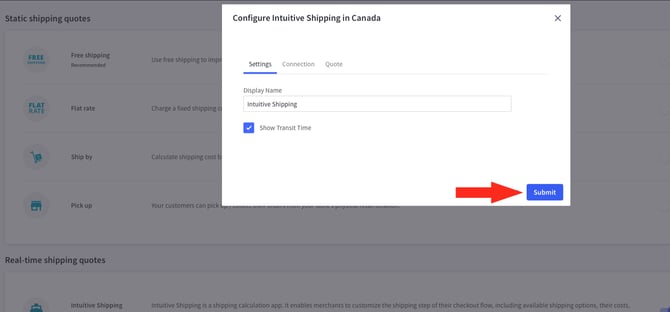
3. Scroll down to the 'Configure your shipping rules' section under 'Checkout shipping options'.
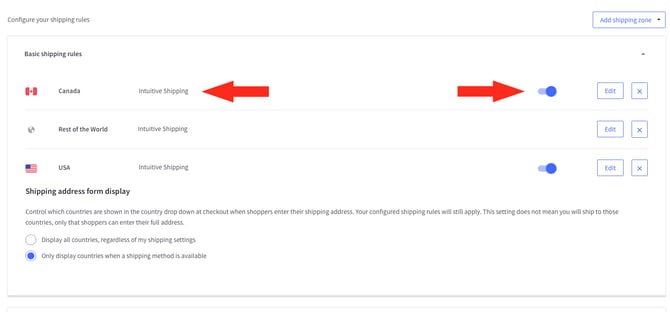
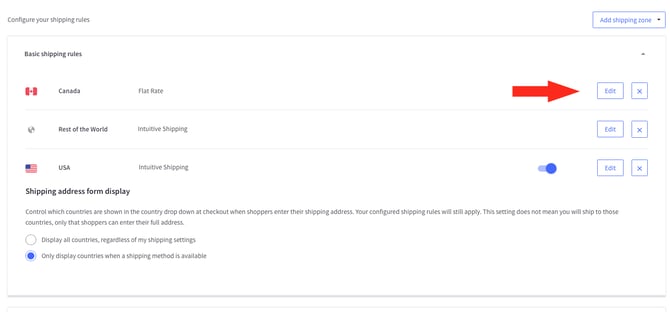
After making changes:
7. Click the Done button at the bottom of the page.