Contents:
It’s common for customers to want their orders delivered as quickly as possible, but sometimes the delivery date carries extra importance. Buying gifts for special occasions like the holidays or Valentine’s Day can be stressful if the sender isn’t sure the package will arrive on time.
With Intuitive Shipping, you can set up time-sensitive shipping methods that give customers confidence in their delivery. These options let them choose priority shipping when speed is essential, or standard shipping if they don’t mind waiting a little longer.
How It Works
Before setting up your holiday shipping methods, it’s important to understand your carriers’ limitations during peak seasons. Be sure you know their guaranteed delivery cut-off dates. Then, by using Scenarios with ‘current date’ conditions, clear descriptions, and if desired, the carrier’s delivery estimates, you can give customers confidence their orders will arrive on time.
In this guide, we’ll show you how to create three Scenarios with current date conditions. The first will include an expedited method, such as ‘Priority Overnight’, that guarantees delivery before the holidays. The second will use a standard method, such as ‘Economy’, that still ensures pre-holiday delivery. The third will use the same standard method as the second, but with delivery dates falling after the holidays.
Once these Scenarios are set up, turn them on during the holiday shipping period, being sure to turn your non-holiday Scenarios off. Alternatively, you can automate the process by adding more current date conditions to each holiday Scenario along with opposing conditions in your general, everyday Scenarios - we'll show you how to do that!
Before completing this setup, be sure to confirm your carrier’s cut-off dates for each service level you plan to offer. Dates can vary depending on service type, such as ‘Ground’ or ‘Next Day’, as well as the country or region you’re shipping to.
Create An Expedited Holiday Scenario
This Scenario will allow customers to select an expedited shipping method that ensures delivery before the holidays. For this example, we’re using FedEx Priority Overnight as the expedited option.
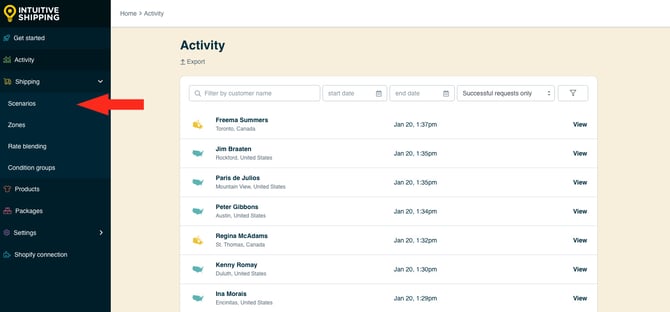
1. Click Shipping on the sidebar menu, then select Scenarios from the drop-down list.

General Settings
1. Enter a Scenario title like ‘Expedited Holiday Shipping’.


Scenario titles are not visible to customers.
2. Set the Scenario status.

You have three (3) settings to choose from:
- Off - the Scenario will be ignored, and shipping methods assigned to it will not display rates, even in Sandbox mode.
- Test - shipping methods assigned to the Scenario will be displayed at checkout when conditions are satisfied, only when using ‘Intuitive’ on the checkout page (see below).
- On - shipping methods assigned to the Scenario will be displayed at checkout when conditions are satisfied. This is the default setting.
When using the 'Test' setting:
- For Shopify - enter ‘Intuitive’ as either the customer’s first or last name.
- For BigCommerce or Shopify B2B - enter ‘Intuitive’ in the optional address field for ‘Apartment/ Suite/ Building’.
While in Sandbox mode, the 'On' setting behaves the same as 'Test' until a billing plan is selected. Learn more about how to test your Intuitive Shipping setup.
Conditions
1. Select Set restrictions.

2. Leave Condition match set to 'All conditions'.

3. Select 'Current date' as the condition type.

4. Select 'less than or equals' as the condition logic.


If you have order processing time that delays when you can ship an order, be sure to adjust the cut-off date accordingly.
Automated Start
If you don't want to rely on memory to make your expedited holiday shipping method live, and prefer to have it appear automatically after a certain date, you can add a start date as well as an end date.
Let's say you want to turn your expedited holiday shipping method on automatically at the beginning of December. You'll need to have two conditions instead of one:
- Current date is greater than or equals 2025-12-01
- Current date is less than or equals 2025-12-22
This means you can safely set your expedited shipping Scenario status to 'On' and customers will only see it when they place orders from December 1st until December 22nd.
Save Your Settings
1. Click the Save button to save your expedited holiday shipping Scenario.

You must save the Scenario before you can add a shipping method. Each Scenario must have at least one shipping method assigned to at least one zone.
Add A Shipping Method
1. Click the Create shipping method button.

Select A Parcel Service
1. Click the downward arrow beside ‘Parcel services’ to display a list of live rate carriers.

2. Select a carrier from the list. For this example, we're selecting FedEx OAuth.

FedEx OAuth requires a FedEx account with new OAuth account credentials Learn more about FedEx OAuth here.
3. Click the Next button.

4. Select a zone. If you have a lot of zones, type the zone name into the search field to narrow the list.

5. Click the Configure shipping button.

General
1. Enter a shipping method title like ‘FedEx Holiday Expedited’ or 'FedEx Holiday Priority'. This title will not be displayed to customers.

2. Leave the title type set to ‘Service title provided by carrier’. The title provided by the carrier, such as ‘FedEx Priority Overnight’, will be displayed as the shipping method title at checkout.

3. Set the shipping method status to 'On'.

4. Enter a description like 'Get it before Christmas!'. We recommend limiting your description to 90 characters or less to ensure it displays properly on the checkout page.

Descriptions are displayed below the shipping method title at checkout.

Additional Display Settings
Additional display settings are available for custom delivery times, order processing time and service codes.
- Delivery times are displayed at checkout and help manage expectations for customers.
- Order processing time lets you add buffer time to start the fulfillment process, if the products can't be packaged, picked or completed the same day the order is received.
- Service codes are not displayed to customers, but get pushed to your fulfilment service, if applicable, once a checkout is successfully completed.
To configure delivery times, order processing times and service codes:
1. Click Show additional display settings, then configure the settings as needed.

Learn more about additional display settings for parcel service shipping methods.
Packages
You can control how the customer’s order is packaged by choosing a packing algorithm and assigning the packages you want this shipping method to use.
1. Select a packing algorithm.

Learn more about packing algorithms and packages - how to add and select them - for parcel service shipping methods.
Shipping Origin
Carrier rates can be calculated using the primary location set up in your eCommerce platform or a custom location saved in Intuitive Shipping. This is useful if you ship products from different retail or warehouse locations.
1. Select the ship from location for the expedited shipping method.

You have two (2) settings to choose from:
- Dynamic origin location - carrier rates for the shipping method will be calculated based on the distance between the customer’s address and your primary eCommerce platform address. This is the default setting.
- Specify origin location - carrier rates for the shipping method will be calculated based on the saved address selected.
If you need a location that isn't listed, you can add it directly from the shipping method.
Learn more about adding and selecting custom locations directly from parcel service shipping methods.
Account
If you have an account with the carrier you selected for your parcel service shipping method, you can use it to access your discounted or negotiated rates. If you’ve already connected your carrier account to Intuitive Shipping, it will appear under 'Carrier accounts' as a selectable option.
Some carriers also offer standard retail rates, which are available to anyone without needing an account. If the selected carrier provides retail rates, a ‘Standard retail rates’ option will appear under 'Carrier accounts' and be selected by default. If the carrier doesn’t offer retail rates, no option will be shown.
 If the carrier requires an account and no ‘Standard retail rates’ option is available, you will be unable to save the shipping method unless a valid carrier account is available and selected.
1. Select a carrier account or use standard retail rates, if available. For this example, we're selecting our FedEx account.

Because our example uses a FedEx OAuth shipping method, only FedEx accounts that have been added to Intuitive Shipping will be displayed as selectable options - there is no 'standard retail rates' option. If no account is displayed, you can add your account details directly from the shipping method.
Learn more about adding a carrier account directly from a parcel service shipping method.
Services
1. Select the expedited/priority service that matches the cut-off date you chose for the Scenario condition. For this example, we’re using FedEx Priority Overnight. If this shipping method is assigned to a domestic zone, make sure you select the domestic service options. If it's assigned to an international zone, select the international service option instead.

Selected services must be available in the customer’s location to be displayed at checkout.
If a customer lives at an address where FedEx Priority is not offered, no shipping method will be displayed at checkout.
Additional service settings are available to filter services.
Learn more about additional service settings for parcel service shipping methods.
Optional Settings
Optional settings for carrier settings, fallback rating, cost adjustments, free shipping, custom shipping blending and rate blending give you further control of your custom shipping rates at checkout. These settings are not required for this setup, but can be adjusted if needed.
- Carrier settings provide additional controls, such as address type (residential or commercial) and package insurance, allowing you to match the settings used at the fulfillment stage.
- Carrier service fallback rating can be enabled to ensure your customers receives a shipping rate at checkout even when rate request times out.
- Cost adjustments let you fully customize the final cost presented at checkout, regardless of the original rate calculation.
- Free shipping allows you to set a threshold for when free shipping is applicable on carts that would otherwise be charged for shipping.
- Custom shipping blending gives you the option to blend rates from the shipping method with product-specific shipping costs.
- Rate blending lets you combine rates from one shipping method with other shipping methods using simple or advanced blending.
Learn more about other optional settings for parcel service shipping methods.
1. Click Show optional settings, then configure the optional settings as needed.

Save Your Settings
1. Click the Save button to save your expedited holiday shipping method.

Create A Standard Holiday Scenario
To simplify the process, you can create a duplicate of your expedited holiday shipping Scenario, then make changes as needed.
1. Click Shipping on the sidebar menu, then select Scenarios from the drop-down list.
2. Click Edit beside your expedited holiday shipping Scenario.

3. Click Duplicate below the Scenario heading. This will create an exact copy of the original Scenario, including the shipping method.

General
1. Change the Scenario title from ‘Copy of [original title] to something else, like 'Standard Holiday Shipping'.

Conditions
The condition added to the original expedited holiday Scenario was included with the duplicate.
1. Change the date to the cut-off date for standard (economy) shipping in the country or region you’re shipping to as the condition value. For this example, we’re selecting December 14, 2025. This means customers who place their orders on or before December 14th will see the standard shipping method assigned to this Scenario. This cut-off date should match the ‘last day to ship’ guidance provided by your carrier for the standard/economy service you plan to use.

If you have order processing time that delays when you can ship an order, be sure to adjust the cut-off date accordingly.
Automated Start
If you added a start date condition to your expedited Scenario, you can leave it as-is. Only the end date condition needs to be adjusted.
In the expedited Scenario, we set the expedited holiday shipping method to turn on automatically at the beginning of December by adding an extra condition - Current date is greater than or equals 2025-12-01.
For the standard holiday Scenario, the conditions will look like this:
- Current date is greater than or equals 2025-12-01 (same as the expedited Scenario)
- Current date is less than or equals 2025-12-14
This means you can safely leave your standard shipping Scenario status set to 'On' and customers will only see it when they place orders from December 1st until December 14th.
Save Your Settings
1. Click the Save button to save your standard holiday Scenario.

Update The Shipping Method
When you created a duplicate of the expedited holiday Scenario, it copied all of the settings, including the expedited (priority) shipping method. You will need to update the shipping method by changing the title and delivery service, as well as the description if it doesn't apply to the standard shipping method.
1. Click Edit beside the expedited shipping method that was copied from the original.

General
1. Change the shipping method title to something different, like ‘FedEx Holiday Standard’. This title will not be displayed to customers.

2. Leave the title type set to 'Service title provided by carrier'. The title provided by the carrier, such as ‘FedEx Economy’ or 'FedEx Ground', will be displayed as the shipping method title at checkout.
3. If the description you used for your expedited holiday shipping method still applies, such as ‘Get it for Christmas!’, you can leave it as-is. Otherwise, make changes as needed to help set expectations for customers selecting the standard holiday shipping method. We recommend limiting your description to 90 characters or less to ensure it displays properly on the checkout page.

4. Make any required changes to additional display settings, packages, shipping origin, and the account or leave them as-is if the settings from your expedited shipping method still apply.
5. Deselect the expedited service, then select the standard service that matches the cut-off date you chose for the Scenario condition. For this example, we’re selecting FedEx Economy. If this shipping method is assigned to a domestic zone, make sure you select the domestic service options. If it's assigned to an international zone, select the international service option instead.

6. Make any required changes to optional settings or leave them as-is if the settings from your expedited shipping method still apply.
Save Your Settings
1. Click the Save button to save your standard holiday shipping method.
Create A Post-Holiday Scenario
When a customer places an order after the cut-off date for your standard holiday shipping method (for example, December 14th), they’ll still see the expedited holiday shipping method - the first one you created - until it's cut-off date (for example, December 22nd). During this period, you can continue to offer the same standard shipping method, but make it clear that delivery will not be in time for the holidays. This gives customers the choice to pay more for expedited shipping to ensure on-time delivery, or select the standard option knowing their order will arrive after the occasion.
To simplify the process, you can duplicate your standard holiday Scenario instead of creating one from scratch.
1. Click Shipping on the sidebar menu, then select Scenarios from the drop-down list.
2. Click Edit beside your standard holiday shipping Scenario.

3. Click Duplicate below the Scenario heading. This will create an exact copy of the duplicated Scenario, including the shipping method.

General
1. Change the Scenario title from ‘Copy of [original title] to something else, like 'Post-Holiday Shipping'.

Conditions
The condition added to the original standard holiday Scenario was included with the duplicate.
1. Change the condition logic to 'greater than'.

2. Leave the date selected as the cut-off date for standard shipping in the country or region you’re shipping to as the condition value date. For this example, we selected December 14, 2025.

If you have order processing time that delays when you can ship an order, be sure to adjust the cut-off date accordingly.
3. Click the Add another condition button.

4. Select ‘Current date’ as the condition type.

5. Select 'less than or equals' as the condition logic.


If you have order processing time that delays when you can ship an order, be sure to adjust the cut-off date accordingly.
Automated Start
If you included a start date condition to your expedited and standard holiday shipping Scenarios, you do not need to add a third condition. However, you'll need to adjust the two existing conditions to look like this:
- Current date is greater than 2025-12-14
- Current date is less than or equals 2025-12-22
Save Your Settings
1. Click the Save button to save your post-holiday Scenario.

Update The Shipping Method
When you created a duplicate of the standard holiday shipping Scenario, it copied all of the settings, including the standard (economy) shipping method. Since we're using the same shipping method for our post-holiday Scenario, the only thing that needs to be updated is the description, which will let customers know their order will be delivered after the occasion.
1. Click Edit beside the standard shipping method.

General
1. Change the description to something different, like ‘Arrives after Christmas’. We recommend limiting your description to 90 characters or less to ensure it displays properly on the checkout page.

2. Make any changes to other settings as needed. Since we’re using the same shipping method for our post-holiday Scenario as in our standard pre-holiday Scenario, no further adjustments are needed.
Save Your Settings
1. Click the Save button to save your post-holiday shipping method.

Edit Your General Scenario
We recommend turning off your main Scenarios during the holiday period to prevent their shipping methods from showing alongside your holiday and post-holiday methods. You can do this manually by switching the Scenario status to ‘Off’ at the same time you set your holiday Scenarios to ‘On’.
If you’ve added a ‘start date’ condition to automatically activate your expedited and standard holiday Scenarios, we recommend editing your general, everyday Scenarios so they switch off automatically when the holiday shipping period begins and switch back on when it ends.
1. Click Shipping on the sidebar menu, then select Scenarios from the drop-down list.
2. Click Edit beside a Scenario you want to be inactive during the holiday period.

3. Select Set restrictions. If your Scenario already has conditions, this is already set correctly.

4. Leave Condition match set to All conditions.

5. Select Current date as the condition type.
6. Change the condition logic to less than.

7. Select the date you want the shipping method(s) assigned to your 'everyday' general Scenario to stop appearing at checkout as the condition value. We recommend chosing the same date your expedited and standard holiday Scenarios are set to start. For this example, we're selecting December 1, 2025.

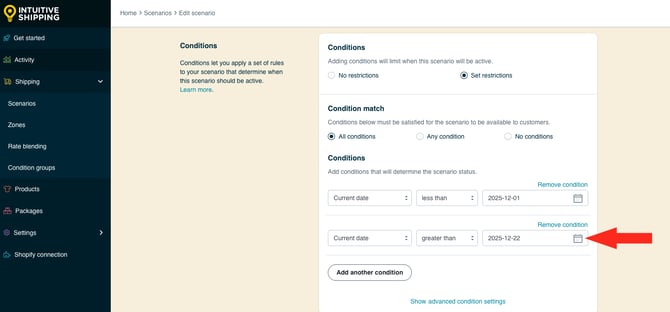
8. Click the Add another condition button.

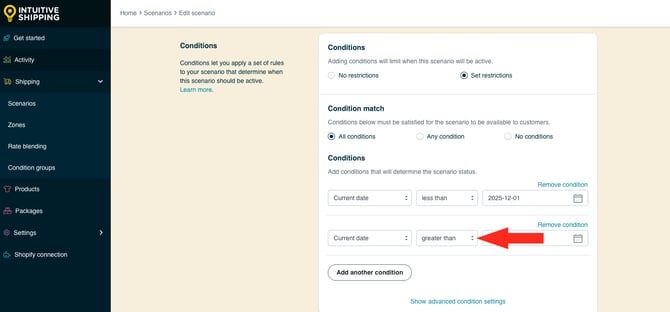
9. Select Current date as the condition type.

10. Change the condition logic to greater than.
11. Select the date you want the shipping method(s) assigned to your 'everyday' general Scenario to begin reappearing at checkout as the condition value. We recommend chosing the same date your expedited holiday shipping Scenario is set to stop running, since it will be active longer. For this example, we're selecting December 22, 2025.