Create Prioritized Scenarios
Set up a hierarchy of shipping rates that supersede your general rates when certain products are in the cart.
Contents:
Do you have product-based shipping rates that take priority over others? Harness the power of Intuitive Shipping to create a series of prioritized, tiered Scenarios. When certain products are added to the cart, shipping rates from prioritized Scenarios will overrule other rates, so your customers are always charged the correct pricing tier.
How It Works
Let’s say you have a custom rate table for your general products. Now you want to introduce a special product type that includes three different categories, each with its own unique flat shipping rate. When any of these special products are in the cart, you want their flat rates to take priority over the general rates, and you want the three categories to follow a specific priority order.
Using product conditions, such as tags, you can control when the general shipping rates are displayed and create a hierarchy among the special categories. For example, if a customer adds both general products and a Category 2 product to the cart, only the shipping rate for Category 2 will be shown at checkout. If the customer then adds a Category 1 product, which has a higher priority, the rate for Category 1 will be displayed instead.
This setup does not combine shipping rates. If you need to display a single rate that includes charges from multiple product groups or categories, use our rate blending feature.

Learn more about rate blending.
For a tiered configuration, create one Scenario for each of the special product categories, beginning with the highest priority.
In this example, we’re using product tags to define the three special categories: ‘Large’, ‘Medium’, and ‘Small’. Products tagged ‘Large’ will have the highest priority, followed by ‘Medium’, then ‘Small’. While we’re using tags in this example, you can apply any available product condition to identify the categories.
Once your special product Scenarios are set up, be sure to add opposing product conditions to your standard Scenario. This will prevent general shipping rates from being triggered when any of the special products are in the cart.
Create The Highest Priority Scenario
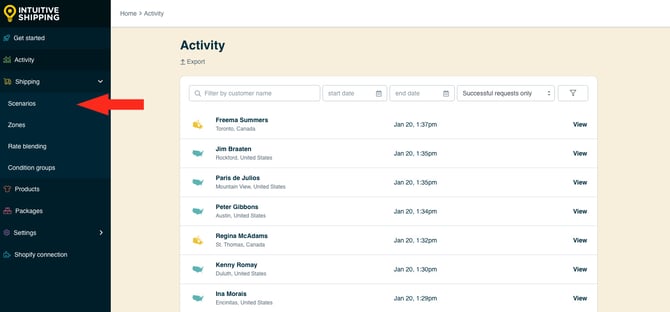
1. Click Shipping on the sidebar menu, then select Scenarios from the drop-down list.

2. Click the Create scenario button.

General Settings
1. Enter a Scenario title, like 'Large'.


Scenario titles are not visible to customers.
2. If you want the Scenario to be available right away, leave the Scenario status set to 'On'. If you want to test it first before making it public, set it to 'Test'. Remember to set it to 'On' once you've completed testing.

 While in Sandbox mode, the 'On' setting behaves the same as 'Test' until a billing plan is selected. Learn more about how to test your Intuitive Shipping setup.
Conditions
1. Select Set restrictions.

2. Leave Condition match set to 'All conditions'.

3. Select the product condition type. For this example, we’re using ‘Product tag’. You can use any product condition that identifies the special product with the highest priority.

4. Leave the condition logic set to equals.

5. Enter the product identifier you assigned to your highest priority products as the condition value. For this example, we’re using the product tag ‘large’.

 Product tags are managed in your eCommerce platform's product information settings. Tags are not case sensitive.
6. Leave the additional product setting below the condition value set to Any product. As long as at least one item in the cart is tagged with the value entered in Step 5, the shipping method assigned to this Scenario will be displayed at checkout.

Save Your Settings
1. Click the Save button to save your highest priority Scenario.

 You must save the Scenario before you can add a shipping method. Each Scenario must have at least one shipping method assigned to at least one zone.
Add The Highest Priority Shipping Method
In this example, we're setting up a custom service shipping method with a flat rate (single rate row). If you prefer to set up a rate table, you can follow the same steps and use a multiple rate rows.
1. Click the Create shipping method button to add a vendor shipping method.

Select A Custom Service
The 'Select a service type' popup opens with 'Custom services' already expanded and 'Custom shipping rates' option pre-selected.
1. Leave 'Custom shipping rates' selected.

2. Click the Next button at the bottom of the pop-up.

3. Select a Zone. If you have a lot of zones, type the zone name into the search field to narrow the list.


Learn more about zones.
4. Click the Configure shipping button.

General
1. Enter a shipping method title.


Shipping method titles are visible to customers.
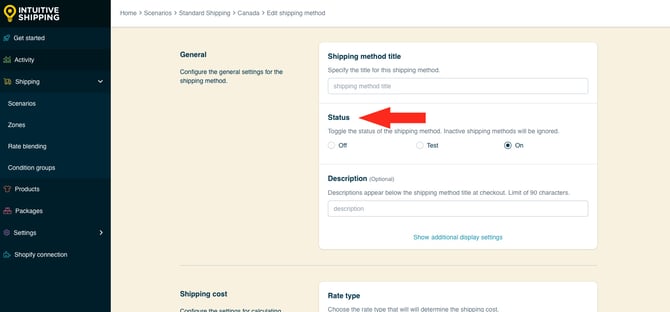
2. Leave the shipping method status set to ‘On’.

3. If desired, enter a description. We recommend limiting your description to 90 characters or less to ensure it displays properly on the checkout page.

Descriptions are displayed below the shipping method title at checkout.

Additional Display Settings
Additional display settings are available for custom delivery times and service codes.
- Delivery times are displayed at checkout and help manage expectations for customers.
- Service codes are not displayed to customers, but get pushed to your fulfilment service, if applicable) once a checkout is successfully completed.
If you don't require custom delivery times or service codes, skip ahead to Shipping Cost.
1. If desired, click Show additional display settings, then configure delivery time and service code settings as needed.

Shipping Cost
1. Select a rate type to determine shipping will be calculated based on the products in the customer's cart.

You have four (4) settings to choose from:
- Quantity - the shipping rate is calculated based on the number of items in the cart. This is the default setting.
- Weight - the shipping rate is calculated based on the combined weight of the items in the cart.
- Total - the shipping rate is calculated based on the combined sub-totals of the products in the cart.
- Dimensional volume - the shipping rate is calculated based on the combined dimensional volume of the items in the cart.
In this example, we’re creating a flat rate with a single rate row that has no limit - meaning the same flat rate applies to everything in the cart, as long as there is at least one product tagged 'large' - so the rate type is irrelevant and can be left on the default setting.
 For dimensional volume to work with Shopify, you must assign product dimensions in your Intuitive Shipping product settings.
2. Leave Rate grouping set to 'Combine products'.

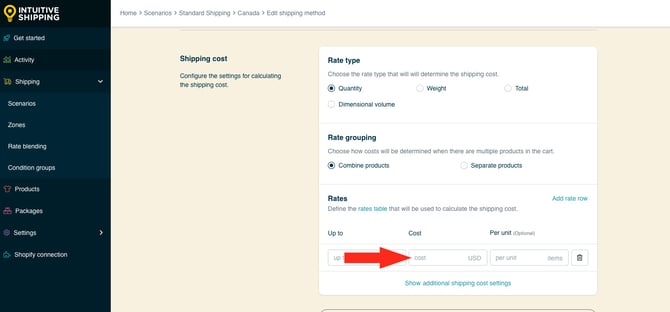
3. Enter the up to amount for the highest priority tier's flat rate. This is the limit for the cost entered in Step 4. If you're setting up a rate table, enter the amount for the lowest rate on your rate table.

 The unit of measure for the 'up to' limit is based on the rate type selected in Step 1.
For this example, we’re entering the ~ (tilde) symbol as the 'up to' limit. In Intuitive Shipping, the ~ symbol indicates 'no limit'.

4. Enter the cost for the highest priority tier's flat rate. This is the shipping cost the customer will see at checkout. Enter the number with or without decimals. For this example, we're entering '80' ($80.00).

Rate tables (multiple rate row): Enter the cost for the first 'up to' limit.
5. Leave the Per unit field blank.

This setting is optional and not needed for this setup unless you charge shipping per unit for your top-tier products. For example, if shipping is $2.00 per item, enter a cost of ‘2’ and a per unit value of ‘1’. A customer ordering 8 items would pay $16.00 for shipping at checkout.
Step 6 is only required if you're building a rate table with multiple rate rows:
6. Click Add rate row to add another shipping cost to your rate table, then repeat Steps 3 to 5 to set up each additional cost.

Additional Shipping Cost Settings
Additional settings are available for cart splitting and rate table blending.
- Cart splitting can be used with a single row or multiple rate rows and allows you to charge extra when the highest 'up to' limit is exceeded, rather than preventing the customer from checking out.
- Rates table blending can only be used with multiple rate rows and allows you to charge compounding rates as each 'up to' limit on the table is exceeded. This is useful when you need to combine costs for larger orders, but a "per unit" cost setup isn't suitable because the costs are not simple multiples of each other.
Please note: If your flat rate (single rate row) or the last row of your rate table (multiple rows) uses the ~ tilde symbol for 'no limit', cart splitting will not work since the highest 'up to' limit can never be exceeded. You must have defined limits for all rate rows for cart splitting to work as intended.
For this example, we're using a single rate row with the ~ symbol for the 'up to' limit, so neither cart splittting nor rate table blending are required.
If you do not need cart splitting or rates table blending, skip ahead to Optional Settings.
To set up cart splitting or rate table blending:
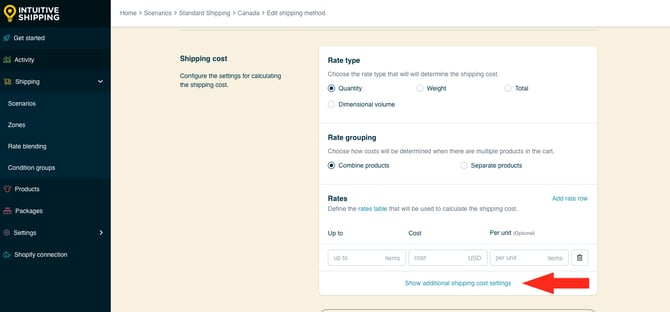
1. Click Show additional shipping cost settings, then configure the additional settings as needed.

Optional Settings
Optional settings for cost adjustments, free shipping, custom shipping blending and rate blending give you further control of your custom shipping rates at checkout. These settings are not required for this setup.

Learn more about optional settings for custom service shipping methods.
Save Your Settings
1. Click the Save button to save your highest priority (top tier) shipping method.

2. Scroll to the top, then click the back button. This will return you to the Scenario's edit page.

Create The Second-Highest Priority Scenario
To simplify the process, you can create a duplicate of your highest priority Scenario, then make changes as needed.
1. At the top of the highest priority Scenerio's edit page, click Duplicate below the Scenario heading. This will create an exact copy of the original Scenario, including the shipping method.

General Settings
1. Change the Scenario title from ‘Copy of [original title] to something else, like 'Medium'.


Scenario titles are not visible to customers.
2. If you want the Scenario to be available right away, leave the Scenario status set to 'On'. If you want to test it first before making it public, set it to Test.

 While in Sandbox mode, the 'On' setting behaves the same as 'Test' until a billing plan is selected. Learn more about how to test your Intuitive Shipping setup.
Conditions
1. For the existing condition (originally added to the highest priority Scenario), leave the condition type as-is. For this example, we used 'Product tag'.

2. Change the condition logic to ‘does not equal’.

3. Leave the condition value set to whichever product identifier you used in your highest priority Scenario. For this example, we used the tag ‘large’.

4. Change the additional product setting to ‘All products’. That means there cannot be any products tagged with the value in Step 3.

5. Click the add another condition button.

6. Select a product condition type. To simplify things, consider using the same condition type you used for the first condition. For this example, we’re using ‘Product tag’. You can use any product condition that identifies the special product with the second highest priority.

7. Leave the condition logic set to ‘equals’.

8. Enter the product identifier you assigned to your second-highest priority products as the condition value. For this example, we’re using the product tag ‘medium’.

 Product tags are managed in your eCommerce platform's product information settings. Tags are not case sensitive.
9. Leave the additional product setting set to ‘Any product’. As long as at least one item in the cart is tagged with the value entered in Step 8, the shipping method assigned to this Scenario will be displayed at checkout
10. Leave all other settings as-is
Save Your Settings
1. Click the Save button to save your second-highest priority Scenario. You must save changes to the duplicate Scenario before you can edit the shipping method.

Update The Shipping Method
The shipping method shown in the ‘Shipping rates and services’ section of your second-highest priority 'Medium' (duplicate) Scenario is an exact copy of the original highest priority shipping method created in the previous steps. This happens automatically when you duplicate a Scenario.

If your second-highest priority speciality products requires a different type of shipping method (parcel service, integrated service, local delivery), you'll need to remove the shipping method that was duplicated with the Scenario and create a new one.
For this example, we're using the same shipping method - a custom service shipping method with a single rate row (flat rate) - with a different cost.
1. Click Edit beside the shipping method that was duplicated from the original Scenario.

2. If you want to keep the shipping method title consistent for all special products, regardless of the tier, leave the title as-is. If desired, change the title to make it unique to your second highest priority shipping method. For this example, we’re leaving it set to ‘Shipping' to keep it consistent with our other shipping method titles.

3. Scroll down to Shipping cost. Leave Up to set to ~, then change the cost of your flat shipping rate. For this example, we’re changing it to ’50’ ($50.00). That means, a customer ordering any quantity will be charged a flat rate of $50.00 as long as there is at least one product tagged ‘medium’ - and no products tagged ‘large’ in the cart.

If you set up a rate table (multiple rate rows) for your highest priority shipping method, change the cost in each row as needed.
Save Your Settings
1. Click the Save button to save your second-highest priority (middle tier) shipping method, then scroll to the top of the page and click the back button below the page header.

Create The Third-Highest Priority Scenario
As with the second-highest priority Scenario, you can create a duplicate Scenario - including the shipping method, then make changes as needed.
1. At the top of the second-highest priority Scenerio's edit page, click Duplicate below the Scenario heading. This will create an exact copy of the second Scenario, including the shipping method.

General Settings
1. Change the Scenario title from ‘Copy of [original title] to something else, like 'Small'.


Scenario titles are not visible to customers.
2. If you want the Scenario to be available right away, leave the Scenario status set to 'On'. If you want to test it first before making it public, set it to Test.

 While in Sandbox mode, the 'On' setting behaves the same as 'Test' until a billing plan is selected. Learn more about how to test your Intuitive Shipping setup.
Conditions
1. Leave first condition (originally added to the highest priority Scenario) as-is. For this example, we're leaving it as 'Product tag does not equal large'.
2. For the second condition, leave the condition type set to whichever product condition you used in your previous two Scenarios. For this example, we’re leaving it set to ‘Product tag’.

2. Change the condition logic to ‘does not equal’.

3. Leave the condition value set to whichever product identifier you used in your second-highest priority Scenario. For this example, we used the tag ‘medium’.

4. Change the additional product setting to ‘All products’. That means there cannot be any products tagged with the value in Step 3.

5. Click the add another condition button.

6. Select a product condition type. To simplify things, consider using the same condition type you used for the first and second conditions. For this example, we’re using ‘Product tag’. You can use any product condition that identifies the special product with the third-highest priority.

7. Leave the condition logic set to ‘equals’.

8. Enter the product identifier you assigned to your third-highest priority products as the condition value. For this example, we’re using the product tag ‘small’.

 Product tags are managed in your eCommerce platform's product information settings. Tags are not case sensitive.
9. Leave the additional product setting set to ‘Any product’. As long as at least one item in the cart is tagged with the value entered in Step 8, the shipping method assigned to this Scenario will be displayed at checkout
10. Leave all other settings as-is
Save Your Settings
1. Click the Save button to save your third-highest priority Scenario. You must save changes to the duplicate Scenario before you can edit the shipping method.

Update The Shipping Method
The shipping method shown in the ‘Shipping rates and services’ section of your third-highest priority (duplicate) Scenario is an exact copy of the original second-highest priority shipping method created in the previous steps. This happens automatically when you duplicate a Scenario.

If your third-highest priority speciality products requires a different type of shipping method (parcel service, integrated service, local delivery), you'll need to remove the shipping method that was duplicated with the Scenario and create a new one.
For this example, we're using the same shipping method - a custom service shipping method with a single rate row (flat rate) - with a different cost.
1. Click Edit beside the shipping method that was duplicated from the original Scenario.

2. If you want to keep the shipping method title consistent for all special products, regardless of the tier, leave the title as-is. If desired, change the title to make it unique to your third-highest priority shipping method. For this example, we’re leaving it set to ‘Shipping' to keep it consistent with our other shipping method titles.

3. Scroll down to Shipping cost. Leave Up to set to ~, then change the cost of your flat shipping rate. For this example, we’re changing it to ’30’ ($30.00). That means, a customer ordering any quantity will be charged a flat rate of $30.00 as long as there is at least one product tagged ‘small’ - and no products tagged ‘large’ or 'medium' in the cart.

If you set up a rate table (multiple rate rows) for your second-highest priority shipping method, change the cost in each row as needed.
Save Your Settings
1. Click the Save button to save your third-highest priority (bottom tier) shipping method, then scroll to the top of the page and click the back button below the page header.

Update The General Scenario
After configuring all of your priority Scenarios for specialty products, you’ll need to add and opposing product condition to your 'general products' Scenario. This ensures that shipping rates for general products are suppressed any time a customer adds any of your specialty products to the cart.
For this example, we only need to add one product condition with multiple tag values.
1. Click Shipping on the sidebar menu, then select Scenarios from the drop-down list.

2. Click Edit beside your standard Scenario.

3. In the Conditions section, select ‘Set restrictions’. If your general Scenario has other conditions, this will already be set.

4. Leave Condition match set to ‘All conditions’.

If your general Scenario already has conditions, you'll need to 'Add another condition' before completing the next steps.
5. Select the product condition type used in your priority Scenarios. For this example, we’re using ‘Product tag’.

6. Change the condition logic to ‘does not equal’.

7. Enter the same product identifiers assigned to each category of specialty products as the condition value - separated by comma. For this example, we’re using the tags ‘small, medium, large’.

8. Change the additional product setting to All products. This means there can be no products in the cart tagged with the value entered in Step 7. This means there can be no products with any the tags from Step 7 in the cart for the general shipping method to be displayed at checkout.

Save Your Settings
1. Click the Save button to save changes to your standard Scenario.

When a customer orders only general products, your standard shipping rates will be displayed at checkout.
If they add a product from your third-tier category - in this case, a product tagged ‘small’ - only the flat rate from your third-highest priority Scenario will be displayed at checkout.
If they add a product from your second-tier category - a product tagged ‘medium’ - only the flat rate from your second-highest priority Scenario will be shown.
If they add a product from your first-tier category - a product tagged ‘large’ - only the flat rate from your highest priority Scenario will be available at checkout.
