Contents:
Intuitive Shipping's package management system allows you to easily add rigid containers, such as cardboard boxes, and soft packages, like poly mailers and envelopes, which can be used with any carrier-based shipping method. Besides physical dimensions, you can include details for maximum weight capacity, empty weight, and cost with each package.
How It Works
 Packages are required to calculate real-time rates for parcel service, freight service and integrated service shipping methods.
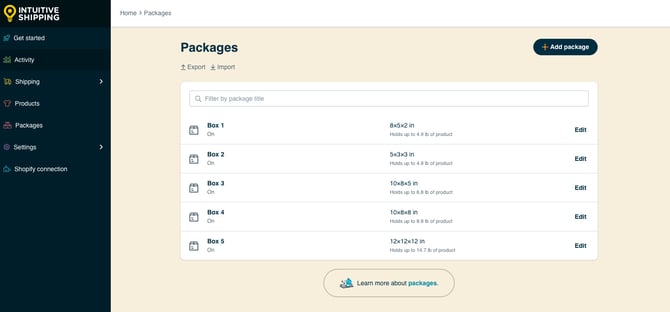
Packages can be added to Intuitive Shipping manually or imported in bulk. The number of packages that can be added is unlimited.
Once added to Intuitive Shipping, packages can be assigned to any shipping method that requires live rates from a carrier. In addition to being listed on the Packages page, each package added to Intuitive Shipping is displayed in the 'Packages' section of parcel service, freight service, or integrated service shipping methods.

Packages can be assigned to any shipping method by checking the box beside a package on the list. The number of shipping methods using the same package is unlimited. You can easily select all packages by checking the box beside 'Custom Packages', which behaves like a 'Select All' function.

If required, more packages can be manually added to Intuitive Shipping directly from the shipping method.

Packages added directly through a shipping method are also added to the package management system and can be used with any new or existing shipping methods.
If you're setting up custom service or local delivery shipping methods, which don't require packages, skip this setup guide and create a Scenario
Add A Package
These steps will show you how to manually add individual packages to Intuitive Shipping's package management system, making them available for any applicable shipping method.
Learn how to import packages in bulk.
To add a package:
1. Click Packages on the sidebar menu.

2. Click the Add package button.

3. When prompted, select Box or Soft package.

- Box - fixed length, width and height dimensions.
- Soft package - fixed length and width dimensions; adjustable height dimension.
If you're not adding any boxes or rigid containers, skip ahead to Add A Soft Package.
Add A Box
If you selected 'Box' in the previous step, this section will show you how to configure settings for a rigid container.

General Settings
1. Enter a package title, like ‘Box 1’ or ‘Large’.

Package titles are not visible to customers.
Titles appear in transaction activities on the Activity page. By default, Intuitive Shipping also sends package information, including the title, to your eCommerce platform’s order details. You can control how package information is added to orders through the general settings in Intuitive Shipping.
Package information sent to the order is currently only supported by Shopify.
Learn more about the Activity page and updating general settings.
2. Set the package status.

You have two (2) settings to choose from:
- Off - the package is ignored by shipping methods it is assigned to.
- On - the package is available for any shipping it is assigned to. This is the default setting.
The 'Off' setting is useful if a package becomes temporarily unavailable. The package can be turned off without the need to remove it from each shipping method that uses it.
Physical Dimensions
When entering dimensions, use only numerical values. Dimensional units, such as inches (in) and centimeters (cm), are displayed as configured in general settings.
1. Add the outer length, width, and height dimensions. Carrier services use these dimensions when calculating the shipping cost.

2. If need, add the inner length, width, and height dimensions. When using the SmartBoxing packing algorithm, these values provide greater packing accuracy when there are tangible differences between the inner and outer dimensions or when extra packing material is needed.

When inner dimensions are excluded, SmartBoxing will use the outer dimensions to determine the most efficient packaging set.
Inner box dimensions can also be used with simple packing algorithms like weight-based or quantity-based packing if the products being purchased have been assigned physical dimensions.
Add A Soft Package
These steps will show you how to configure settings for a soft container if you selected 'Soft package' at Step 3 of the 'Add A Package' section.

Soft packages have an variable height that automatically adjusts with the dimensions of the products being ordered. This improves packing efficiency and ensures greater accuracy with shipping costs.
If soft packages are not required, skip ahead to Optional Settings.
General Settings
1. Enter a package title, like ‘Soft Package 1’ or ‘Large Poly Mailer’.

Package titles are not visible to customers.
Titles appear in transaction activities on the Activity page. Intuitive Shipping also sends package information, including the title, to the order in your eCommerce platform by default. You can determine how package information is sent to the order in your Intuitive Shipping general settings.
Package information sent to the order is currently only supported by Shopify.
Learn more about the Activity page and updating general settings.
2. Set the package status.

You have two (2) settings to choose from:
- Off - the package is ignored by shipping methods it is assigned to.
- On - the package is available for any shipping it is assigned to. This is the default setting.
Physical Dimensions
When entering dimensions, use only numerical values. Dimensional units, such as inches (in) and centimeters (cm), are displayed as configured in general settings.
3. Add the outer length, width and the maximum height dimensions. Carrier services use these dimensions when calculating the shipping cost. To determine the maximum height of a soft package, fill it to capacity and measure the height. Avoid overfilling, as stretching the package may alter its length or width, leading to calculation errors.

Soft package outer dimensions are also used by the SmartBoxing packing algorithm. Learn more about SmartBoxing.
Optional Settings
Additional optional settings can be applied to each box or soft package if needed.
If you don't need to apply optional settings, skip ahead to Save Your Settings.
1. Enter the maximum weight of the package. Intuitive Shipping will ensure the total product weight does not exceed this limit for a single package. We recommend using this setting if the package has a physical weight limit that may be exceeded or if you are concerned about exceeding the carrier’s package weight limit.

Maximum weight is intended to be used with the SmartBoxing and weight-based packing algorithms. If you're using the volume-based packing algorithm, maximum weight is not considered.
Check with your preferred carriers for any package weight restrictions.
2. Enter the empty weight of the package. Intuitive Shipping will add this weight to the combined weight of the products. We recommend using this setting if the weight of the package is significant enough to affect the total weight used for the carrier service rate calculation.

When a maximum weight is assigned, Intuitive Shipping automatically subtracts the empty weight from the maximum weight of a package when performing the packaging process.
Weight units, such as pounds (lbs) and kilograms (kg) are configured in general settings.
3. Enter the cost of the package. Intuitive Shipping will add the cost (per box used in the order) to the total shipping cost. It is not displayed as a separate cost. We recommend using this setting to recover the cost of packaging through the shipping cost.

Currency is managed by your eCommerce platform. Learn more about updating currency settings.
Save Your Settings
1. Click the Save button to save your package.

Duplicate A Package
Use the Duplicate feature to quickly add more packages. This is useful when adding new packages with similar settings to an existing one.
1. Click Packages on the sidebar menu.
2. Click Edit beside the package you want to duplicate.

3. Click Duplicate below the package heading.

4. Change the package title from ‘Copy of [original title]’ to something different, like ‘Box 4’ or ‘Extra Small’. Packages can have the same title - they are cataloged using a unique package ID assigned by Intuitive Shipping. However, we recommend creating unique titles so they can be easily identified in shipping methods and transaction activities.

Package titles are not visible to customers.
6. Click the Save button to save the new package.
Packages are listed alphabetically by their title. To list packages in a customized order, use numerical prefixes, such as ‘1. FedEx Polybag’, in the package title.
7. Repeat the steps above to create more duplicate packages.
Import Packages In Bulk
Intuitive Shipping lets you import settings for multiple packages at once using a CSV file. You can import packages whether or not any were previously added manually.
This process requires a specially formatted file, which must be exported from Intuitive Shipping to get started.
If there are no packages currently listed in your account, consider manually adding a sample package first using the steps above. Make sure all fields are completed. This will give you a clear reference for how values should be formatted in the CSV file and help reduce the chance of errors before continuing with the steps below.
 CSV files require a spreadsheet app that supports them, like Microsoft Excel. Modifying columns or headings will cause import failures.
1. Click Packages on the sidebar menu.
2. Click Export under the page heading.

3. When prompted, click the Export button to confirm. After exporting the CSV file, a notification will appear in the top right of any page, though it may not show until you refresh the Packages page or navigate to a different page. An email notification will also be sent to the primary and, if available, secondary email contact.
The primary email contact is based on your eCommerce platform settings and cannot be changed within Intuitive Shipping. The secondary email contact can be updated in general settings.
4. Click on the Notifications icon on any page to move to the Notifications page.
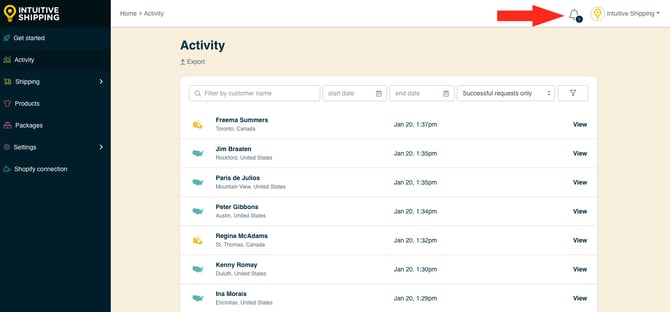
5. Click the downward arrow in line with the most recent 'Package export complete' notification. When expanded, the notification confirms the success of the export and provides access to download the CSV file.

6. Click download. The file will be sent to your default 'Downloads' folder. Depending on the browser and operating system, confirmation may be required to complete the download.

The download link expires and can no longer be accessed after 14 days.
7. Navigate to your computer's downloads folder, then open the CSV file. Settings for any previously added packages will be listed in the CSV file. If no packages were previously added to Intuitive Shipping, all rows will be blank except for the column headings in the first row.

Modifying columns or headings will cause import failures.
8. In the first available row, enter a value in each applicable column.
| PackageID | Leave blank. This value is assigned by Intuitive Shipping during import. |
| Title | Enter title of package, such as 'Box 1'. Spaces are permitted. Special characters are not permitted. |
| Type | Enter either 'box' or 'softpack' depending on package type. |
| OuterLength | Enter outer length using numbers only up to 1 decimal place. |
| OuterWidth | Enter outer width using numbers only up to 1 decimal place. |
| OuterHeight | Enter outer height using numbers only up to 1 decimal place. For soft packages, enter maximum achievable height. |
| InnerLength | Enter inner length using numbers only up to 1 decimal place. Leave blank if not applicable or if adding a soft package. |
| InnerWidth | Enter inner width using numbers only up to 1 decimal place. Leave blank if not applicable or if adding a soft package. |
| InnerHeight | Enter inner height using numbers only up to 1 decimal place. Leave blank if not applicable or if adding a soft package. |
| MaxWeight | Enter maximum weight the package can hold using numbers only, up to 1 decimal place. Leave blank if not applicable. |
| EmptyWeight | Enter weight of the empty package using numbers only, up to 1 decimal place. Leave blank if not applicable. |
| Cost | Enter package cost using numbers only, up to 2 decimal places. Leave blank if not applicable. |
| Status | Enter either 'On' or 'Off' dependening on the preferred status of the package immediately after importing. |
9. Repeat the Step 8 for each additional package being added. There is no limit to the number of packages that can be added to Intuitive Shipping.
If the original CSV file export included packages that were previously added and assigned Package IDs, leave them as-is, including the Package ID. These settings will be ignored during the import process.
Removing rows for previously added packages will not delete them from Intuitive Shipping. Packages can only be deleted manually from the Packages page.
10. Save the CSV file to any folder on your computer. If you choose a location other than 'Downloads,' note it so it can be easily found. Leave the file name as-is or change it to something else, if needed.
11. Return to the Packages list page in Intuitive Shipping.
12. Click Import.

13. Click Choose file, then navigate to the folder containing the saved CSV File.

14. Select the file to be uploaded.
15. Click Import to upload the file. A notification will appear in the top right of any page, though it may not show until you refresh the Packages page or navigate to a different page. An email notification will also be sent to the primary and, if available, secondary email contact.

The notification will indicate if the import was successful or unsuccessful.
16. If the import was unsuccessful, repeat the steps above or contact us for assistance.

17. If the import was successful, return to the Packages page to verify all of your packages have been imported.

What's Next:
Can we lend a hand? Let us help you get up and running faster and with greater confidence. Book a complimentary Onboarding session!