Contents:
To get the most from Intuitive Shipping, we recommend reviewing your Shopify settings, making adjustments where necessary, and following some best practices to ensure reliable rate calculations. That includes confirming your shipping zones are set up correctly, using a single shipping profile when possible, keeping your product data accurate and complete, and syncing your store settings when updates are made.
Shipping Zones
Shopify’s shipping zones determine which geographic regions your products can be shipped to, and they continue to play an important role even after installing Intuitive Shipping. While the app includes its own built-in zones feature for managing rate logic, Shopify shipping zones are still required for checkout to work properly. That’s because Shopify controls how shipping rates are shown to your customers, and Intuitive Shipping must be assigned as a rate provider to each Shopify shipping zone you want to ship to.
To streamline setup, you can import your Shopify shipping zone settings into Intuitive Shipping when creating your zones in the app. Whether you import those settings or build new zones from scratch, we recommend keeping your Shopify shipping zones unchanged. They’re still needed to ensure shipping rates from Intuitive Shipping are displayed at checkout.
Why Shopify Shipping Zones Still Matter
Shopify shipping zones have two key functions. First, they control which geographic regions your products can be shipped to. Once Intuitive Shipping is configured, zone management shifts to the app, which means this part of Shopify’s functionality becomes less important.
The second function, managing rates and rate providers, remains essential. For shipping rates to appear at checkout, a rate provider must be assigned to each Shopify shipping zone you want to ship to.
Before installing Intuitive Shipping, you may have had separate Shopify zones for regions like Canada, the US, and the UK, each with a rate or provider linked to it. That setup still applies. Intuitive Shipping is automatically added to your existing Shopify shipping zones during installation. However, if you were to create new zones in Shopify after the app is installed, you would need to manually assign Intuitive Shipping to those zones. If not, rates wouldn't appear at checkout for customers in those areas. And if you delete a Shopify shipping zone that had Intuitive Shipping assigned, the app will no longer be able to return rates for customers in that region, even if you created a matching zone in Intuitive Shipping.
Can You Change Your Shopify Shipping Zone Settings?
Yes, you can - but in most cases, you don’t need to. We only suggest doing so if you’re expanding your shipping reach. Zones in Intuitive Shipping are completely independent of your Shopify shipping zones, whether or not you imported Shopify’s settings during setup.
For example, if you originally imported Shopify shipping zones for Canada, USA, and the UK, and later decide to split the USA into two zones - ‘Mainland’ and ‘Hawaii and Alaska’ - you can do that directly in Intuitive Shipping without touching your Shopify settings. The same goes for removing Canada’s northern territories from your Intuitive Shipping zone. These adjustments won’t impact your Shopify zones, which remain unchanged and continue to include all original regions, even if those areas are no longer eligible for rates from Intuitive Shipping.
When Should You Change Your Shopify Shipping Zone Settings?
There is really only one reason to change your settings in Shopify after installing Intuitive Shipping: when you want to ship to geographical areas you’ve never shipped to before, and those areas were not previously included in any of your original Shopify shipping zones.
Let’s say that before you installed Intuitive Shipping, you only had two shipping zones: a domestic USA zone and a zone for Canada. That’s because you were only shipping within those two countries at the time. During setup, you imported those same two zones to Intuitive Shipping.
Now you’ve decided to start shipping to other parts of the world, like the UK and Europe. You can set up those zones in Intuitive Shipping and configure them however you like, such as by individual countries or by groups of countries. However, because they were never part of your original Shopify shipping zones, customers from those regions still won’t be able to check out.
To fix this, either add the new countries and regions to an existing Shopify shipping zone or create a new one. Then, assign Intuitive Shipping as the rate provider.
Edit An Existing Shipping Zone
The easiest way to expand your shipping region is to simply add the new countries and regions to one or more of your existing shipping zones in Shopify.
Keep in mind, you’ll need to repeat the process below each time you want to add more countries and regions. If you think there’s a chance you’ll expand to additional shipping territories in the future, consider skipping ahead to Create a Catch-all Shipping Zone so you only need to complete this process once. We’ll show you how to create an all-in-one super zone that includes all current and potential shipping regions. If you have no plans to add new regions later, continue with the steps below.
1. In Intuitive Shipping, click on your store name at the far right of the app header, then select Shopify admin from the drop-down list. This will open your Shopify admin screen in a new browser tab.

2. Click Settings on the Shopify admin sidebar menu.


5. Click the ellipsis (three dots) beside any existing shipping zone. It doesn’t matter which one because it will not affect how zones are set up in Intuitive Shipping. Be sure to click the ellipsis beside the zone name - not the one beside the rate provider.


7. Search for the country or region you wish to add to the zone.

If the country you're looking for isn't available, you'll need to add it as a market. Click 'Add more countries/regions in Markets' at the bottom of the 'edit shipping zone' pop-up, then skip ahead to learn how to add more markets. Once you've added more countries to Markets, return here to complete the steps below.

8. Select each new country or territory you want to ship to. Use the ‘Search’ feature if necessary. You can add all of them to this existing zone, and use Intuitive Shipping to configure them correctly.

9. To stay organized, we recommend editing the shipping zone name to reflect any additions you’re making. The name you choose doesn’t affect how zones are labeled in Intuitive Shipping. It’s simply a way to keep your Shopify settings clear and manageable.


Learn more about zones.
Remember, you control which countries and regions see rates through Intuitive Shipping. You can add, remove, or edit zones in the app however you like, whenever you need to.
Create A Catch-all Shipping Zone
If you’re planning to add more countries and regions to your shipping strategy in the future - or even if you’re unsure - it’s a good idea to set up a ‘catch-all’ shipping zone in Shopify that includes not just the areas you want to ship to now, but every country and territory you might consider adding later. This gives you the flexibility to expand your shipping coverage down the road without needing to repeat this process in Shopify multiple times.
1. In Intuitive Shipping, click on your store name at the far right of the app header, then select Shopify admin from the drop-down list. This will open your Shopify admin screen in a new browser tab.
2. Click Settings on the Shopify admin sidebar menu.

6. Enter a name for your catch-all shipping zone, like ‘International’ or ‘Rest of World’. All of your new shipping regions will be added to this single zone, so it doesn’t matter what you call it.


9. Click Add rate under your newly created shipping zone.


Learn more about zones.
Remember, you control which countries and regions see rates through Intuitive Shipping. You can add, remove, or edit zones in the app however you like, whenever you need to.
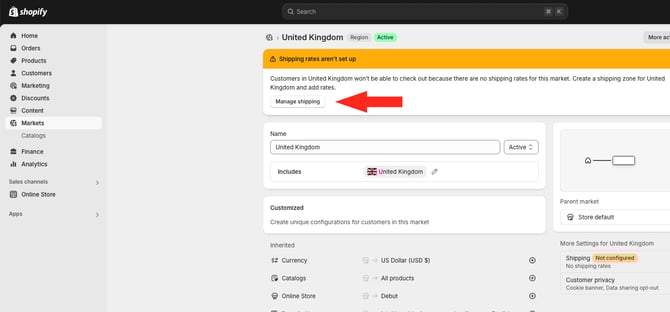
Markets
Shopify Markets lets you manage cross-border and overseas selling from your store. When you first set up your store in Shopify, your Primary market is created automatically. This is your domestic market, based on your store’s address and default currency.
International markets let you sell to customers in other countries, but they’re disabled by default. If you plan to sell internationally and haven’t activated any international markets, customers outside your country won’t be able to complete purchases, even if you’ve set up Shopify shipping zones and configured zones in Intuitive Shipping. At checkout, international customers will only see your domestic country and won’t be able to choose their own.

To resolve this, you’ll need to enable international markets:
1. In Intuitive Shipping, click on your store name at the far right of the app header, then select Shopify admin from the drop-down list. This will open your Shopify admin screen in a new browser tab.
2. Click Markets on the sidebar menu.

3. Click the + symbol to add a market.

4. If desired, edit the Market name - or leave it as-is.

5. If you're setting up an international market, add or remove countries/regions by clicking the pencil icon in the 'Includes' section. You may wish to edit the name (see Step 4) based on which countries are included, or leave it as 'International'.


8. Click the Save button at the top of the screen to save your new market.

New markets require shipping rates to be assigned. Without them, customers from those countries or regions won’t be able to complete the checkout process.
Locations
Shopify’s Locations feature lets merchants set up multiple shipping origin points, helping manage inventory and regional fulfillment more efficiently. However, we generally recommend against using multiple Shopify Locations with Intuitive Shipping, as it can lead to issues like missing or duplicated rates. This is because Shopify doesn't share location or inventory details with our system during checkout. Without access to that information, Intuitive Shipping cannot apply conditions based on location or inventory, increasing the risk of incorrect rate calculations.
How To Prevent Missing Rates and Checkout Errors
If you must set up multiple Shopify locations, make sure to add Intuitive Shipping as a rate provider for each location, as well as for the Shopify shipping zone or zones assigned to each location.
If a new location is created but not yet configured in your Shopify Shipping and delivery settings, and a customer tries to order products stocked at that location, no rates will appear at checkout. This happens even if the cart also includes products from properly configured locations. The same error will occur if a location has assigned shipping zones but no rates or rate providers connected to those zones.
Here’s how to ensure all your Shopify locations are configured with Intuitive Shipping as a rate provider:
1. In Intuitive Shipping, click on your store name at the far right of the app header, then select Shopify admin from the drop-down list. This will open your Shopify admin screen in a new browser tab.
2. Click Settings on the Shopify admin sidebar menu.
5. Confirm that all of your shipping origin locations are listed in the 'Fulfillment locations' section


Profiles
Shopify’s Shipping Profiles feature lets merchants create custom profiles for products with special shipping needs, like fragile items or inventory from different vendors with different rates. When a customer orders products from multiple profiles, Shopify combines the rates from each one into a single blended rate at checkout.
Intuitive Shipping is built to work with just one profile. This is due to how Shopify handles rate calculations at checkout. When more than one profile is used, Shopify splits the cart into separate sub-carts for each profile before passing the information to us. Intuitive Shipping calculates shipping for each sub-cart individually, then returns those rates to Shopify, where they’re blended into one rate.
How Profiles Work
In your Shopify Shipping and delivery settings, you’re assigned one profile for 'General shipping rates' by default. It includes all of your products. Shopify gives you the option to create additional profiles, each with its own shipping rate.
When you assign products to a custom profile, they're removed from the General profile, since products can only belong to one profile at a time. Within each profile, you can set up shipping zones and add rates just as you would in the default profile. This gives you the flexibility to apply different shipping rates to certain products or restrict products to specific shipping zones.
This setup can work well for basic shipping needs where simply blending rates together is sufficient. However, if your shipping strategy is more complex, multiple profiles can interfere with accurate rate calculations. That's where Intuitive Shipping comes in!
The good news is, if you’re already using Intuitive Shipping, you don’t need custom shipping profiles. More on that shortly...
Assigning Intuitive Shipping to a Single Profile
Let’s say you have three different profiles: your General profile, which was created by default, along with two custom profiles for Clothing products and Fragile products. If Intuitive Shipping is only assigned as a rate provider for your General profile, it can only calculate shipping for products in that profile. That means, if a customer attempts to purchase products from your custom profiles on the same order, Intuitive Shipping won’t calculate shipping for those items.
For example, let's say you’re offering conditional free shipping on orders over $75.00. A customer order includes:
- A $60.00 product from your General profile.
- A $20.00 product from your Clothing profile.
Intuitive Shipping will only see the $60.00 item. Even though the customer’s total is $80.00, our system only registers $60.00 and will not trigger the free shipping condition. While you could resolve this by assigning Intuitive Shipping to all your profiles, doing so introduces a different problem...
Assigning Intuitive Shipping to Multiple Profiles
When you assign Intuitive Shipping to all three profiles (the General profile, plus your two custom profiles), shipping rates may be duplicated or multiplied depending on the customer’s order. And if you’re using free shipping thresholds, it may result in only partial free shipping.
Let’s use the same example. You have three Shopify profiles: one for General, one for Clothing, and one for Fragile products. You’ve assigned Intuitive Shipping as a rate provider for all three profiles this time. In Intuitive Shipping, your setup looks like this:
- One Scenario with no conditions.
- A shipping method with a flat shipping rate of $15.00.
- A free shipping threshold of $75.00.
If a customer orders a $60.00 product from your General profile and a $20.00 product from your Clothing profile, they won’t qualify for free shipping. Shopify sends each profile’s items as a separate sub-cart, so neither sub-cart meets the $75.00 threshold. Each one is charged $15.00, resulting in a $30.00 shipping charge at checkout. Not only is the customer denied free shipping, they’re charged twice your standard rate.
Even if the customer increases their order - for example, two $60.00 items from General, for a updated subtotal of $120.00, plus the $20.00 item from Clothing - they’ll still be charged $15.00 at checkout. That’s because only the General sub-cart qualifies for free shipping. To receive free shipping on the entire order, the customer would need to spend at least $75.00 within each profile.
Remember that good news we mentioned earlier?
You Don’t Need Multiple Profiles
Because of how Shopify sends us information at checkout, there is no workaround for rate calculation issues caused by multiple profiles. The only way to completely avoid these risks is to remove any additional profiles and use only your General profile.
That’s okay! Shopify’s profiles feature was designed to give merchants flexibility and customization with shipping rates. Fortunately, Intuitive Shipping is powerful, robust, and flexible enough to handle everything profiles were meant to do, plus a whole lot more. If certain products need different shipping rates, you can create multiple product-based Scenarios using product conditions, then use simple rate blending to combine those rates at checkout.
With advanced blending, you can even customize the way rates are blended together or create custom shipping method titles and descriptions when blending is in effect. If one product’s rate should take priority regardless of what else is ordered, Intuitive Shipping can do that too.
In situations like the examples we used earlier, where free shipping should be offered to customers that spend $75.00 or more, Intuitive Shipping ensures that works as intended.
Remove Custom Profiles
To ensure Intuitive Shipping is calculating rates properly, we recommend removing all custom profiles and keeping only your General (default) profile.
1. In Intuitive Shipping, click on your store name at the far right of the app header, then select Shopify admin from the drop-down list. This will open your Shopify admin screen in a new browser tab.
2. Click Settings on the Shopify admin sidebar menu.
4. In the Shipping section, click the side-facing arrow next to a custom profile.

5. Click Actions at the top of the page, then click Delete profile.

6. When prompted by the pop-up box, click the Delete profile button to confirm you want to delete your custom profile. Products that were assigned to the deleted profile will automatically be put back into your default General profile.
7. Repeat Steps 4 to 6 for each additional custom profile until only your General profile remains.
Products
When you install Intuitive Shipping, all of your products are synced with our system during installation. This allows us to access product details that may be needed for rate calculations, including names, collections, types, tags, and vendors used in Scenario product conditions.
If you add, remove, or edit products in Shopify, our system needs to be updated accordingly. Keeping product information current ensures Intuitive Shipping can calculate rates accurately and helps avoid errors or missing rates at checkout.
Update Your Product Catalog Changes
We recommend performing this action while in Sandbox mode whenever you do any of the following:
- Add or remove products or variants
- Change product or variant titles (names)
- Add or remove product tags
- Assign or remove product vendors
- Add to or update product collections/ categories
- Update product prices
- Update product types
- Update product images
- Update fulfillment services (legacy Shopify feature)
Importing product catalog changes is required while you are in Sandbox.
Product catalog changes are synced automatically when you have an active billing plan. However, we recommend manually importing changes if you add, remove, or update several products in a short period of time.
1. Click Shopify connection on the sidebar menu.

2. Click the Import product catalog changes button.

The number of products, collections, and, if applicable, fulfillment services synced, along with the date and time of your last sync, are displayed above the button. After clicking the button, the summary and time stamp will update.
While syncing is in progress, the button will be replaced with a message: ‘Syncing in progress. Please check back shortly.’
Syncing may take a couple of minutes, depending on the size of your product catalog. You can navigate to other parts of the app during this time, but we strongly recommend avoiding changes to your Intuitive Shipping product settings or running test checkouts until the sync is complete.
Manual syncing refreshes your entire product catalog, even if only a few products were changed.3. Check back and review the time stamp to confirm the sync was completed.
Product Weight
Product weight is required whenever you’re using:
-
a parcel service, integrated service or freight service shipping method to calculate live carrier rates.
-
product weight or cart weight Scenario conditions to restrict shipping.
-
weight as a Scenario product filter.
-
a weight-based rate type to calculate custom shipping rates.
-
a weight-based threshold to offer free shipping.
Each product listing in Shopify includes a field for product weight. When any of the situations above apply, Intuitive Shipping checks Shopify for the product’s weight during the checkout process. Product weights are not synced with our system. We reference the weight in Shopify only if it’s required for the calculation.
If a product weight is required and even one product in the cart is missing a weight value, the entire calculation will fail.
To prevent this, there are two ways to fix calculation errors caused by missing product weights in Shopify.
Option 1: Add Weight To Shopify Product Information Listing
The first option is to update a product’s weight directly in Shopify. When a weight is required, Intuitive Shipping checks Shopify at checkout and uses that value to calculate shipping.
1. In Intuitive Shipping, click on your store name at the far right of the app header, then select Shopify admin from the drop-down list. This will open your Shopify admin screen in a new browser tab.
2. In the Shopify admin, click Products from the sidebar menu.
3. Click on any product that requires a weight.
4. Scroll to the Shipping section. Enter a weight value for the product, then click Save.
We recommend using the same unit of measure that you use in Intuitive Shipping.
For example, if your default unit of measure in Intuitive Shipping is kilograms (kg), we recommend using kg in Shopify as well. If the units of measure are different, such as using kilograms (kg) in Intuitive Shipping and pounds (lbs) in Shopify, the weight value will be converted during the calculation, which may result in discrepancies that could affect rates.
5. Repeat Steps 3 and 4 for each product that requires a weight value.
Option 2: Add Weight To Intuitive Shipping
You may find it easier to simply add required product weights directly to Intuitive Shipping. You can add a weight to any product, whether it already has a weight in Shopify or not. The product weight in Intuitive Shipping will override the weight in your Shopify product settings.
Please note: Intuitive Shipping does not sync product weights with Shopify.
That means we only look for a weight in Shopify when it’s required. If weight is required, we first look at the product listing in the app. If it’s there, we use it for the calculation. If it’s not there, we look at the product listing in Shopify.
To add product weights to Intuitive Shipping, check out our Update Product Settings help guide and refer to the ‘Physical Attributes’ section for information on adding individual product weights. Alternatively, using the same guide, check out the ‘Update Product Settings In Bulk’ section to learn how to add product weights in bulk using a CSV file.
Product Dimensions
Product dimensions are required if you’re using:
-
volume-based or dimensional-based conditions in Scenarios.
-
volume-based packing algorithms, including SmartBoxing.
-
simple packing algorithms, such as weight-based, but where dimensions are used to restrict certain products from being packed into specific boxes due to their size.
Learn more about how to use SmartBoxing for accurate dimensional shipping.
If any of these apply to your setup, you’ll need to add product dimensions to Intuitive Shipping. Without them, shipping methods that rely on these features won’t be able to calculate rates - and customers won’t be able to complete their checkout.
When product dimensions are needed, Intuitive Shipping requires a dedicated value for length, width, and height. Shopify doesn’t include these fields in your product information listings. That means any product dimensions you’ve added to Shopify are not provided to us at checkout. The only way to prevent calculation errors due to missing dimensions is by adding them directly to Intuitive Shipping.
To add product dimensions to Intuitive Shipping, check out our Update Product Settings help guide and refer to the ‘Physical Attributes’ section for information on adding product dimensions to individual products. Alternatively, using the same guide, check out the ‘Update Product Settings In Bulk’ section to learn how to add product dimensions in bulk using a CSV file.
Customer Tags
Shopify no longer sends us customer tags or email addresses at checkout. As a result, Intuitive Shipping relies on the customer’s name and shipping address to match the customer on file and apply any associated tags. If you have customers using different names, or if orders are placed on behalf of a third-party using a different address, this can affect customer identification and prevent tags from being applied correctly.
To work around this, Intuitive Shipping can provide a code snippet, which you, your developer or Shopify administrator can add to the product page. Please contact us for more information.