Create A No Shipping Method
Use the advanced 'no shipping' method to create a forced fail when you want to restrict shipping under certain cart conditions.
There may be times when you need to prevent shipping from being displayed under specific conditions. In many cases, this can be managed using Intuitive Shipping’s standard features and common settings. However, some situations may require more complex Scenarios with multiple conditions, zones, or subzones, which can be time-consuming to set up and difficult to maintain when changes are needed later.
A simpler and more efficient solution is to use a ‘forced fail’ setup with the advanced No shipping service.
This guide will show you how to use the ‘No shipping’ service option when you have product restrictions or when you want to block shipping to certain postal code subzones.

Learn more about subzones.
How It Works
In this guide, we’ll show you how to use the ‘No shipping’ service option as a forced fail in two different situations:
-
Product restrictions
-
Subzones (postal codes or ZIP codes)
Using 'No shipping' with product restrictions is especially helpful when you offer blended shipping rates with multiple carrier service levels (ground, expedited, etc.), but certain products can't ship with some services.
With this setup, you don’t need to edit your existing Scenarios. Instead, you can create a new Scenario that includes a paid shipping method set to blend with other eligible methods for restricted products, along with a No shipping method that blends with, and blocks, any methods that are not eligible for those products.
Using a No shipping service with subzones lets you force fail shipping with postal codes or ZIP codes that are difficult to reach or cost-prohibitive. In this situation, you don’t need to create any new Scenarios. Once you’ve set up your restricted subzones, you can add a No shipping service to your existing Scenarios and assign it to those subzones.
No Shipping With Product Restrictions
Let’s say you have ten different product types, each with its own Scenario that includes a flat ‘Ground’ and ‘Expedited’ rate option. You’ve enabled blending on each shipping method and set up two advanced blending rules: one that combines all shipping methods tagged ‘GROUND’ and another that combines all methods tagged ‘EXPEDITED’.

Learn more about rate blending and advanced blending rules.
Now you've introduce a new product that has shipping restrictions and can only ship ‘Ground’. This means the entire order must be shipped ‘Ground’, no matter what else is in the cart. To prevent customers who order this product from seeing the ‘Expedited’ option, simply create a new Scenario for the restricted product. In that Scenario, add a paid ‘Ground’ option set to blend with other ‘Ground’ rates, along with a ‘No shipping’ option set to blend with other ‘Expedited’ rates.
You don’t need to edit your existing Scenarios. When customers order the restricted product along with other items, they’ll only see your blended ‘Ground’ option at checkout. The ‘Expedited’ option won’t appear unless they remove the restricted product.
To avoid confusion, we recommend clearly stating any product shipping restrictions on your website, such as in a ‘Shipping’ info page or in your site footer.
Create A New Scenario
While you can create a new Scenario from scratch, it might be easier to create a duplicate of one of your existing Scenarios, then make changes as needed.
For this example, we’re going to create a duplicate of an existing Scenario.
1. Click Shipping on the main menu, then select Scenarios from the drop-down list.
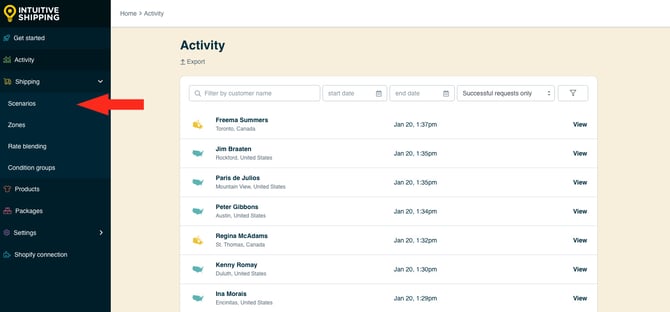
2. Click Edit beside any of your existing product-based Scenarios.

3. Click Duplicate below the Scenario heading.

4. Change the Scenario title from ‘Copy of [the original title] to something else. We recommend using a format similar to the title of your existing Scenarios that identifies it as the restricted product Scenario, like 'Restricted Products'.

5. Leave Status set to 'On'.

6. Leave Conditions set to Set restrictions and Condition match set to All conditions.
7. Change the product condition as needed. For this example we're using product tags, so we're changing the condition value to 'restricted' which is the tag we assigned to our restricted products.

 Product tags are managed in your eCommerce platform's product information settings. Tags are not case sensitive.
8. Leave the additional product setting below the condition value set to Any product. As long as at least one item in the cart is tagged with the value entered in Step 7, the shipping methods assigned to the new Scenario - including the 'No shipping' service we're creating soon - will activate at checkout.

Save Your Settings
1. Click the Save button to save your new Scenario.

Delete Ineligible Shipping Methods
When you created the duplicate of the original Scenario, it copied all of the settings from the original, including the shipping methods. Depending on how those shipping methods were configured, you’ll likely need to remove at least one before adding ‘No shipping’.
In this example, the original Scenario included two custom service (flat rate) shipping methods: one for Ground and one for Expedited. Both shipping methods include a rate blending tag, which allows them to be blended with other shipping methods using the same tag.
Since the restricted products can only be shipped by Ground, we're deleting the 'Expedited shipping' method and replacing it with a ‘No shipping’ service. We'll add the 'EXPEDITED' rate blending tag to it, which will force expedited shipping blending to fail when restricted products are in the cart, leaving only the Ground option.
1. Click Edit beside the shipping method you need remove.

2. Scroll to the bottom of the page, then click the Delete button.

3. When prompted, click the Delete button to confirm.


Deleting a shipping method is permanent and cannot be undone.
4. Scroll down to ‘Shipping rates and services’, then click the Create shipping method button.

Select No Shipping Service
1. Click the downward arrow beside ‘Advanced services’, then select No shipping from the list.

2. Click the Next button.

3. Select the same zone you used for the shipping method that was removed earlier.

4. Click the Configure shipping button.

General
1. Enter a shipping method title, like ‘No Shipping - Restricted Products’. Typically, shipping method titles are visible to customers. However, for ‘No shipping’ service, the title is not visible to customers.

2. Leave the Status set to ‘On’.

3. Click Show optional settings.

4. Select Blend with other rates.
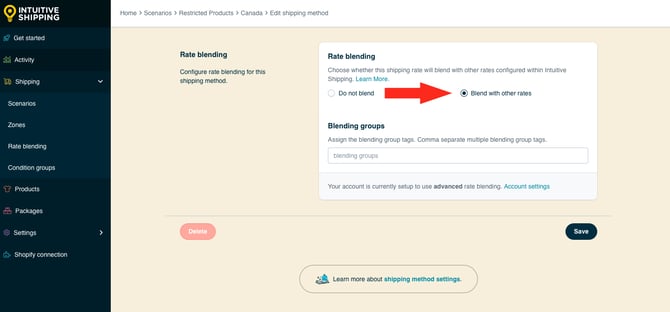
For this example, we’re using advanced blending with blending rules. Advanced blending lets you create multiple blending rules that use blending group tags to combine rates together, such as blending all Ground shipping methods into one group and all Expedited shipping methods into another.

Advanced blending must first be enabled in your General Settings.

Learn more about rate blending.
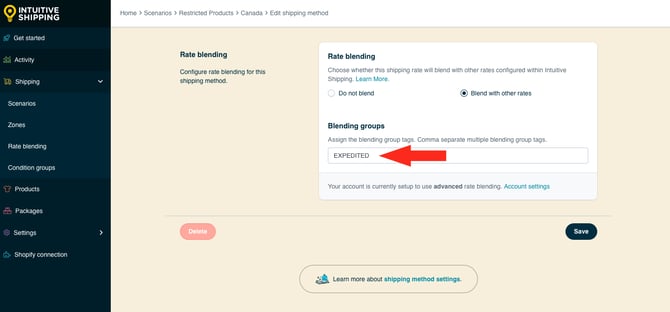
5. Enter the same blending group tag used with the service you do not want available for restricted products. In this example, we’re using 'EXPEDITED'. When a customer adds a restricted product to the cart, the No shipping method will blend with all other shipping methods tagged 'EXPEDITED', causing the entire blended rate to fail. At checkout, the customer will only see a blended Ground option unless they remove the restricted product.
Save Your Settings
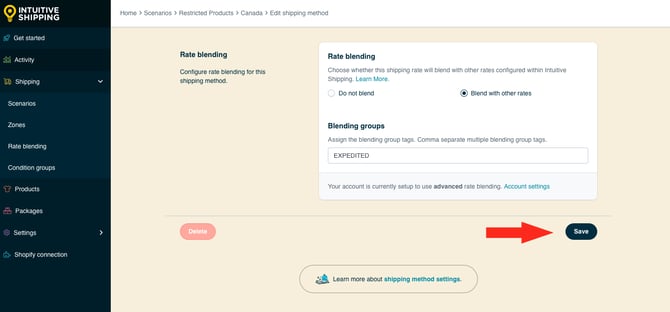
1. Click the Save button to save you ‘no shipping’ shipping method.
No Shipping With Subzones
Subzones are created using postal codes or ZIP codes. They let you offer exclusive rates or restrict shipping to smaller, more localized areas within a parent zone (countries, regions, islands, states, or provinces.)

Learn more about zones.
Instead of building a subzone for every region you do ship to, which can be time-consuming for larger areas, you can create subzones only for the regions you don’t ship to.
For example, if you ship throughout the United Kingdom but want to exclude the Scottish Highlands due to higher costs or delivery challenges, you’ll need to set up a subzone specifically for the Highlands. Since the Highlands are normally part of your main UK Zone, which already has a shipping method assigned, you can edit your existing Scenarios with UK shipping methods and assign a 'No shipping' method only to the Highlands subzone.
You do not need to create a new Scenario for this setup. Customers outside the Highlands will continue to see your regular shipping options at checkout. Customers in the Highlands will not see any shipping methods.
To avoid confusion, we recommend making your shipping restrictions clear on your website, such as in a ‘Shipping’ info page or in your store footer.
Create A Sub-Zone
If you don’t already have a subzone for the area you want to prevent from getting shipping, you’ll need to create one.
Subzones must be added to the ‘parent’ zone that includes their postal codes or ZIP codes. That means you cannot add UK postcodes to a zone that doesn’t include the UK, just as you cannot add US ZIP codes to a zone that doesn’t include the US - or at least the state those ZIP codes belong to.
1. Click Shipping on the main menu, then select Zones from the drop-down list.

2. Click Edit beside the zone you want to add the subzone to. For this example, we’re editing our zone for the UK (United Kingdom).

3. Scroll down to the Subzones section, then click Add subzone.

4. Enter a subzone title. We recommend naming your subzone after the local region (or regions) covered by the postal codes entered in Step 6. For the example, we’re calling it ‘Scottish Highlands’.


Subzone titles are not visible to customers.
5. Leave the subzone status set to ‘On’.

6. Enter the postal code or postal code ranges for your subzone. For this example, we’re entering all of the UK postcode ranges for Scottish Highlands.

 Use the : (colon) symbol to create a range, such as ‘AB10:AB24’. Every postcode between and including the prefixes AB10 and AB24 are included in the range.
7. Select a postal code type. For this example, we’re selecting ‘United Kingdom’ because we’re using UK postcodes. If your subzone is for ZIP coes or postal codes outside the UK, use ‘Standard’.

 The UK uses a unique postcode format that requires Intuitive Shipping to perform a special lookup to verify the postcode is entered correctly. Learn more about postal code formatting.
8. Click the Save button to save your subzone

The subzone is listed in the parent zone and can be edited or deleted at any time without affecting the parent. However, if you delete a parent zone, it will also delete any subzones included in it.

Add A No Shipping Method
After creating a subzone for restricted shipping areas, you’ll need to add a ‘No shipping’ service to your existing Scenario (or Scenarios).
1. Click Shipping on the sidebar menu, then select Scenarios from the drop-down list.

2. Click Edit beside a Scenario that currently includes shipping to the area you wish to restrict. For this example, we only have one Scenario for 'Standard Shipping'.

3. Scroll down to Shipping rates and services, then click the Create shipping method button.

Select No Shipping Service
1. Click the downward arrow beside ‘Advanced services’, then select No shipping from the list.

2. Click the Next button.

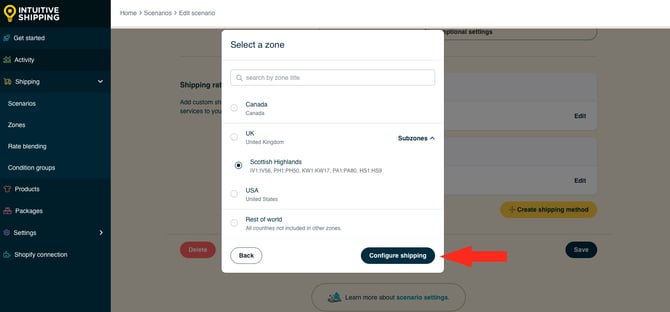
4. Locate the parent zone that includes the subzone you created earlier in this guide. Click the downward arrow beside 'Subzones', then select the newly created subzone from the list. For this example, we're selecting 'Scottish Highlands'.

5. Click the Configure shipping button.
General
1. Enter a shipping method title, like ‘No Shipping - Scottish Highlands’. Typically, shipping method titles are visible to customers. However, for ‘No shipping’ service, the title is not visible to customers.

2. Leave the Status set to ‘On’.

Optional settings are available for rate blending. However, these settings are not required when using ‘No shipping’ with sub-zones.
Save Your Settings
1. Click the Save button to save you ‘no shipping’ shipping method.

2. Repeat all the steps above for each Scenario that currently includes a shipping option for the restricted area.
