---
title: How To Use Greenest Choice
description: Learn how to configure display settings for Greenest Choice and help customers choose the lowest-carbon shipping option at checkout.
---
[Skip to content](https://knowledge.intuitiveshipping.com/how-to-use-greenest-choice#main-content)
[](https://knowledge.intuitiveshipping.com?hsLang=en)
- [FAQ](https://knowledge.intuitiveshipping.com/faq-page)
- [Main Site](https://intuitiveshipping.com/)
Open main navigation
Close main navigation
- [FAQ](https://knowledge.intuitiveshipping.com/faq-page)
- [Main Site](https://intuitiveshipping.com/)
- [Contact us](https://knowledge.intuitiveshipping.com/contact)
[Contact us](https://knowledge.intuitiveshipping.com/contact?hsLang=en)
How can we help?
- There are no suggestions because the search field is empty.
1. [Intuitive Shipping Help Center](https://knowledge.intuitiveshipping.com/?hsLang=en)
2. [How-To](https://knowledge.intuitiveshipping.com/how-to?hsLang=en)
# How To Use Greenest Choice
## Configure display settings for Greenest Choice and help customers choose the lowest-carbon shipping option at checkout.
**Contents:**
- [How It Works](https://knowledge.intuitiveshipping.com/how-to-use-greenest-choice#how-it-works)
- [Configure Greenest Choice](https://knowledge.intuitiveshipping.com/how-to-use-greenest-choice#configure-greenest-choice)
- [Configure Checkout Banner in Shopify](https://knowledge.intuitiveshipping.com/how-to-use-greenest-choice#configure-banner-in-shopify)
- [Test Greenest Choice](https://knowledge.intuitiveshipping.com/how-to-use-greenest-choice#test-greenest-choice)
- [Troubleshooting](https://knowledge.intuitiveshipping.com/how-to-use-greenest-choice#troubleshooting)
****
**Greenest Choice** gives shoppers a more sustainable way to receive their order by showing them the lowest-carbon shipping option at checkout. It's designed for shoppers who are happy to wait a little longer to reduce the environmental impact of shipping.
### How It Works

Greenest Choice is currently available for Shopify in Canada and the US.
When Greenest Choice is enabled, Intuitive Shipping highlights the shipping option with the **lowest carbon footprint**, giving customers the option to choose a more environmentally friendly delivery, even if it takes a little longer.
To use Greenest Choice, both your store’s origin address and the customer’s delivery address **must be in Canada or the United States**, including US territories such as Puerto Rico and the US Virgin Islands.
If your store is located outside these regions, the Greenest Choice settings will not be visible in Intuitive Shipping. If your store is in Canada or the US and you ship internationally, Greenest Choice will not be shown for customers with delivery addresses outside these regions.
Greenest Choice options will be displayed when:
- You're using a [parcel service](https://knowledge.intuitiveshipping.com/create-a-parcel-service-shipping-method?hsLang=en) or [integrated service](https://knowledge.intuitiveshipping.com/create-an-integrated-service-shipping-method?hsLang=en) shipping method (real-time carrier rates) **with additional display settings set to 'Show delivery estimate',** either carrier-provided or custom estimates defined by you.
- You're using a [custom service](https://knowledge.intuitiveshipping.com/create-a-custom-service-shipping-method?hsLang=en) shipping method (flat rates, rate tables, free shipping) or [local delivery](https://knowledge.intuitiveshipping.com/create-a-local-delivery-shipping-method?hsLang=en) shipping method **with custom delivery days (or dates) enabled in additional display settings**.
If the difference in carbon impact between available options is **less than 1x**, Intuitive Shipping will identify the *cheapest option* as the Greenest Choice, and will indicate that other options have an equivalent carbon impact.
After setting up Greenest Choice, be sure to [test your configuration](https://knowledge.intuitiveshipping.com/how-to-use-greenest-choice#test-greenest-choice) to confirm everything is working as expected.

Please [contact us](https://knowledge.intuitiveshipping.com/contact?hsLang=en) if you need any assistance with Greenest Choice.
### Configure Greenest Choice
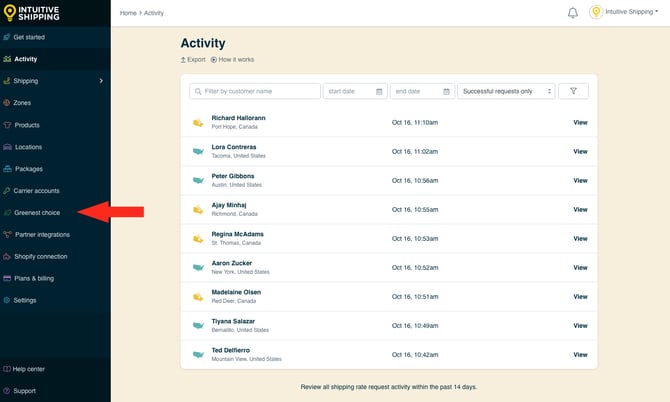
**1.** Click **Greenest Choice** on the sidebar menu.
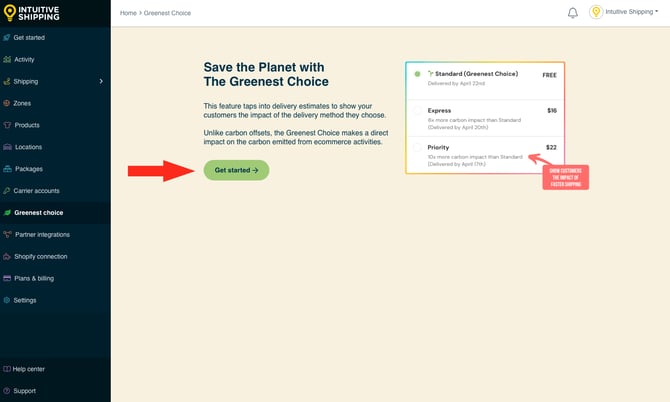
**2.** Click **Get started**.
**3.** Set the **Greenest Choice status**.
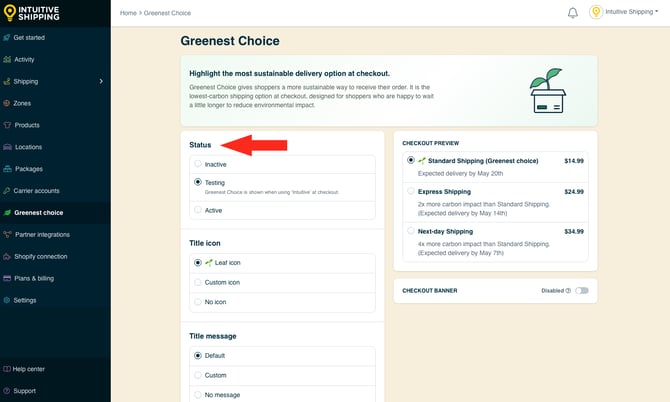
You have three settings to choose from:
- **Inactive** - The Greenest Choice will not be shown at checkout.
- **Testing** - The Greenest Choice will be shown at checkout, only when using ‘Intuitive’ on the checkout page (see below).
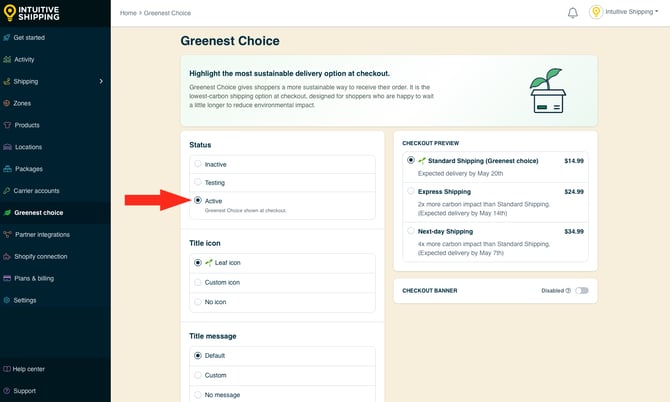
- **Active** - The Greenest Choice will be shown at checkout.
When using the '**Testing**' setting:
- **Shopify** - Enter ‘Intuitive’ as either the customer’s first or last name.
- **Shopify B2B** - Enter ‘Intuitive’ in the optional address field for ‘Apartment/ Suite/ Building’.
****While in[Sandbox mode](https://knowledge.intuitiveshipping.com/select-a-billing-plan#sandbox-mode), the 'Active' setting behaves the same as 'Testing' until a billing plan is selected.
 We strongly recommend [testing](https://knowledge.intuitiveshipping.com/how-to-use-greenest-choice#test-greenest-choice) Greenest Choice before making it active at checkout.
**4.** Select a **title icon**.
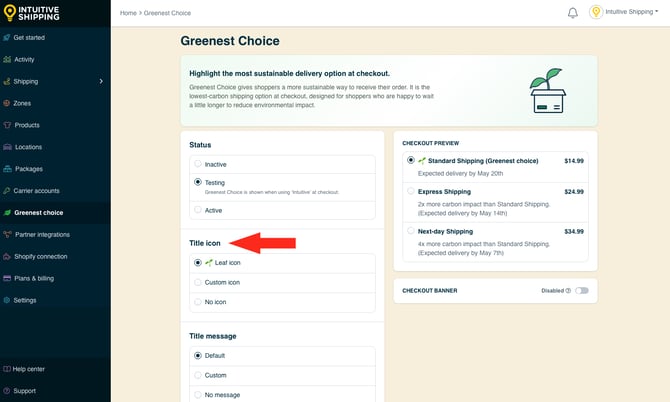
You have three settings to choose from:
- **Leaf icon** - The leaf icon will be displayed next to the shipping method identified as the greenest choice.
- **Custom icon** - The icon (emoji) you select will be displayed next to the shipping method identified as the greenest choice.
- **No icon** - No icon will be displayed next to the shipping method identified as the greenest choice.
**5.** Select a **title message**.
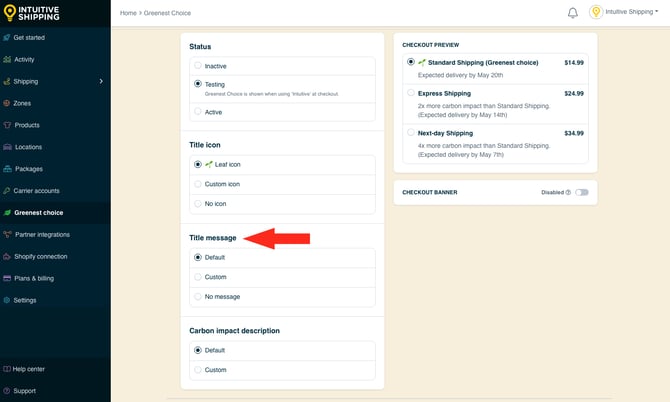
You have three settings to choose from:
- **Default** - Intuitive Shipping's default title message will be displayed with the shipping method identified as the greenest choice.
- **Custom** - The message you enter here will be displayed with the shipping method identified as the greenest choice.
- **No message** - No message will be displayed with the shipping method identified as the greenest choice.
**6.** Select the **carbon impact description**.
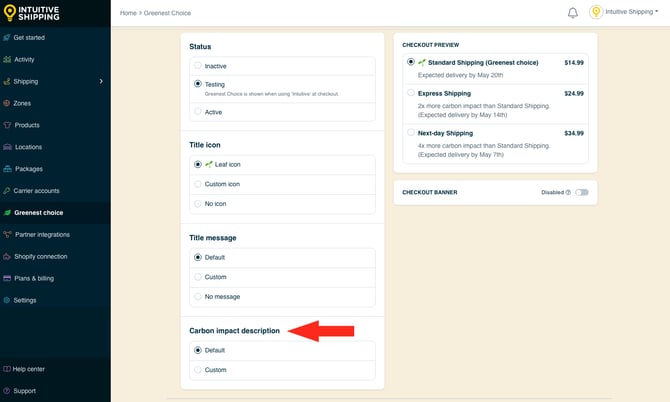
You have two settings to choose from:
- **Default** - Intuitive Shipping's default description will be displayed with the shipping methods that are *not* the greenest choice.
- **Custom** - The message you enter here will be displayed with the shipping methods that are *not* the greenest choice.
When using the 'Custom' setting, be sure your description includes the properties formatted exactly as shown with double { brackets.
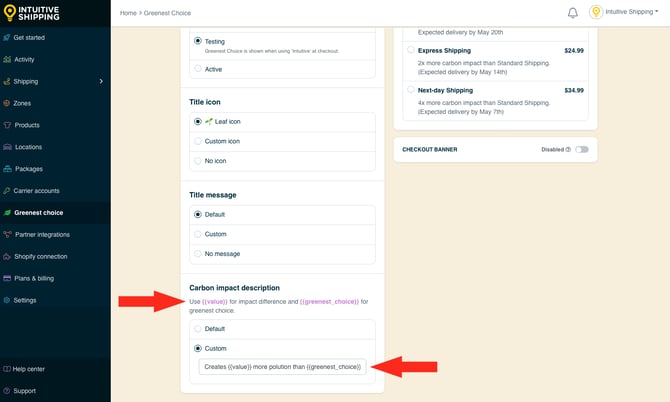
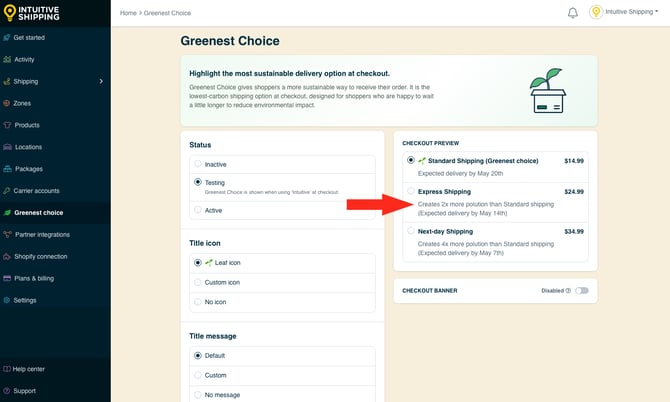
At checkout, it will appear like:
'Creates 2x more polution than standard shipping'
#### Enable Checkout Banner
Intuitive Shipping lets you highlight Greenest Choice options even more while adding some flair to your checkout experience by enabling a Greenest Choice banner on your Shopify checkout page.
To enable a checkout banner, continue to **Step 1**. If you don't wish to display a banner at checkout, skip ahead to [save your Greenest Choice settings](https://knowledge.intuitiveshipping.com/how-to-use-greenest-choice#save-your-settings).
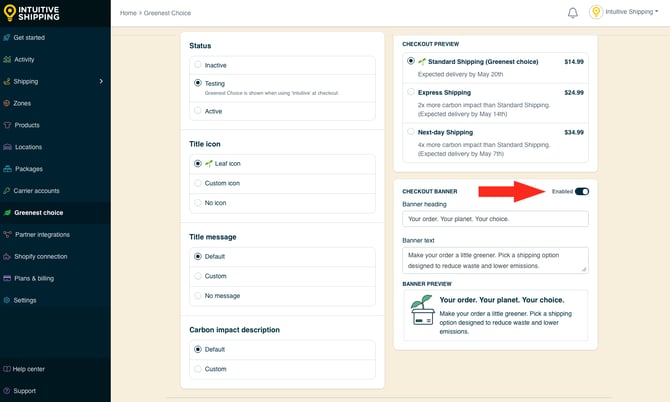
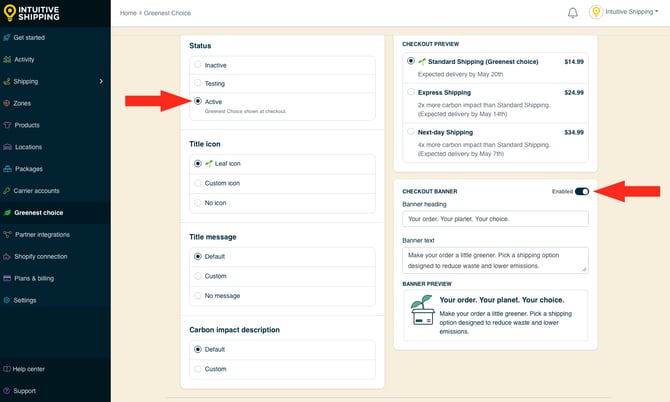
**1.** Set the **Checkout Banner** toggle to '**Enabled**'.
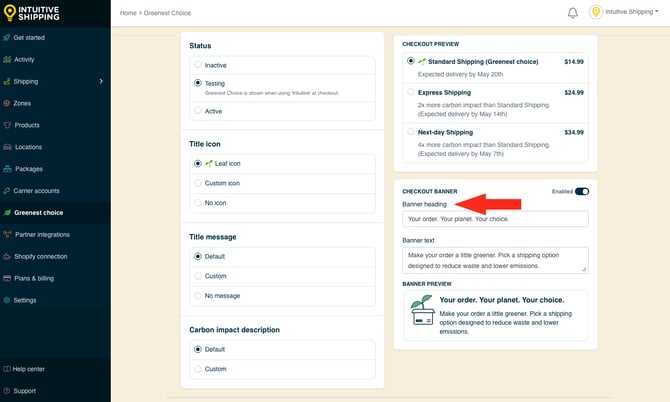
**2.** Change the **Banner heading** or use the pre-loaded heading.
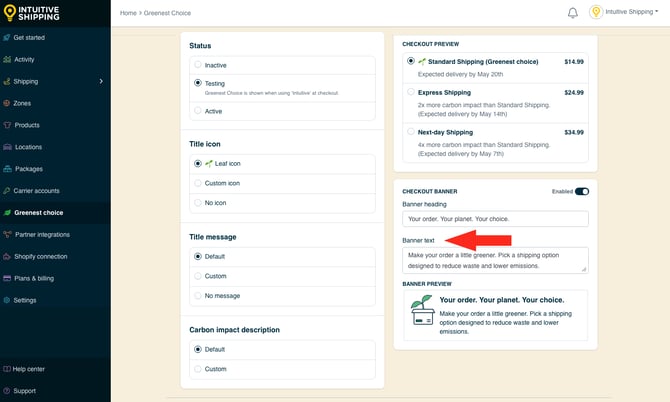
**3.** Change the **Banner text** or use the pre-loaded message.
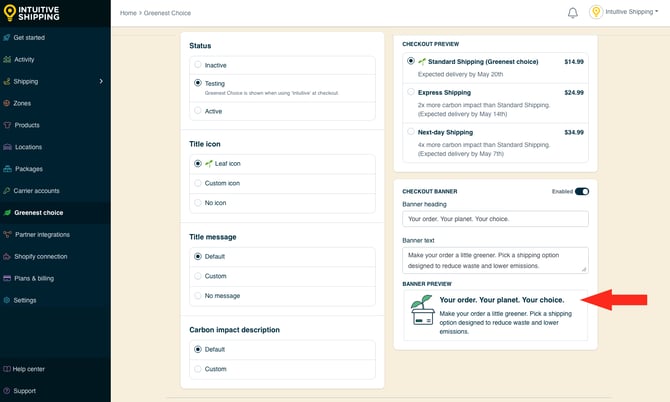
Any changes made to either the banner heading or text will appear in real-time on the **banner preview**.
#### Save Your Settings
**1.** Click the **Save** button to save your Greenest Choice settings.
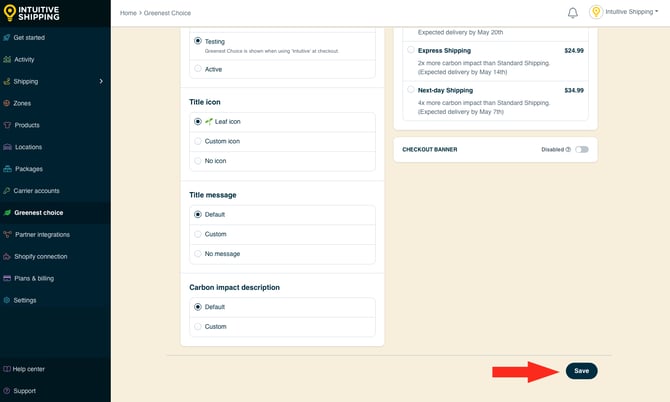
**Please note:** if you [enabled the checkout banner](https://knowledge.intuitiveshipping.com/how-to-use-greenest-choice#enable-checkout-banner) in Greenest Choice settings, you must also configure it in your Shopify settings for it to appear at checkout. Continue to the [next section](https://knowledge.intuitiveshipping.com/how-to-use-greenest-choice#configure-banner-in-shopify).
If you do not want to display the checkout banner, skip ahead to [test your Greenest Choice settings](https://knowledge.intuitiveshipping.com/how-to-use-greenest-choice#test-greenest-choice).
### Configure Checkout Banner in Shopify
To display the Greenest Choice banner on your checkout page, you’ll need to edit your theme to **add it to the checkout page**.
**1.** Confirm that Intuitive Shipping Greenest Choice is **active** and that the checkout banner is **enabled**. If either setting is not active, the banner will not display at checkout, even if it has been configured in Shopify.
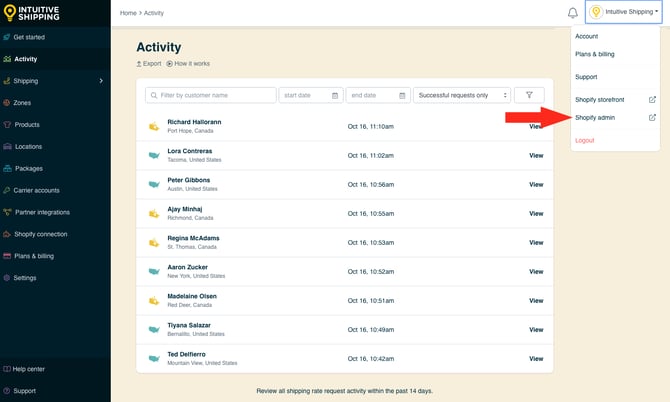
**2.** Click your store name at the top right of the app header, then select **Shopify admin** from the drop-down menu. This will open your Shopify settings in a new browser tab.
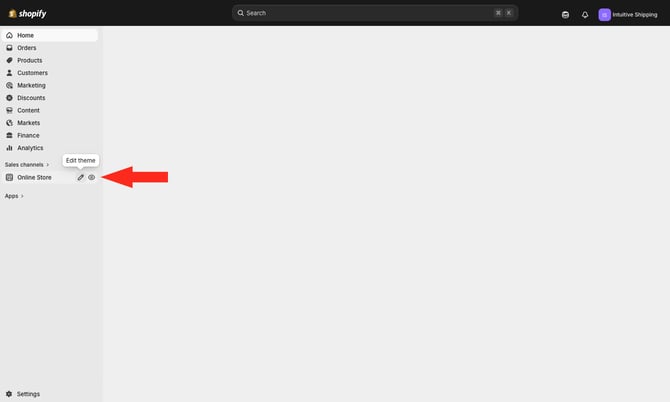
**3.** Hover over '**Online Store**', then click the **pencil icon** to edit your theme.
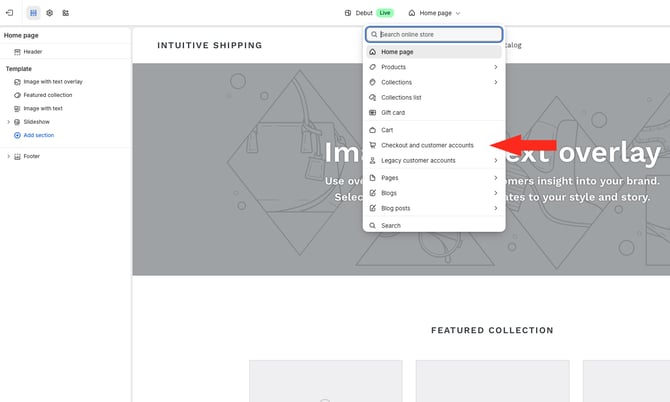
**4.** Click the **downward arrow** next to 'Home Page' on the menu bar, then select **Checkout and customer accounts** from the drop-down list.
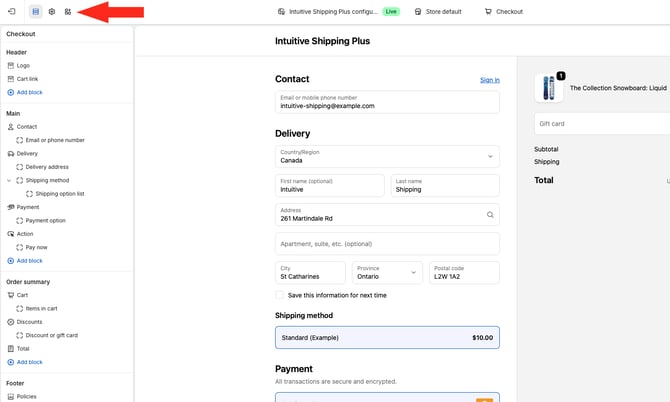
**5.** Click the **apps icon** on the menu bar.
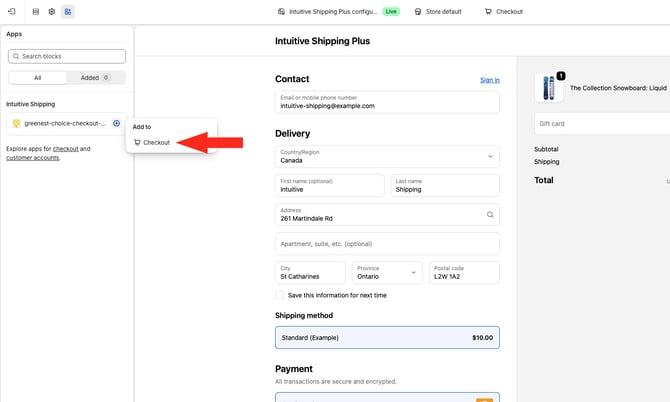
**6.** Click the **plus (+) icon** next to Intuive Shipping **greenest-choice-checkout**, then select **Checkout** from the 'Add to' box.
The Greenest Choice banner will be displayed like this:
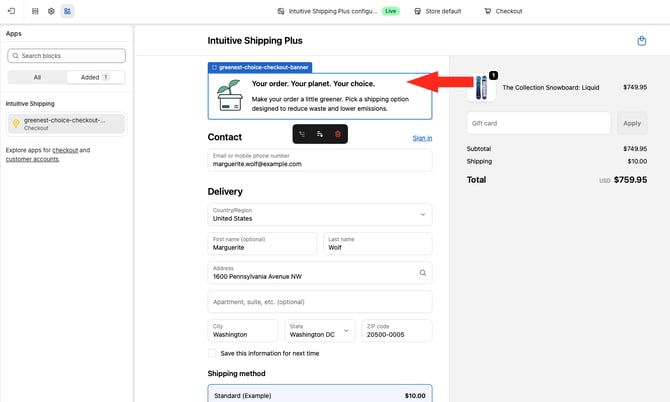
**7.** If desired, use the **up/down functions** to adjust the location of the banner on your checkout page.
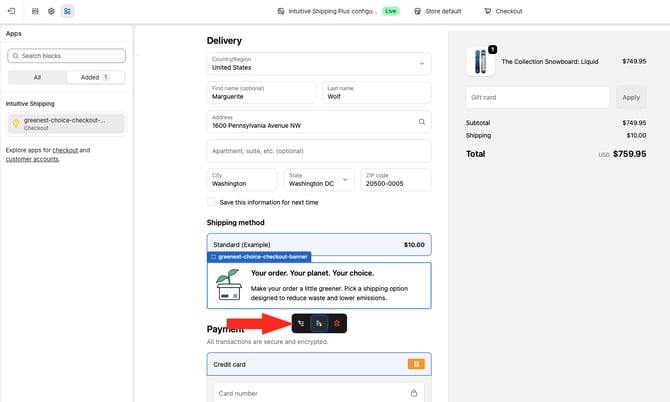
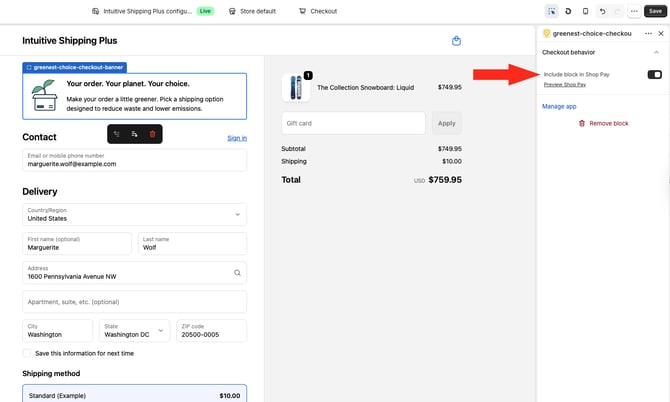
**8.** If desired, **toggle the switch** at the right of the page to **include the banner in Shop Pay**.
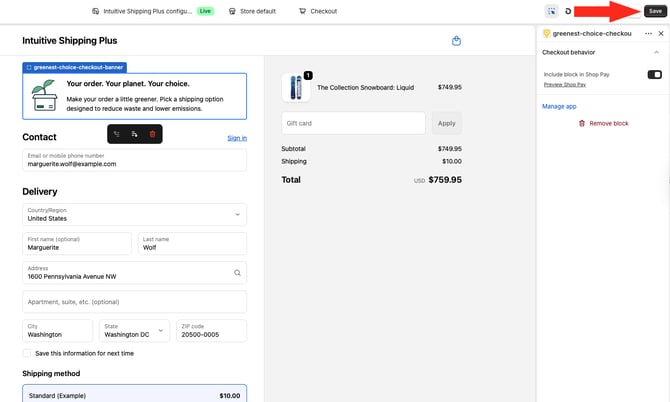
**9.** Click the **Save button** to finish adding the banner to your checkout page.
#### Temporarily Remove Checkout Banner
If you want to temporarily remove the Greenest Choice banner from your checkout page, **you do not need to remove it using the Shopify theme editor**. Simply go to your Greenest Choice settings in Intuitive Shipping:
**1.** Disable the **checkout banner**. This will prevent it from being displayed at checkout, even if it's still configured in your Shopify theme settings.
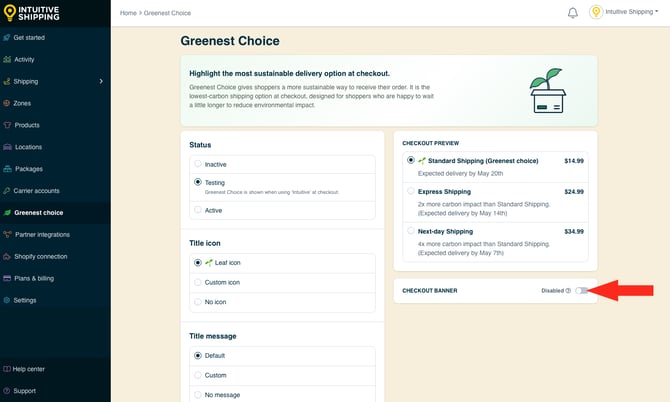
When you want to display it again, reenable the checkout banner.
### Test Greenest Choice
The **checkout preview** on the Greenest Choice page is a visual demo of how your Greenest Choice options will be displayed at checkout. It updates dynamically as you adjust your settings, even without saving.
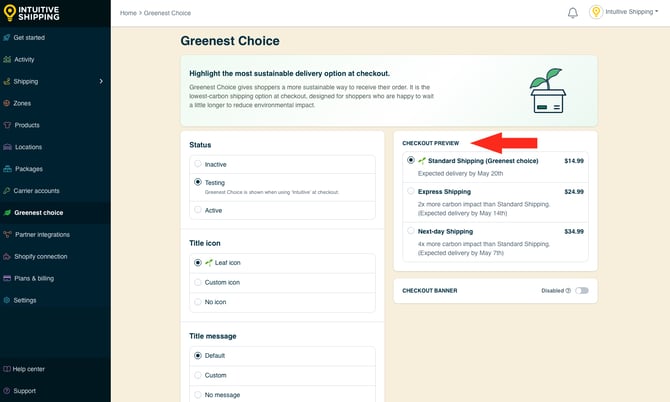
Checkout preview does not use real titles, descriptions or rates from your Intuitive Shipping Scenarios and shipping methods.
We strongly recommend testing your Greenest Choice settings on your checkout page to ensure they're working as expected.
**1.** Ensure the [status](https://knowledge.intuitiveshipping.com/how-to-use-greenest-choice#status) is set to '**Testing**'.
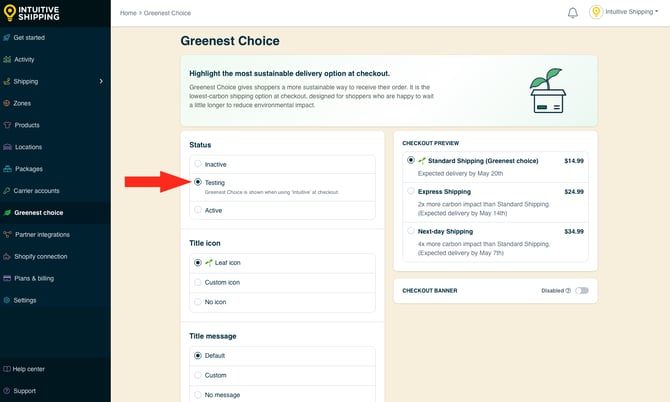
**2.** Ensure your Intuitive Shipping Scenarios include at least one of these:
- A [parcel service shipping method](https://knowledge.intuitiveshipping.com/create-a-parcel-service-shipping-method?hsLang=en) (Iive rates directly from carrier).
- An [integrated service shipping method](https://knowledge.intuitiveshipping.com/create-an-integrated-service-shipping-method?hsLang=en) (live rates from a subscription service).
- A [custom service service shipping method](https://knowledge.intuitiveshipping.com/create-a-custom-service-shipping-method?hsLang=en) (flat rates, rate tables, free shipping) with defined custom delivery days or dates.
- A [local delivery shipping method](https://knowledge.intuitiveshipping.com/create-a-local-delivery-shipping-method?hsLang=en) (distance-based rates) with defined custom delivery days or dates.
**3.** Click your store name at the top right of the app header, then select **Shopify storefront** from the drop-down menu. This will open your store’s main page in a new browser tab.
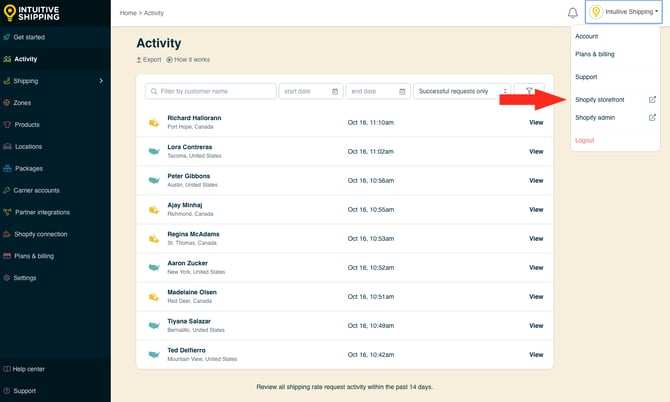
**4.** Add some products to the cart, then proceed to the checkout page.
**5.** If you’re using **Shopify**, enter the name '**Intuitive**' in *either* the customer **first or last name** field (it doesn't matter which one you choose).
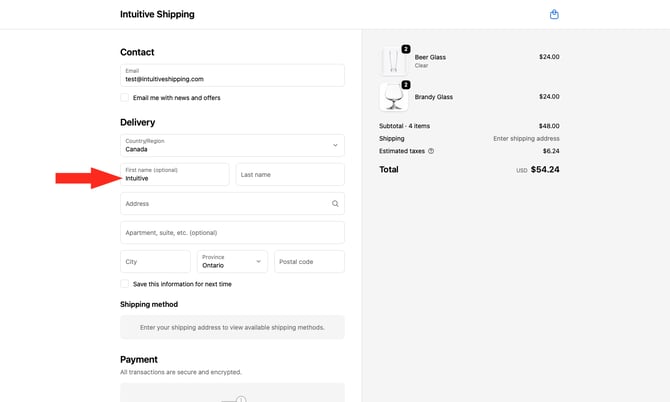
If you’re using **Shopify B2B**, enter '**Intuitive**' in the optional address field.
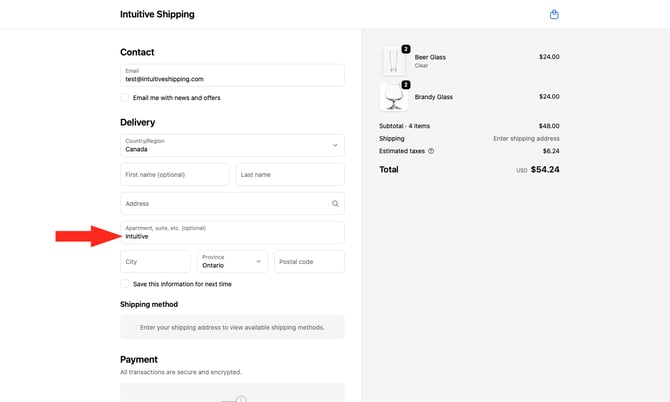
This **bypass method** will allow rates from Intuitive Shipping to appear with Greenest Choice settings the way your customers will see them once you activate Greenest Choice.
**6.** Complete the **Shipping address** form on the checkout page by adding a test address. We recommend using an address that is far enough away to trigger Greenest Choice, such as one in a neighbouring province or state.
If the difference in carbon impact between the 'Greenest Choice' and other shipping options is less than 1x, Intuitive Shipping will show the cheapest option as the Greenest Choice.
A real address is not required for testing as long as the postal code or ZIP code is valid for the province, state or territory you’re testing.
**7.** Complete your test checkout and verify that your **Greenest Choice** settings are displaying as expected.
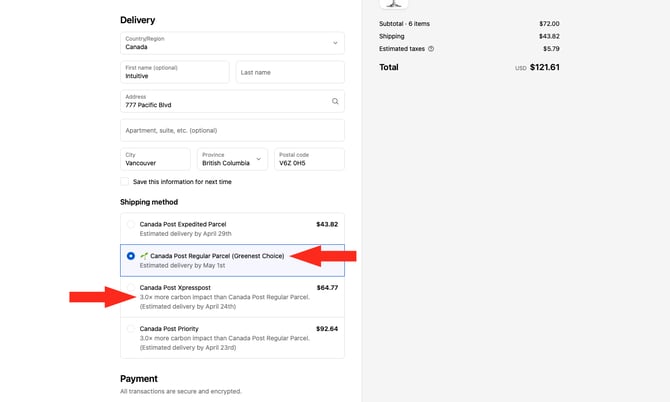
**8.** Complete **more test checkouts**. We recommend using different addresses, especially if you have more than one shipping [zone](https://knowledge.intuitiveshipping.com/create-a-zone?hsLang=en).
**9.** After verifying your Greenest Choice settings, return to the **Greenest Choice page** in Intuitive Shipping.
**10**. Set the **status** to 'Active', then click **Save**.
### Troubleshooting
Here are some common reasons why Greenest Choice options may not appear at checkout:
- The origin address or customer’s delivery address is not in Canada or the United States. Greenest Choice is only available when both are within these regions.
- Greenest Choice is set to 'Inactive'. To resolve this, set the [status](https://knowledge.intuitiveshipping.com/how-to-use-greenest-choice#status) to Active.
- Greenest Choice is set to 'Testing'. To resolve this if you're still testing, make sure to put 'Intuitive' in the customer's first or last name fields on Shopify or in the optional address field (for apartment/suite) on Shopify B2B. To resolve this is you're finished testing, set the [status](https://knowledge.intuitiveshipping.com/how-to-use-greenest-choice#status) to Active.
- Your parcel service or integrated service shipping methods do not have delivery estimates configured. To resolve this, configure delivery estimates to 'Show delivery estimate' in '[Additional Display Settings](https://knowledge.intuitiveshipping.com/create-a-parcel-service-shipping-method#additional-display-settings)'.
- Your custom service or local delivery shipping methods do not have custom delivery times (days or dates) defined. To resolve this, add custom delivery times in ‘[Additional Display Settings](https://knowledge.intuitiveshipping.com/create-a-custom-service-shipping-method#custom-additional-display-settings)’.
- You are using parcel service or integrated service shipping methods, but the carrier did not return delivery estimates for one or more options. This can occur with certain carriers for cross-border routes, such as USPS for US to Canada deliveries. If Greenest Choice works for domestic deliveries but not cross-border deliveries, you can add custom delivery estimates in ‘[Additional Display Settings](https://knowledge.intuitiveshipping.com/create-a-custom-service-shipping-method#custom-additional-display-settings)’ for those routes.
**Please note:** there may be times when the difference in carbon impact between available shipping options is **less than 1x**. This can happen when the origin and delivery locations are close together or when the difference between options is minimal.
In these cases, Intuitive Shipping will:
- Identify the *cheapest option* as the Greenest Choice
- Indicate that the other options have an *equivalent carbon impact* to the Greenest Choice
If you configured the Greenest Choice [checkout banner](https://knowledge.intuitiveshipping.com/how-to-use-greenest-choice#enable-checkout-banner), but it isn't displaying on your checkout page:
- Ensure that Greenest Choice is in **active** **status** and the checkout banner is **enabled** in Intuitive Shipping. If either of these settings is not active, the banner will not display at checkout, even if you've added it through your Shopify theme editor.


Please [contact us](https://knowledge.intuitiveshipping.com/contact?hsLang=en) if you need any assistance with Greenest Choice.
### Learn more:
- [Common setups](https://knowledge.intuitiveshipping.com/common-setups?hsLang=en)
- [Additional setups](https://knowledge.intuitiveshipping.com/additional-setups?hsLang=en)
- [How-to guides](https://knowledge.intuitiveshipping.com/how-to?hsLang=en)
- [Connect a carrier](https://knowledge.intuitiveshipping.com/connect-a-carrier?hsLang=en)
- [General info](https://knowledge.intuitiveshipping.com/general-info?hsLang=en)
- [FAQ](https://knowledge.intuitiveshipping.com/faq-page?hsLang=en)
- [Get Started](https://knowledge.intuitiveshipping.com/get-started?hsLang=en)
- [Common Setups](https://knowledge.intuitiveshipping.com/common-setups?hsLang=en)
- [Additional Setups](https://knowledge.intuitiveshipping.com/additional-setups?hsLang=en)
- [How-To](https://knowledge.intuitiveshipping.com/how-to?hsLang=en)
- [Connect A Carrier](https://knowledge.intuitiveshipping.com/connect-a-carrier?hsLang=en)
- [Black Friday](https://knowledge.intuitiveshipping.com/black-friday?hsLang=en)
- [Billing & Account](https://knowledge.intuitiveshipping.com/billing-account?hsLang=en)
- [General Info](https://knowledge.intuitiveshipping.com/general-info?hsLang=en)
- [Get Help](https://knowledge.intuitiveshipping.com/get-help?hsLang=en)
- [Main Site](https://intuitiveshipping.com/)
- [FAQ](https://knowledge.intuitiveshipping.com/faq-page)
- [Privacy Policy](https://intuitiveshipping.com/legal/privacy)
- [Terms](https://intuitiveshipping.com/legal/terms)
- [EULA](https://intuitiveshipping.com/legal/eula)
[](http://intuitiveshipping.com)
The shipping solution for serious sellers.
© Copyright 2019-2025 Intuitive Shipping Inc.